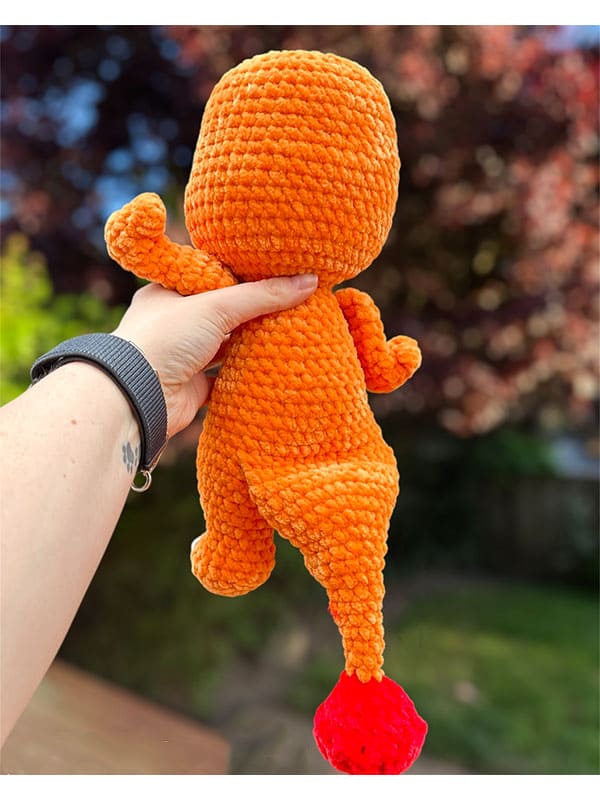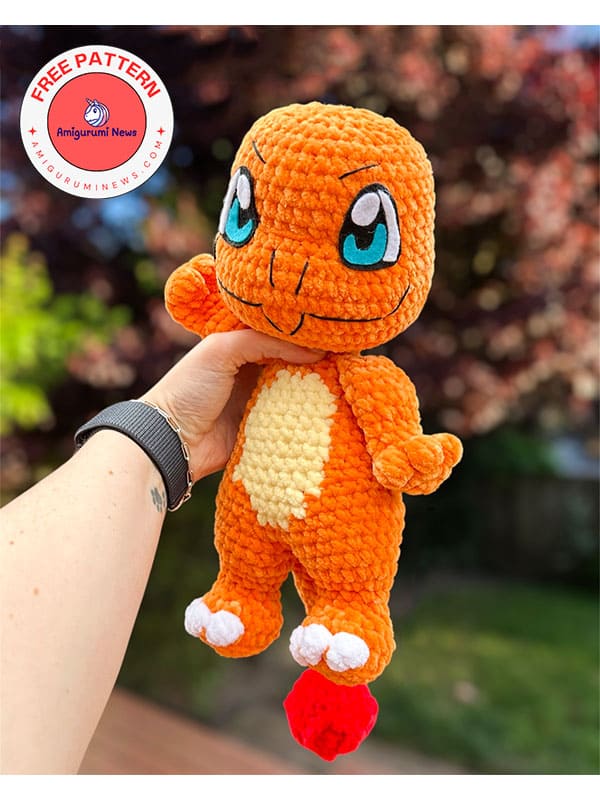
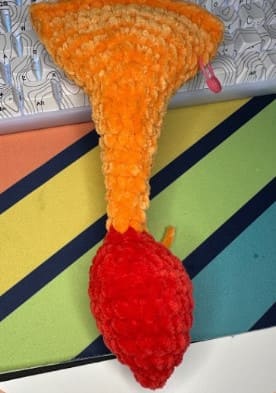
Amigurumi crochet pokemon lovers will love this topic. Free crochet charmander pattern with you. This pokemon charmander is known for the flame at the end of its tail. Although it is a difficult pokemon to control, it can turn into charmeleon and charizard over time. It is an extremely cute and adorable pokemon. It will attract the attention of not only children but also adults who love pokemon. This wonderful crochet pokemon is completely free and step by step with you. Now you can take a look at the pattern below to learn how to crochet charmander.
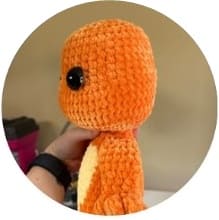
Crochet charmander free pattern
Via: talentlys_crochet
Abbreviations & materials
MR: magic ring
ch: chain
sc: single crochet
st: stitch
slst: slip stitch
inc: increase
dec: decrease
hdc: half double crochet
FLO: front loop only
BLO: back loop only
FO: fasten off
CC: change color
BOB: 5 st bobble stitch
Material estimations are based on a 4.5 mm hook and parfait chunky yarn.
• size 6 plush yarn (orange, light yellow, white, and red)
• 4.5 mm hook (on your preferred size)
• scissors.
• polyester stuffing/filling.
• stitch marker.
• safety eyes or felt eyes.
• black floss or cotton yarn for detailing.
Arms – make 2
Use orange yarn.
R1. 6 sc in a MR (6)
R2. (inc)x6 (12)
R3. 3 sc, (BOB,sc)x3, 3 sc (12)
R4. sc around (12)
R5. 3sc, 3 dec, 3 sc (9)
R6. sc around (9)
R7. 3 sc, 3 inc, 3 sc (12)
R8-10. sc around (12) – 3 rnds
Do not stuff.
R11. (sc,dec)x4 (8)
Make sure you are on the side of the arm. Add a couple sc if needed.
Make 4 sc across the top to close hole. FO and leave a short tail.
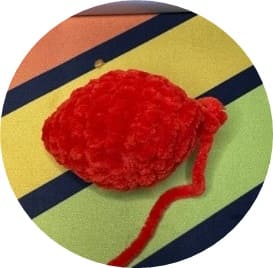
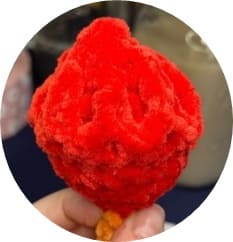
Tail
Start with red yarn.
R1. 3 sc into a MR (3)
R2. (inc)x3 (6)
R3. (inc)x6 (12)
R4. sc around (12)
R5. (sc,inc)x6 (18)
R6-7. sc around (18) – 2 rnds
R8. BLO sc around (18)
R9. (sc,dec)x6 (12)
Stuff firmly.
R10. (dec)x6 (6)
Note: Mark the first and last unused front loops of rnd 8.
Tail continued.
CC to orange and FO red.
R11-15. sc around (6) – 5 rnds
R16. (sc,inc)x3 (9)
R17-18. sc around (9) – 2 rnds
R19. (inc,sc)x4, inc (14)
R20-21. sc around (14) – 2 rnds
R22. (2sc,inc)x4, 2 sc (18)
R23. (3sc,inc)x4, 2 sc (22)
R24. (inc,4sc)x4, inc, sc (27)
R25. (8sc,inc)x3 (30)
R26-27. sc around (30) – 2 rnds
Lightly stuff the tail and then make 15 sc across the top to close. FO and leave a small tail.
Tail flames
Use red yarn.
You will attach your red yarn to the first unused loop of rnd 8 on the tail.
Make sure the tip of the tail is facing up when crocheting in the flames.
Follow the pattern below in the unused front loops to create the flames.
(2sc, ch 3, slst into the 3rd row of the tail, turn 3 sc down the ch, 2 sc, ch 2, slst into the 4th row of the tail, turn and 2 sc down ch)x4, 2 sc (18)
Slst back into the first front loop and FO. Weave in ends.
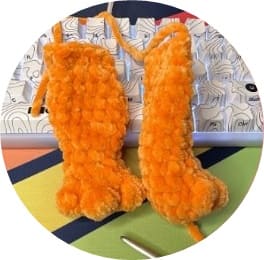
Feet – make 2
Start with orange yarn.
R1. ch 6, turn and starting at the 2nd ch from the hook: 4 sc, 3 sc in the last ch, working on the other side of the ch: 3 sc, inc (12)
R2. inc, 3 sc, 3 inc, 3 sc, 2 inc (18)
R3. BLO 6 sc, (BOB,sc)x3, 6 sc (18)
R4. sc around (18)
R5. 2 sc, 7 dec, 2 sc (11)
R6-7. sc around (11) – 2 rnds
R8. 2 sc, 7 inc, 2 sc (18)
Lightly stuff the foot. Make sure it still lays flat.
R9. sc around (18)
FO the first leg, but do not FO the second leg. Leave a short tail on the first leg to close up any gaps when joining.
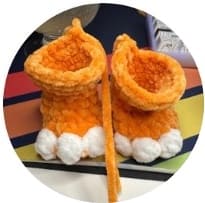
Note: The BOBs in Rnd 3 should be in white. FO white after Rnd 3.
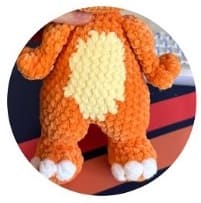
Body
Continue from the second leg. Make 3-5 more sc so you are on the side of the leg when joining.
R1. (joining the legs): Make sure the toes start facing away from you. Ch 3 and then sc into the 1st leg. Make 17 more sc around the leg and then 3 sc into the back bump of the ch. Now sc back into the 2nd leg and make 17 more sc around the leg.
You will finish by doing 3 sc through the unused bumps of the ch (42).
R2. 5 sc, 3 inc, 20 sc, 3 inc, 11 sc (48)
R3. dec, 16 sc, 5 dec, 14 sc, 3 dec (39)
Stuff the legs firmly.
Note: the inc’s on Rnd 2 should be on the sides of the legs and the dec’s on Rnd 3 should be centered on the front and back.
Body continued.
R4. 17 sc, sc, dec, sc, 9 sc, 9 sc through the body and tail (38)
R5. 6 sc through the body and remainder of tail, 10 sc, 5 sc, 17 sc (38)
R6. (4sc,dec)x2, 3 sc, sc, dec, 4 sc, dec, (4sc,dec)x2, 2 sc (32)
R7-10. 13 sc, 7 sc, 12 sc (32) – 4 rnds
Start stuffing and continue as you go.
R11. (3sc,dec)x2 3 sc, dec, 3 sc, dec, sc, 2 sc, dec, 3 sc, dec, 2 sc (26)
R12-13. 11 sc, 6 sc, 9 sc (26) – 2 rnds
R14. (2sc,dec)x3, 2 sc, dec, (2sc,dec)x2, 2 sc (20)
FO yellow and continue with just orange.
R15. sc around (20)
R16. 6 sc, 4 sc through arm and body, 4 sc, 4 sc through arm and body, 2 sc (20)
R17. (sc,dec)x6, 2 sc (14)
R18. sc around (14)
Note: You will CC to yellow when the text is yellow.
Head
R19. (inc)x14 (28)
R20. (sc,inc)x14 (42)
R21. 15 sc, (sc,inc)x9, 9 sc (51)
R22-26. sc around (51) – 5 rnds
R27. 17 sc, (sc,dec)x9, 7 sc (42)
R28. 20 sc, 2 dec, 4 sc, 2 dec, 10 sc (38)
R29-34. sc around (38) – 6 rnds
If you plan to use safety eyes, add them now.
Place them between Rnds 28 & 29 with about 5 visible sts apart.
Start stuffing and continue as you go.
Don’t over stuff as you will be doing face shaping at the end.
R35. (2sc,dec)x9, 2 sc (29)
R36. (sc,dec)x9, 2 sc (20)
R37. (dec)x10 (10)
Finish stuffing, FO and leave a medium tail to close hole. Weave in ends.
Note: the incs on R21 and decs on Rnd 27 should be centered in the face. Adjust if needed.
Finishing touches
Face shaping: Use orange yarn (either the body yarn or matching acrylic yarn) to shape the nose. Insert your needle into the back of the head and pull yarn out of to the left side of the nose.
Insert your needle into the right side with about 8 sts apart. Pull your yarn back out the start place in the back of the head. Pull yarn tight to make nose indent and tie ends of yarn together to hold shape. Hide ends.
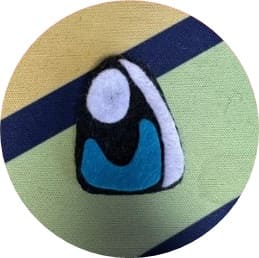
Felt eyes: You will be using black, white, and blue felt. Use the pictures below to cut out and assemly the felt eyes to look similar to my charmander felt eyes.
Smile: Use pins to mark the smile you want. See picture below for reference if you want to make the same design.
Nose: Make two small diagonal lines centered above the smile and below wear you made the nose indent.
Eyebrows: Make a diagonal line along the top of each eye to make eyebrows.
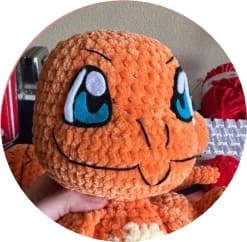
Amigurumi crochet charmander is ready!