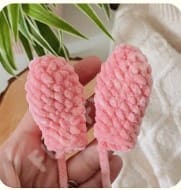
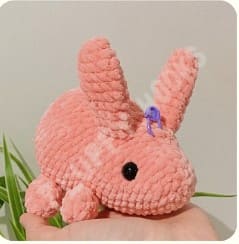
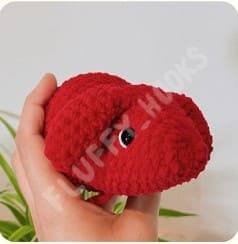
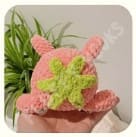
A very cute crochet strawberry bunny that you can make in different colors is with you. Those who want to make an amigurumi crochet bunny should not miss this free pattern. Because a crochet bunny pattern that is as cute as you have never seen before is waiting for you. You can make the ears and legs of the crochet strawberry bunny either floppy or normal. If you make it floppy, you can use it more as a decoration. It will be a great playmate that you can use in children’s rooms.
Hobbii toucan (colour: cotton candy-main)
Gohandmade happy chunky “fine” (colour: kiwi green-secondary)
White cotton/acrylic yarn for embroidery strawberry seeds and nose
4.5mm crochet hook
12mm safety eyes
Stuffing
Stitch markers
Sewing needle
Scissors
Abbreviations:
R- round
ch- chain
MR- magic ring
sc- single crochet
slst- slip stitch
hdc- half double crochet
dc- double crochet
inc- increase
dec- decrease
FO- fasten off
st(s)- stitch(es)
Body
In main colour.
Keep stuffing the body as you go.
R1. 6 sc in MR (6)
R2. 6 inc (12)
R3. (sc,inc)x6 (18)
R4. sc around (18)
R5. 6 sc, (inc,sc)x3, 6 sc (21)
Mark the middle increase of R6 for later.
R6. 9 sc, 3 inc, 9 sc (24)
R7. sc around (24)
R8. (3sc,inc)x6 (30)
R9-11. sc around (30) *3 rounds*
R12. 7sc, (2sc,dec)x4, 7sc (26)
R13. 7sc, (2sc,inc)x4, 7sc (30)
R14. sc around (30)
R15. 6sc, (2sc,inc)x6, 6sc (36)
R16. sc around (36)
R17. 6sc, (inc,3sc)x6, 6sc (42)
R18-22. sc around (42) *5 rounds*
R23. (5sc,dec)x6 (36)
R24. (4sc,dec)x6 (30)
R25. (3sc,dec)x6 (24)
R26. (2sc,dec)x6 (18)
R27. (sc,dec)x6 (12) *finish stuffing*
R28. 6 dec (6)
FO, sew the hole closed, tuck away the yarn tail.
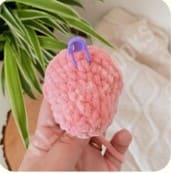
Place the eyes between R6 & R7, each eye should be 1 inc and 3sts away from the R6 marker.
Marked R6.
Eyes placement.
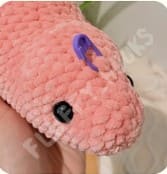
Body from the left.
Front legs
In main colour (make 2).
R1. 6 sc in MR (6)
R2. (sc,inc)x3 (9)
R3. sc around (9)
R4. (sc,dec)x3 (6)
Stuff lightly.
R5. sc around (6)
FO, leave a yarn tail for sewing.
Back legs
In main colour (make 2)
R1. 6 sc in MR (6)
R2. (sc,inc)x3 (9)
R3. sc around (9)
R4. (2sc,inc)x3 (12)
R5. (2sc,dec)x3 (9)
R6. sc around (9)
Stuff lightly.
R7. (sc,dec)x3 (6)
R8. sc around (6)
FO, leave a yarn tail for sewing.
Ears
In main colour (make 2)
R1. 6 sc in MR (6)
R2. (2sc,inc)x3 (9)
R3. (2sc,inc)x3 (12)
R4-6. sc around (12) *3 rounds*
R7. (2sc,dec)x3 (9)
R8-10. sc around (9) *3 rounds*
Don’t stuff. FO, leave a yarn tail for sewing.
If you’d like to make longer ears, just crochet more rounds of sc around and then FO.
Small tail
Secondary colour.
R1. 6 sc in MR (6)
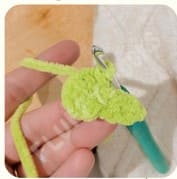
R2. (ch 4, starting at 2nd ch 3sc, slst into the next st)x6
FO, leave a yarn tail for sewing.
In the assembly section we will combine the small and big tail together, so you should make both.
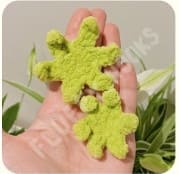
Big tail
Secondary color.
R1. 6 sc in MR (6)
R2. 6 inc (12)
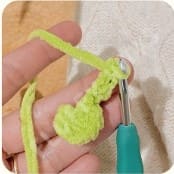
R3. (ch 5, starting at the 2nd ch 2 sc, 2 hdc, skip one st, slst)x6
FO, leave a yarn tail for sewing.
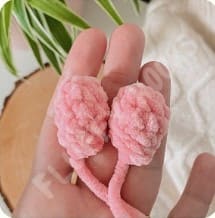
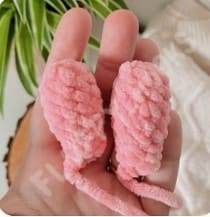
Small tail, ch4.
Small tail after 1st slst.
Big vs small tail.
Assembly
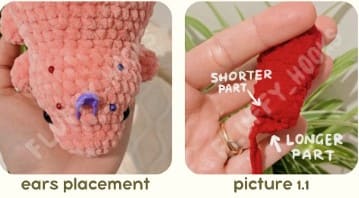
Standing ears
The ears should cover R8 until R11 and there should be about 5sts between them.
Centre with the marker from R6.
Attach the ears in a way that the “longer” part of the ear is on the bottom. “see picture 1.1”
This will make them naturally point up.
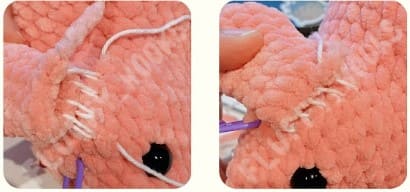
When attaching the ears I like to create a “zig-zag” shape with the yarn working through 1 stitch of the ear & one of the head until I’ve covered the whole row.
Then I just pull the yarn tight and repeat on the other half od the ear.
Attached standing ears:
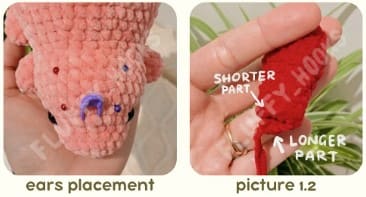
Relaxed ears
The ears should cover R8 until R11 and there should be about 5sts between them. Centre with the marker from R6.
Attach the ears in a way that the “longer” part of the ear is on the top. *see picture 1.2*
This will make them naturally point down.
Attached relaxed ears: to help the ears lay flat against the bunny’s head, thread the yarn out below the ear and sew the ear fixed to the head.
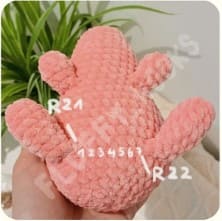
Front legs
Make sure that the legs are centred with the marker from R6.
Fold in half and attach on the bottom of the bunny, between R13 & R14.
There should be 5 visible stitches between them.
To keep the legs in place and achieve the desired look, you can use a strand of yarn and securely sew the legs to the bun’s body. *see picture*
Tail
Big tail: line up the MR of the tail with the body’s MR. For an easier sewing process you can pin each leaf of the tail to the body and sew securely.
Small tail: line up the MR of the small tail with the big one’s. Sew the small tail by making a few sts around the MR. Do not sew the leaves to the body. *see picture*
Back legs
Regular:
Make sure that the back legs are centred with the front legs.
Fold in half & attach on the bottom of the bunny, between R21 and R22.
Make them face the front of the bunny.
There should be abt 7 visible stitches between them.
To keep the legs in place and achieve the desired look, you can use a strand of yarn and securely sew the legs to the bun’s body.
Relaxed:
Make sure that the back legs are centred with the front legs.
Fold in half & attach on the bottom of the bunny, between R21 & R22.
Make them face the tail of the bunny.
There should be abt 7 visible stitches between them.
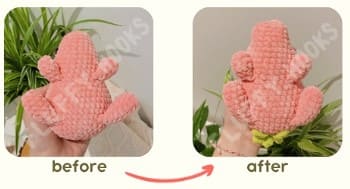
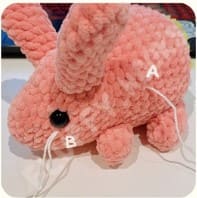
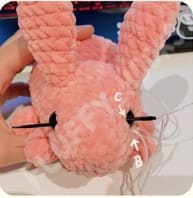
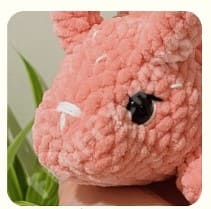
Face shaping
If you’d like for you bunny to have a more defined face shape, you can follow these instructions.
Insert the yarn through a random point A and out a point B right under the bunny’s eye.
From there, insert the hook into a point C right to the side of that eye and out on the other side of the bunny’s face.
Repeat this action pulling the yarn tightly 2 to 3 times to get the eyes settled a bit deeper into the bunny’s face.
Once finished, pull the yarn out in the middle of the face, through the centre of the MR.
Then insert it about 3 rows below and out the centre again, pull tightly and repeat 2 to 3 times to get a more defined snout.
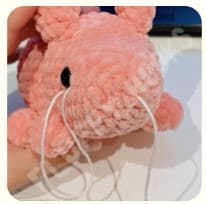
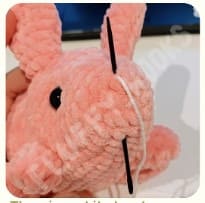
Embroider the nose, strawberry seeds and add any details that you see fit.