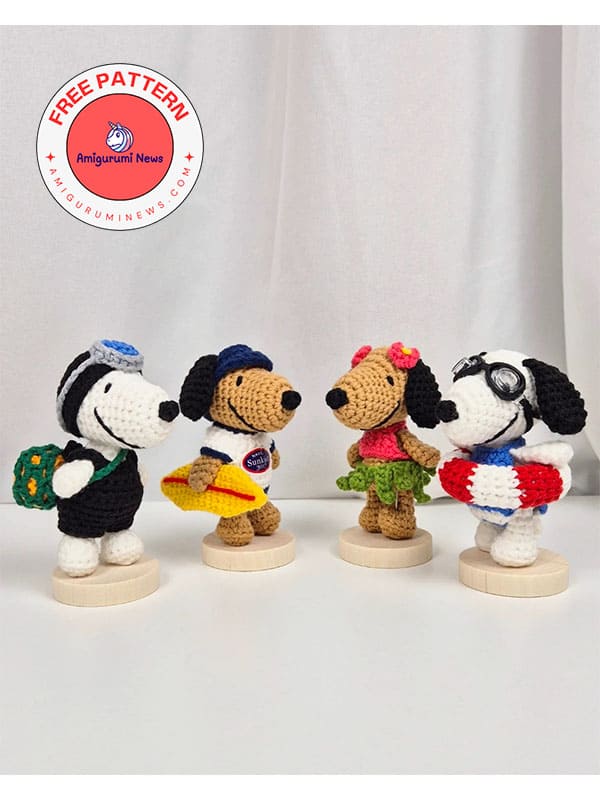
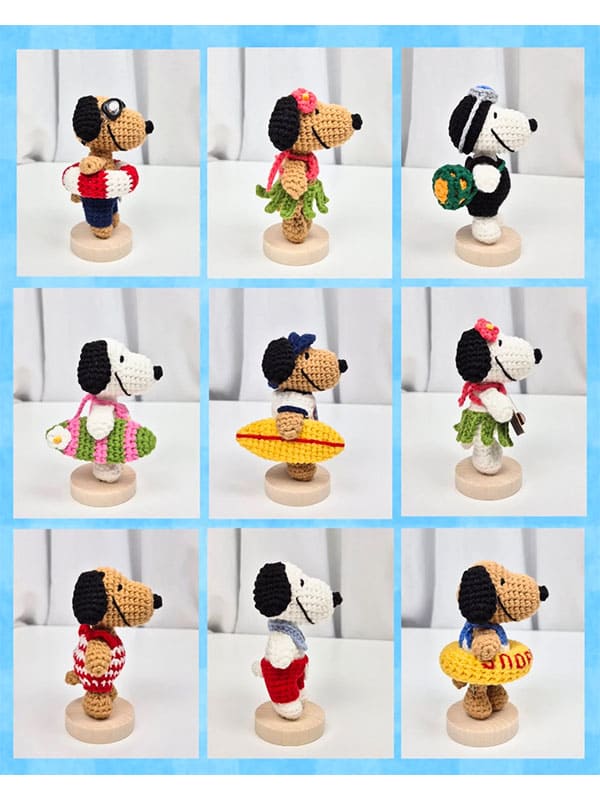
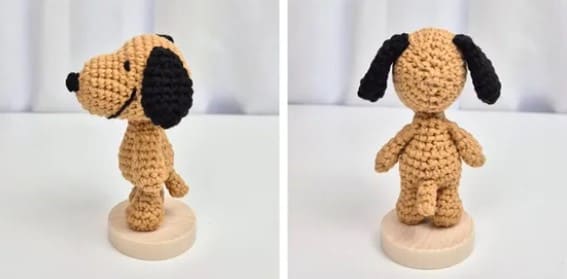
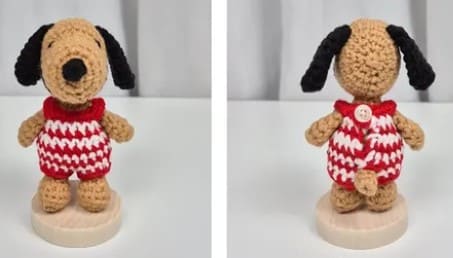
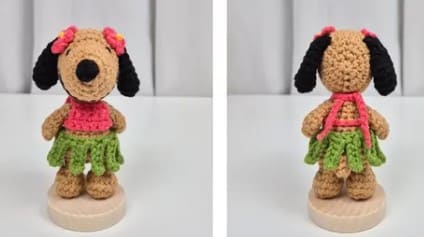
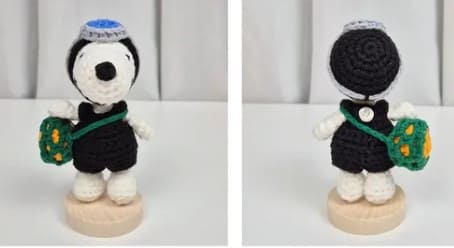
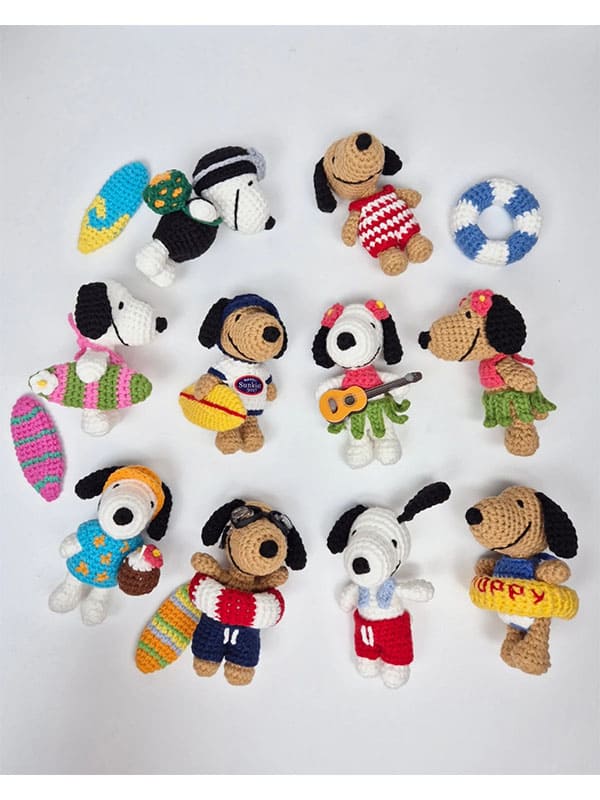
Here’s a crochet Snoopy dog pattern that will help you create a variety of fun summer outfits. You can use these crochet summer outfits for other amigurumi dolls, too. For example, crochet Barbie doll clothes are very popular. Using them on them wouldn’t be a bad idea. A fun crocheted dog pattern project awaits you. First, we’ll make Snoopy dog and then move on to his clothes. It’s a bit long and detailed, so it might be a bit challenging for beginners. However, the detailed photos will be helpful. Below, you’ll find the step-by-step crochet Snoopy dog pattern.
Ears worked in continuous round.
Not need to fill the cotton in ears.
R1. magic ring – sc6 (6)
R2. inc6 (12)
R3-5. sc12 (12)
R6. (sc2-dec1)x3 (9)
R7. sc9
R8. (sc1-dec1)x3 (6)
R9. sc3 (fold the opening closed and do sc in each facing 3 stitches) (3)
—> cut the yarn with the long tail and connect to head.
Nose
R1. magic ring – sc5- slst (5)
—> cut the yarn with the long tail and connect to R1 of the head.
Tail
R1. magic ring-sc4-slst (4)
R2-3. ch1- sc4- slst (4)
—> cut the yarn with the long tail and connect to R9 of the body.
Arms (make 2)
Make arms first before making legs and body.
Arms worked in continuous round.
Not need to fill cotton in arms.
R1. magic ring- sc4 (4)
R2. inc 4 (8)
R3-4. sc 8 (8)
R5. (sc2-dec1)x2 (6)
R6. sc6 (6)
R7. sc3 (fold the opening closed and do sc in each facing 3 stitches) (3)
—> cut the yarn and I’ll connect it while making body later.
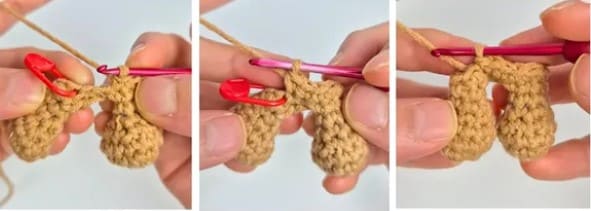
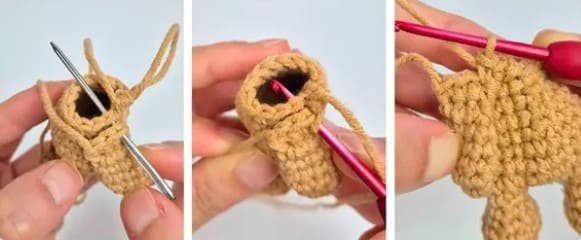
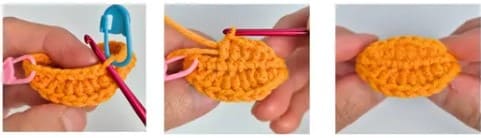
Legs- body
Before R7, it worked in continuous round. And after R7, joined round.
R1. ch4- (from the 2nd chain)sc2-sc3 (in same stitch)- sc1- inc1 (8)
R2. inc1- sc1- inc3- sc1- inc2 (14)
R3. sc14 (14)
R4. dec1- sc2- dec3- sc2- dec1 (9)
R5. sc1- dec3- sc2 (6)
R6. sc 6 (6)
—> cut the yarn and mark with marker in 5th stitch of R6.
And make one more the same, but the second leg makes sc2 more after R6.
And the second leg goes straight to R7 without cutting the yarn.
R7. ch2- (first leg)sc6-sc2 (in the upper loop of the chain)- (2nd leg) sc6-sc2 (in the bottom loop of the chain)-slst (in first stitch) (16)
R8. ch1- sc5- inc4- sc7- slst (20)
R9. ch1- sc5- (sc1-inc1)x4- sc7- slst (24)
R10. ch1- sc24-slst (24)
R11. ch1- (sc2-dec1)x6- slst (18)
R12. ch1- sc18- slst (18)
R13. ch1- (sc1-dec1)x6- slst (12)
R14. ch1- sc12- slst (12)
R15. ch1- sc1- (with the arms)sc3-sc4-(with the arm)sc3-sc1- slst (12)
R16. ch1- (sc4-dec1)x2- slst (10) —> fill with the cotton.
—> cut the yarn with the long tail and connect to head.
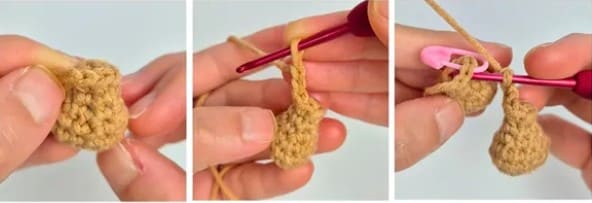
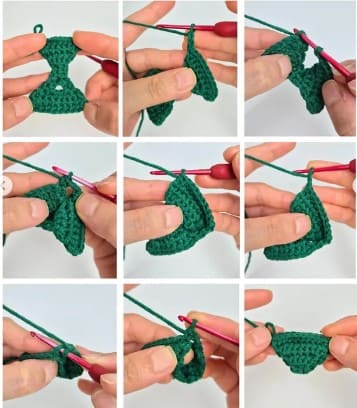
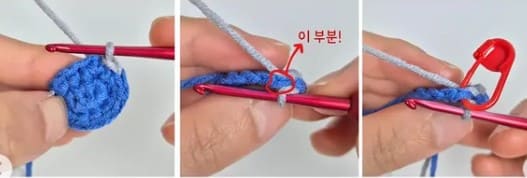
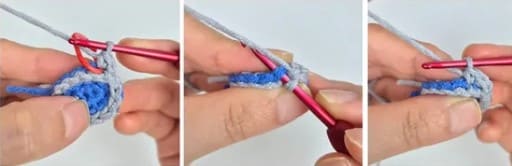
The part that connects the two legs. (R7 of body)
Please refer to the picture and make it!
R7 of body
1. Two more sc in 2nd leg.
2. Make 2 chains.
3. Do sc where you marked the 1st leg marker.
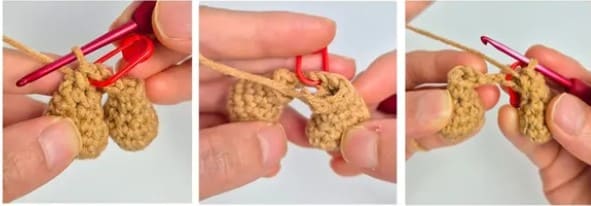
4. This stitch will be the first stltch of the R7. Mark a marker.
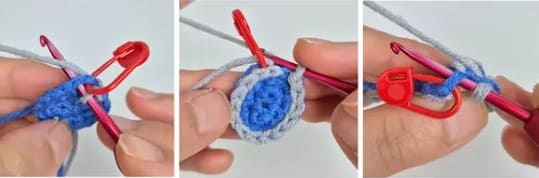
5. Do 5 single crochet in the next 5 stitches.
6. Then do sc on the chain we made first.
7. Put a hook only the upper loop of the chain and do single crochet. Twice in total.
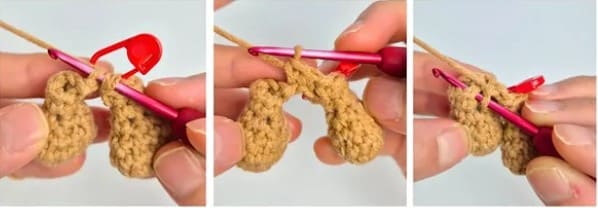
8. Now, do 6 single crochet on the second leg.
8. Then this time, put a hook on remaining bottom loop of the chain and do single crochet, twice in total.
9. Next, make slip stitch in first stitch we marked the marker before.
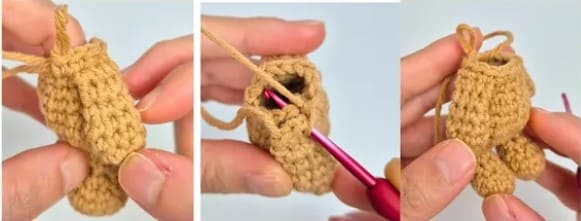
R15 of body
1. Put the arms and body facing as in the picture, and then pass through the hook on the two stitches facing each other at once, and make single crochet. Repeat 3 times in total.
2. Like this.
3. Connect the other arm in the same way.
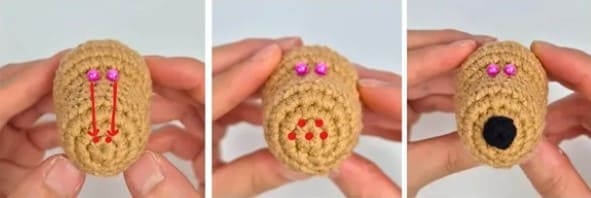
Embroidery
Order: nose-eye and mouse embroidery, ears.
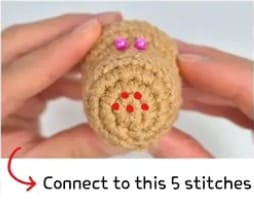
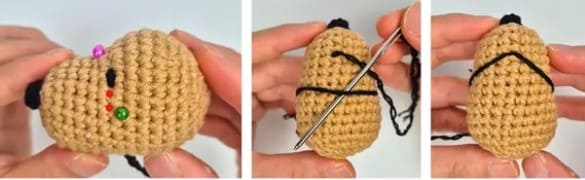
Nose
Connect to R1 of the head.
Mark the pin on the middle stitches (third and fourth) out of the six stitches that put “increase” between the R7-R8 of the head. Then, straight down to the R1 based on the pin and connect the nose to the 5 stitches (red dot) including the magic ring hole.
Eyes
Between R8-R9 (the distance between the eyes is 6 stitches)
After moving 2 stitches down based on the pin, the next side stitch (blue) is the lower part of the eye. Make eyes between that stitcch and the directly above it.
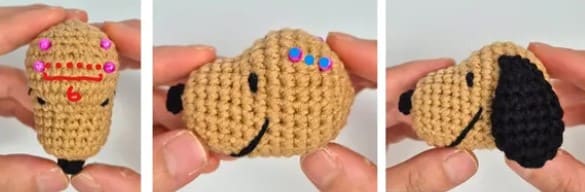
Mouse
Between R9-10 of the head.
Move two stitches down base on the lower the eyes, then the next stitch (it’s slightly below) is the corners of the mouth (green). Connect the corners of mouth on each side, then some out near the slst part in R5-6 of the head, then hang the yarn and put back into the same stitch to fix the yarn.
Ears
R11-12-13-14 of the head.
Connect it to the head (between R11-12 and 13-14) over 3 stitches (blue dot)
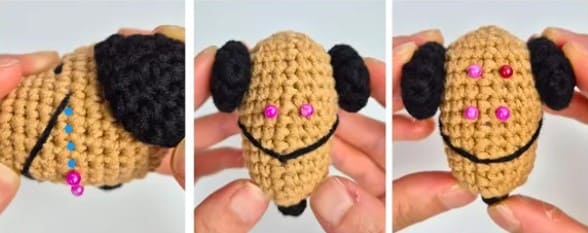
Based on R11-12, the distance between the two ears is 6.
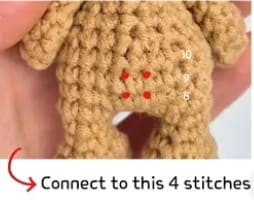
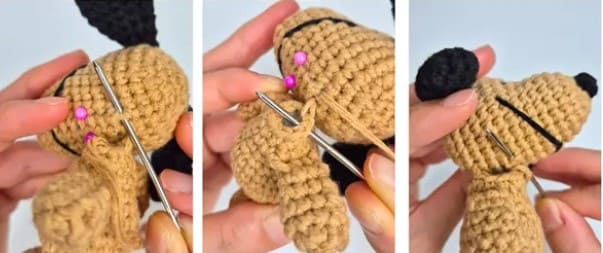
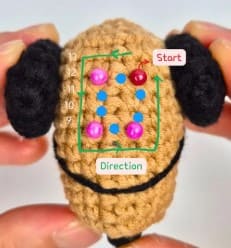
Connecting the body and head
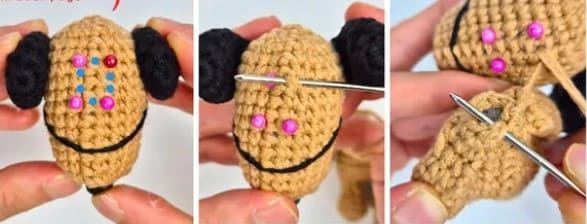
1. Skip 4 stitches down from the corners of mouth and put a pin on 5th. Proceed both ways.
2. Mark a pin in 3 stitches above each from the spot marked with pin.
3. Where the pin is marked and where the blue dot is marked in between, a total of 10. Then we’ll connect it to the 10 stitches o the body. The starting point is the red pin.
4. Like the picture, connect to head and body.
5. Finished.
Sewing:
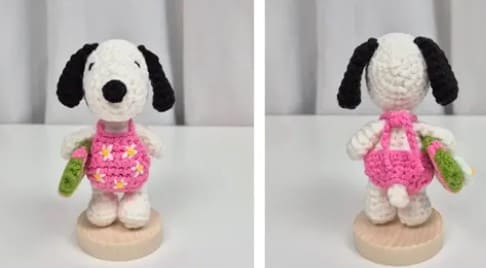
T-shirts
Up to the R5, it is proceed by turning back and forth in each round. And from at the end of the R5, it worked in joind round.
Start: ch 14 (14)
R1. ch6- (from the 7th stitch from the hook)sc4-inc1-sc4-inc1-sc4 (16)
If it looks like a circular ring, that’s right. This part will be a button ring.
R2. ch1- (sc3-inc1)x4 (20)
R3. ch1- (sc2-inc1-sc2)x4 (24)
R4. ch1- (sc5-inc1)x4 (28)
R5. ch1-sc4-ch4- (skip 6 stitch) sc8-ch4- (skip 6 stitch)sc4- slst (in first st) (24)
R6. ch1-sc4- (upper loop of chain) sc4- sc8- (upper loop of chain) sc4-sc4- slst (24)
R7-9. ch1- sc24- slst (24)
Cut the yarn and hide it, put a button on a shirt and fix it by hang the botton ring.
Pants
Start ch 12- slst in first stitch (12)
R1-2. ch 1- sc12- slst (12)
Make two. And don’t cut the yarn on the second leg.
R3. ch1- (2nd leg) sc10- (1st leg) sc12- (2nd leg)- sc2- slst (24)
R4. ch1- sc24- slst (24)
R5. ch1- (sc4-dec1)x4- slst (20)
R6. ch1- sc18- ch2- (skip 2 stitch) slst (20)
R7. ch1- sc18- (upper loop of the chain) sc2-slst (20)
Cut the yarn and hide it.
The pants strap is made by passing the yarn through the center of the pants.
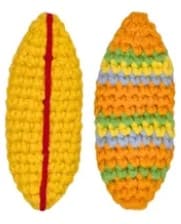
Surfingboard
R1. magic ring-sc6- slst (6)
R2. ch1- (sc1-inc1-sc1)x2- slst (8)
R3. ch1- (sc3-inc1)x2- slst (10)
R4. ch1- (sc2-inc1-sc2)x2- slst (12)
R5. ch1- (sc5-inc1)x2- slst (14)
R6-14. ch1- sc12- slst (14)
R15. ch1- (sc5-dec1)x2- slst (12)
R16. ch1- (sc2-dec1-sc2)x2- slst (10)
R17. ch1- (sc3-dec1)x2- slst (8)
R18. ch1- (sc1-dec1-sc1)x2- slst (6)
Cut the yarn and hide it.
Make it in a variety of colors.
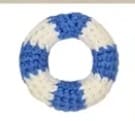
Float
Start: ch 10- slst in first stitch (10)
R1-2. ch1- sc10-slst (10)
Change the color.From R3 to R30, change the color every 4 round.
R3-30. ch1- sc10- slst (10)
Change the color and make 2 round more.
R31-32. ch1- sc 10- slst (10)
Fill it with cotton.
Cut the yarn with the long tail and connect (R32) & (between R1-2).
Swimsuit
Please proceed by turning the knited fabric back and forth in each round except R12.
R1. ch 11- (from 2nd chain from the hook) sc 10 (10)
R2. (turn) ch1- dec1- sc6- dec1 (8)
R3. (turn) ch1- dec1- sc4- dec1 (6)
R4. (turn) ch1- dec1- ch2- (skip 2 stitch) dec1 (4)
R5. (turn) ch1- dec2 (2)
R6-7. (turn) ch1-sc2 (2)
R8. (turn) ch1-inc2 (4)
R9. (turn) ch1- inc1- sc2- inc1 (6)
R10. (turn) ch1- inc1- sc4- inc1 (8)
R11. (turn) ch1- inc1- sc6- inc1 (10)
In R12, connect the remaining upper loop of the 10 chains of R1 to R11.
R12. ch 2- (remaining loop of chains of R1) sc10- ch2- (in R11) sc 10 (24)
It’s right if the panties shape comes out! From R13, proceed by turning the knited fabric back and forth in each round.
R13. (turn) ch1- dec1- sc6- dec1 (8)
R14. (turn) ch1- sc8 (8)
R15. (turn) ch1- dec1- sc4- dec1 (6)
R16. ch1- sc6- ch 12 (it’ll be shoulder string)
Cut the yarn and hide it. And bring the new yarn to the other side and do 12 chains to make opposite string. Afterwards, tie these two strings around the back of neck.
Jumpsuit
Start: ch16 (16)
R1: ch6 (from the 7th chain from the hook) sc2-sc3 (in same stitch) – sc2-sc3 (in same stitch) – sc4 – sc3 (in same stitch) – sc2-sc3 (in same stitch) sc2 (24)
R2: ch1-sc3ch4- (skip 6 stitch) sc6 ch4 – (skip 6) sc3 (20)
R3: ch1-sc3-(upper loop of the chain) sc4 – sc6 – (upper loop of the chain)sc4 sc3 (20)
R4: ch1 (sc2 inc1 – sc2)x4 (24)
R5: ch1-sc24 – slst in first stitch (24)
R6: ch1-sc24 slst (24)
R7: (next stitch of 1st) sist – ch1 – (in same stitch)scl – sc21 – ch2- sist (24)
R8: ch1-sc3-dec2-sc4- ch2 – (last stitch of R7= 2nd chain of the 2 chians made in previous round) scl- sist (12)
R9: ch1-sc9-(upper loop of the chain made un previous round) sc2 – sc1 – slst (12) –> cut the yarn and make opposite leg.
*The opposite leg starts from (23th stitches of R7 = 1st chain of 2 chains at the end of R7)
(Opposite leg)
R8: (bring the yarn)ch1 – (in same stitch) sc1- (remaining bottom loop of the chain) sc2 – sc4 – dec2 – sc3 – sist (12)
R9: ch1 sc12 sist (12) –) cut the yarn and hide it.
Hawaii skirt
Start: ch 21- slst in 1st stitch (21)
R1. [ch6-(from the 2nd chain) sc5- (from the next stitch) slst2]x10
Last slst is made in first stitch.
Flowers
R1. magic ring- [ch3-(the hole of magic ring)slst]x5
Pull the yarn and tighten the hole.
Before connecting to head, make flower stamen by tying up the yellow yarn and then connect it to head.
Hawaii top
Start by making a single shoulder strap.
Start: ch 12 (string part)- ch3
R1. ch 1- (from the 2nd chain) inc1- sc1- inc1 (5)
R2. (turn) ch1- sc5 (5)
R3. (turn) ch1- inc1- sc3- inc1- ch 12- (in 1st of R3) slst (19)
Cut and hide the yarn. And bring the yarn on the other side and make 12 chains (opposite string)
Finally, tie the completed strings around the back of neck.
Swimming cap
R1. magic ring – sc7- slst (7)
R2. ch1- inc7- slst (14)
R3. ch1- (sc1-inc1)x7- slst (21)
R4. ch1- (sc1-inc1-sc1)x7- slst (28)
R5-8. ch1- sc28- slst (28)
Cut the yarn and hide it.
Sun cap
Start: ch 24- slst in first stitch (24)
R1. ch1- sc24- slst (24)
R2. (from the next stitch of 1st) slst7- (FLO)sc1- hdc1- dc1- dc inc 2- dc 1- hdc 1- sc1)- slst 8.
Cut the yarn and hide it.
Upper brim:
Put the hook in remaining loop of ch 24 you first made/from 16th stitch to 9th stitch.
(Bring the yarn) ch1- (from the next stitch)sc2- hdc2- sc2- slst 1.
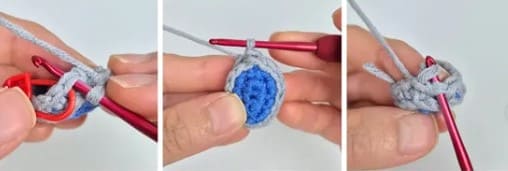
Swimming goggles
It’s difficult to explain so I’ll attach pictures.
R1. ch4- (from the 2nd chain) sc2- sc3 (in same st)- sc1- inc1- slst (8)
R2. ch1- inc1- sc1- inc3- sc1- inc2- (change the color) slst (14)
1. It’s finished up to the R2.
2. If you look at the top in that state, the blue stitch is here. That stitch is the position you made slst right before. Mark this stitch.
3. And make slip stitch from the next stitch to the end.
4. Then, make slip stitch in stitch you marked before.
5. And make one chain, do single crochet in same stitch. And mark this stitch, and do single crochet from the next blue stitch to the end.
6. Finally, make slst in stitch you marked.
7. Now, put the hook in previous stitch and bring the yarn out there.
8. Then make 20 chains, connect to opposite stitch. After completion, connect it to the swimming cap.
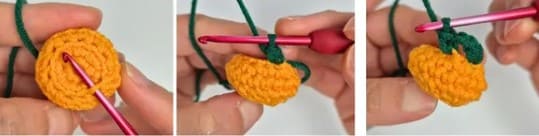
Haenyeo’s bag
Make tewak (orange) first, then make mesh (green).
*Start to the orange yarn.
R1: magic ring-sc6 – slst (6)
R2: ch1-inc6sist (12)
R3: ch1 {blo (scl- inc1)}x6 – slst (18)
R4-5: ch1-sc18- sist (18)
R6: ch1 (sc1dec1)x6 – slst (12)
R7: ch1- (blo)dec6 – slst (6)
—> cut the yarn and fasten off.
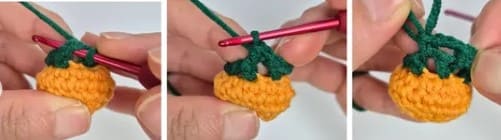
*If you’re done with the tewak, I’ll make the mesh right away. The mesh starts with the remaining front chains at the R3 of the tewak. Make the hook face towards the magic ring
R1: (bring the yarn)ch1 – (in same stitch) sc1 – {ch2 – (skip one stitch)sc1}x5 ch2 – slst
R2-3: (in the next chain hole) slst] – ch1 – (in same stitch)sc1 – {ch3 – (skip one stitch)sc1}x5 – ch3 – slst
R4: (in the next chain hole) slst1 – ch1- (in same stitch)sc1 – {ch2- (skip one stitch)sc1}x5 – ch1 – slst
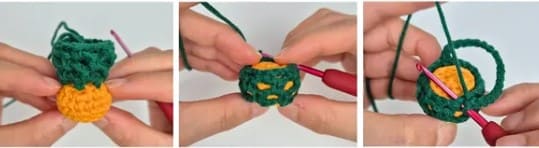
–> After you finish up to here, turn the mash over to the side where the tewak is. Then make 20 chains and connect them to the opposite side of the stitchwhere the chain comes out to make a string.
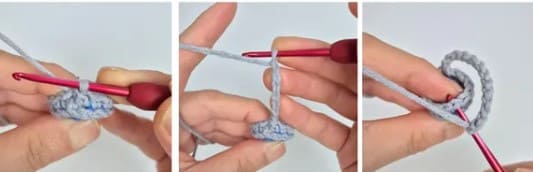
Mesh
1. Put the hoomm like picture and bring the yarn and make one chain & single crochet.
2. Then repeat (ch 2-(skip 1 stitch) to the end.
3. Finally, after the two chains, make slip stitch, and go into the hole in the chain right next to it and make slst again. Then proceed with the pattern and proceed in the same way until R4.
4. When you’re done with the R4, turn the mesh over towards the tewak, and do 20 chains. And slip stitch in opposite stitch.
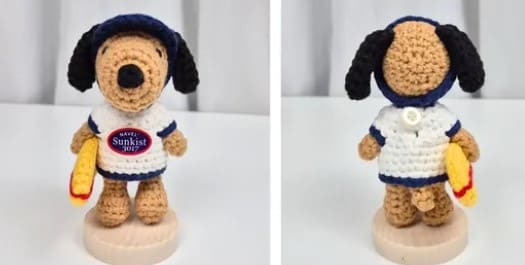
Here’s your summer snoopy dog ready!