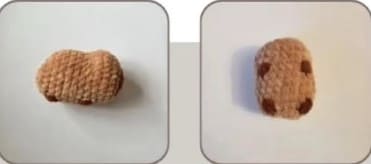
Here’s a wonderfully cute crochet capybara pattern for Christmas. For those looking for a simple free crochet capybara pattern, I think it’s a great alternative. Because it’s small, it’s a lovely amigurumi pattern that you can work through very quickly. It also makes a great Christmas gift idea. If you’re thinking of making crochet Christmas gifts, don’t miss this adorable amigurumi capybara. Besides, you have plenty of time. If you like, this crocheted capybara could also be useful as a keychain. A wonderfully cute amigurumi experience awaits you, which you can design however you like.
Crochet capybara with christmas hat pattern
Designer: avarycrochets
Materials:
Hook: 4.5mm
• Yarn:
– Premier parfait chunky – red, white, brown and light brown
– Acrylic (I used red heart) – black
• Sewing needle
• Scissors
• Poly-fil stuffing
Abbreviations:
sc- single crochet
inc- increase
dec- decrease
slst- slip stitch
bo- bobble stitch (5 loops)
ch- chain
FLO- front loop only
BLO- back loop only
ccl- color change light brown
ccd- color change dark brown
Capybara
Use dark brown yarn.
R1: 8sc in MR (8)
R2: (1sc, [3sc]) x4 (16)
Color change to light brown.
R3: (1sc, inc) x8 (24)
R4: 9sc, inc x6, 9sc (30)
R5-R6: 30sc (30) (2 rounds)
R7: 7sc, dec x8, 4sc, ccd bo, ccl inc, 1sc (23)
R8: inc, 1sc, ccd bo, ccl 6sc, inc, 2sc, inc, 10sc (26)
R9-R11: 26sc (26) (3 rounds)
You may need to adjust the bobble stitches in the next 2 rounds so the legs line up.
R12: 24sc, ccd bo, ccl 1sc (26)
R13: 3sc, ccd bo, ccl 4sc, dec x6, 6sc (20)
Start stuffing, continue as you go.
R14: 6sc, dec x6, 2sc (14)
R15: dec x7 (7)
Fasten off, pull through remaining 7 loops, tie and hide ends.
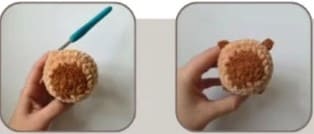
Crochet on the ears
Pull up a loop of dark brown yarn at the top side of the head between R5-R6.
Ch 2, sc into 2nd chain from hook, slst into the same starting stitch.
Repeat on the other side of the head, approx. 8 stitches apart.
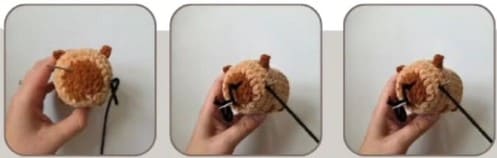
Embroider the eyes
Embroider the eyes on the sides of the face, across R4-R5.
Make sure you start and finish in the same stitch to tie and hide your tail ends.
Embroider the nose
Using black acrylic yarn.
Insert sewing needle into the top right of the nose and across the top 3 stitches, insert it into the top right.
Before pulling tight, pull the needle through the center of the nose about 1 row below.
Wrap the yarn around the top thread and back
through the same stitch. This will secure the shape of the nose as a “V”.
Pull through the center about 1 row below and back through the base of the “V”.
You could fasten off, or continue to embroider the eyes.

Santa hat
Using red yarn.
R1: 6sc in MR (6)
R2: 6sc (6)
R3: (sc, inc) x3 (9)
R4-R5: 9sc (9) (2 rounds)
Color change to white.
R5 FLO: 9sc (9)
slst into starting stitch.
Fasten off leaving a long tail. Do not stuff.
Using white yarn, attach a bobble stitch to the top of the hat, through R1 (through the MR).
Fasten off, tie and hide ends.
Sew onto the top of the head, between the ears.