This cute amigurumi cat free pattern comes with a beautiful crochet frog hat accessory. This is how you can decorate your cute amigurumi cat. Make your crochet cat in two colors or in one color as explained in the pattern instructions. I will explain how to do it in detail below. You need to be a little careful with the color changes. Also, the frog hat on its head looks very cute. This cute amigurumi cat pattern is waiting for you below. Start making it now!
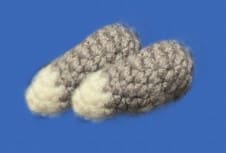
Amigurumi cat with frog hat free pattern
Via: koala.crochet
Materials:
4ply acrylic yarn in grey, white and dark blue.
3.5 mm hook.
Dark blue and pink felt.
Black sewing thread.
A darning and sewing needle.
Glue.
Scissors.
Stuffing.
Abbreviations:
ch- chain
st- stitch
inc- increase
dec- decrease
slst- slip stitch
FO- fasten off
sc- single crochet
MR- magic ring
Head
Start in grey, change to white when text is blue.
R1. 8 sc in mr (8)
R2. inc around x8 (16)
R3. (1sc,inc)x8 (24)
R4. (2sc,inc)x8 (32)
R5. (3sc,inc)x2, 1sc, 2sc, inc, (3sc,inc)x5 (40)
R6. 10 sc, inc, 29 sc (41)
R7-9. (3 rounds) – 10 sc, 2 sc, 29 sc (41)
R10. 7 sc, 2 sc, 1 sc, 2 sc, 1 sc, 2sc, 26 sc (41)
R11. 6 sc, 10 sc, 25 sc (41)
R12. 5 sc, 12 sc, 24 sc (41)
R13. 6 sc, 10 sc, 25 sc (41)
R14. 7 sc, 8 sc, 26 sc (41)
R15. 39 sc, 1 dec (40)
R16. (2sc,dec)x10 (30)
Start stuffing.
R17. dec around (15)
R18. 7 dec, 1 sc (8)
FO, weave in tail.
Here is what it should look like:
Body
Start in grey, change to white when text is blue.
R1. 8 sc in MR (8)
R2. inc around x8 (16)
R3. (1sc,inc)x3, (1sc,inc)x5 (24)
R4. 9sc, (1sc,inc)x7, inc (32)
R5-7. (3 rounds) – 9 sc, 23 sc (32)
R8. 10 sc, 21 sc, 1 sc (32)
R9. 10 sc, 2sc, 8 dec, 3 sc, 1 sc (24)
R10. (1sc,dec)x8 (16)
R11-12. (2 rounds) – sc around (16)
Start stuffing, FO, leave a long tail for sewing.
Side view:

Front view:
Arms X2
In white:
R1. 4 sc in mr (4)
R2. inc around x4 (8)
R3-5. (3 rounds)- sc around (8)
R6. (1sc,inc)x4 (12)
R7. (2sc,inc)x4 (16)
R8. sc around (16)
Start stuffing.
R9. (2sc,dec)x4 (12)
R10. dec around (6)
FO, leave a long tail for sewing.
Legs X2
Start in white, change to grey when text is black.
R1. 4 sc in mr (4)
R2. inc around x4 (8)
R3. sc around (8)
R4-5. (2 rounds) – sc around (8)
R6. (1sc,inc)x4 (12)
R7. (2sc,inc)x4 (16)
R8-9. (2 rounds) – sc around (16)
Start stuffing.
R10. (2sc,dec)x4 (12)
R11. (1sc,dec)x4 (8)
R12. dec around (4)
FO, leave a long tail for sewing.
Hood
In colour of your choice.
R1. 6 sc in mr (6)
R2. inc around x6 (12)
R3. (1sc,inc)x6 (18)
R4. (1sc,inc,1sc)x6 (24)
R5. (3sc,inc)x6 (30)
R6. (4sc,inc)x6 (36)
R7-14. (8 rounds) – sc around (36)
Do longer/shorter rounds depending what yarn you use
*insert head into hood around R12*
Froggy ears
R1. 6 sc in mr (6)
R2. inc around x6 (12)
R3. sc around (12)
Slst, FO, leave a long tail for sewing.
Assembly
Eye details:
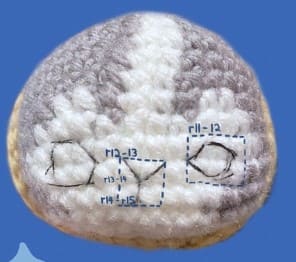
Using black sewing thread. Sew an outline for the eyes and nose.
Cut two eyes and a nose with blue and pink felt and glue on black outline.

Without the outline:
Place eyes at R12-13. 4sts apart.
Place nose between R12-13, 1st apart from each eye.
Add a small white dot on the eyes.
1. Insert head into hood.
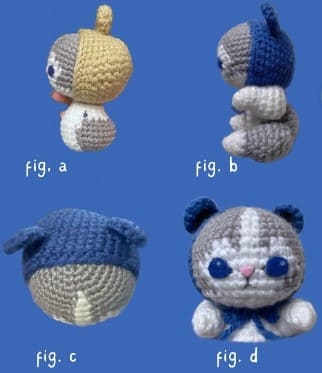
2. Sew the head to the body (fig a).
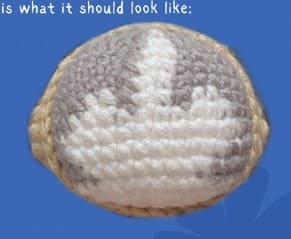
3. Sew arms to body at R10-12 across from each other (fig b).
4. Sew legs to body at R4-7 below the arms (fig b).
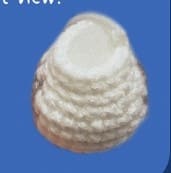
5. Sew froggy ears to hood at R11, 7 visible sts apart (fig c).
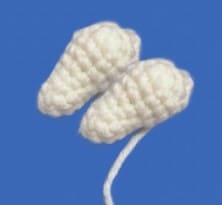
6. Add a bow under the head for decoration if you like (fig d).