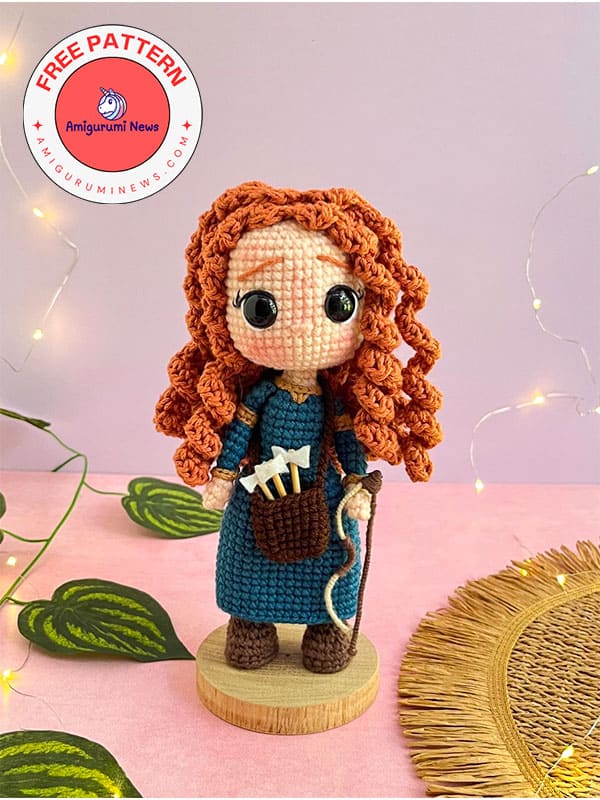
Hello friends, we’ve entered September, and I’m here with some wonderful crochet disney princess dolls. Today’s crochet disney princess dolls, Merida, is coming to you. It’s easy to make and incredibly fun. With so many details, this Merida crochet doll will be everyone’s favorite. It makes a great gift for your children who love Merida’s bold personality and rebellious spirit. You can follow the amigurumi pattern below, which I’ve included detailed step-by-step instructions and helpful photos.
Yarn of your preferred brand. In my case, I used “La Abuelita” yarn in the following colors: cinnamon, slate, black, white, tobacco, flesh, beige, and brown.
2.00 and 2.50 mm crochet hooks
Stuffing for stuffed animals
12 mm safety eyes
Stitch marker
Scissors
Silicone
Yarn needle
Florist wire
Wooden stick
White felt
Blush/optional
Abbreviations
Rnd- round
S- strands
MR- magic ring
ch – chain
sc – single crochet
slst- Slip Stitch
inc – increase
dec- decrease
BLO- Back loop only
FLO- Front loop only
dtr- double triple (treble) crochet
inchdc- half double crochet increase
hdc – half double crochet
inc4: 4 single crochets in the same stitch
inc3: 3 single crochets in the same stitch
[]- number of endpoints
(…)x: repeat what is in the parentheses for the number of times indicated by X
The orange underlined stitches are crocheted with a 2.50mm crochet hook.
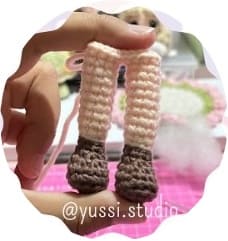
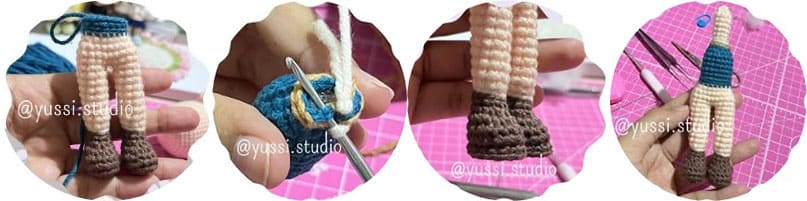
Legs and Body
We started with coffee color
Rnd 1. 5ch, 1inc, 2sc, inc4, 2sc, 1 inc [12]
Rnd 2. 1sc, 1inc, 3sc, 2inc, 3sc, 1inc, 1sc [16]
Rnd 3. BLO 16sc [16]
Rnd 4. 16sc [16]
Rnd 5. 5sc, 3dec, 5sc [13]
Rnd 6. 4sc, 3dec, 3sc [10]
Rnd 7. 10sc [10]
change color skin color
Rnd 8. BLO slst [10]
Rnd 9. BLO 10 sc [10]
Rnd 10-16. 10sc [10]*7 rounds*
We cut the thread only from the first leg and continue knitting on the second.
We make 4 more sc on leg 2, we lift 2 ch and join in the last stitch of leg 1, as we knit we will hide the remaining strand that we left from leg 1
Rnd 17. (10sc, 2sc in the ch) x2 [24]
Rnd 18. (10sc, 1dec)x2 [22]
Rnd 19. 22sc [22]
Rnd 20. 5sc, 1dec, 7sc, 1 dec, 6pc [20]
Rnd 21. 4sc, 1dec, 6 sc, 1 dec, 6sc [18]
Note: Make the necessary stitches so that both legs are centered.
Change the color to slate.
Rnd 22. 18sc [18]
Rnd 23. BLO 18sc [18]
Rnd 24-28. 18 [18] * 5 rounds*
Rnd 29. (3sc, 1 dec)x3, 3sc [15]
Rnd 30. (2sc, 1dec)x3, 3sc [12]
Change the color to tobacco.
Rnd 31. 12slst [12]
Change color skin color.
We crochet in the back loops that remain behind the sl st that we just made previously.
Rnd 32. BLO 12 slst [12]
Rnd 33. BLO 3sc, 1 dec, 2sc, 1 dec, 3 sc [10]
Rnd 34-38. 10sc [10] *5 rounds*
Rnd 39. 5 dec and finish closing with a needle.
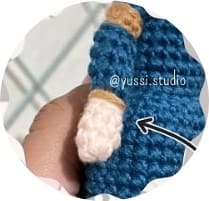
Shoe Detail
In FLO from RND3, we’ll crochet 16 sc in both shoes.
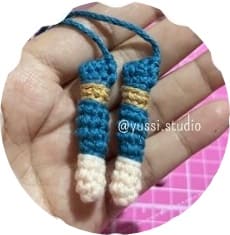
Arms X2
We start with skin color
Rnd 1. MR 6 sc [6]
Rnd 2-4. 6sc [6] *3 rounds*
Change the color to slate.
Rnd 5. BLO 6 sc [6]
Rnd 6. BLO (2sc, 1 inc)x2 [8]
Rnd 7-9. 8sc [8] * 3 rounds*
Change the color to tobacco.
Rnd 10. BLO 8 slst [8]
Rnd 11. BLO 8 sc [8]
Change the color to slate.
Rnd 12. BLO 8 slst [8]
Rnd 13. BLO 8sc [8]
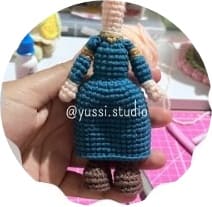
We fold it in half and close with 3 or 4 sc taking both sides, we sew between Rnd29-30 of the body.
Dress
In FLO from Round 13, we will knit the lower part of the dress
Rnd 1. 18sc [18]
Rnd 2. (1sc, 1 inc)x9 [27]
Rnd 3. (2sc, 1 inc)x9 [36]
Rnd 4-16. 36sc [36] *13 rounds*
We finish stitching with a needle.
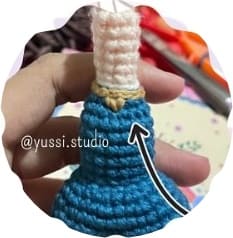
We stitch this detail in the slts of Rounds 5-6.
We embroider this detail on the neck between Rounds 30-31
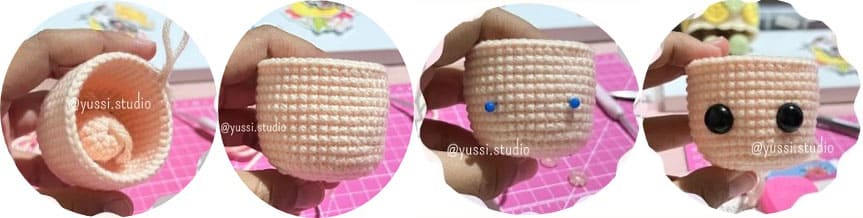
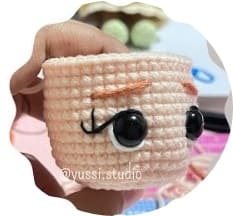
Head
Rnd 1. MR 7 sc [7]
Rnd 2. 7 inc [14]
Rnd 3-8. 14sc [14] * 6 rounds*
Rnd 9. BLO (1sc, 1 inc)x7 [21]
Rnd 10. (2sc, 1 inc)x7 [28]
Rnd 11. (3sc, 1 inc)x7 [35]
Rnd 12. (4sc, 1 inc)x7 [42]
Rnd 13-22. 42sc [42] *10 rounds*
We place the eyes between Rnd 16-17 with 9 sc of separation
Rnd 23. (4sc, 1 dec) x7 [35]
Rnd 24. 35sc [35]
Rnd 25. (3sc, 1 dec)x7 [28]
Rnd 26. (2sc, 1dec)x7 [21]
Rnd 27. (1sc, 1 dec)x7[14]
Rnd 28. 7 dec and finish closing with a needle
You can make the details of your face as you wish and use the images below as a guide.
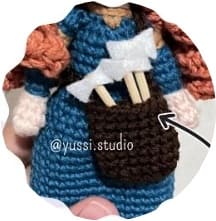
Pocket
Rnd 1. 6 ch, we return crochet 4 sc, inc3, 3 sc, 1 inc [12]
Rnd 2. 1inc, 4sc, 2 inc, 4sc, 1inc [16]
Rnd 3-9. 16sc [16] *7 rounds*
We make 1 slst in the next stitch, we pick up 30 ch and join with 1 slst on the opposite side, we secure and finish hiding the thread with a needle.
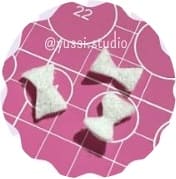
Bow and Arrows
For the bow: Use wire to make the shape shown in the image and cover it with the indicated color thread.
For the arrows, we’ll need wooden sticks approximately 4-5 cm long, and we’ll cut the shape shown in the image out of white felt.
We’ll need three sticks approximately 4-5 cm long.
Cut a mini rectangle out of felt.
Glue it to the top of the stick. This is how it should look.
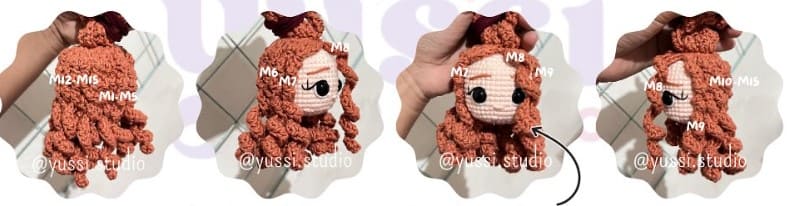
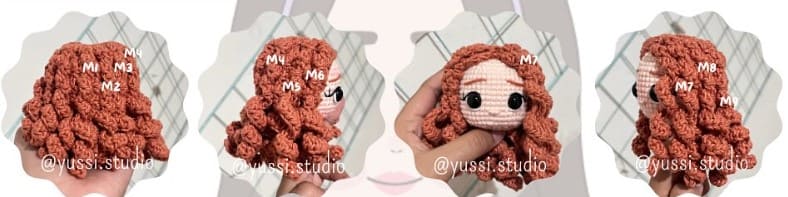
Hair
Cinnamon
Rnd 1. MR 6 sc [6]
Rnd 2. 6 inc [12]
Rnd 3. (1sc, 1 inc)x6 [18]
Rnd 4. BLO (2sc, 1 inc)x6 [24]
We will continue with the strands [15 in total]
S1-5. 29ch, (1hdc, 1inchdc)x14 and join with 1 slst in the next stitch at the base * 5 strands *
S6-9. 29ch, (1hdc, 1inchdc)x14, skip 2 stitches from the base and join with 1 slst in the next stitch * 4 strands *
S10-15. 29ch, (1hdc, 1inchdc)x14 and we join in the next point at the base *6 strands*
We will leave the strand 10 loose in the front.
Top locks (9 total)
At FLO on Round 4
S1-9. 29 ch, (1hdc, 1inchdc)x14, we skip 1 stitch from the base and make sl st in the next stitch *9 strands*
We glue the upper strands consecutively, leaving a small space between each one.
To provide the best experiences, we use technologies like cookies to store and/or access device information. Consenting to these technologies will allow us to process data such as browsing behavior or unique IDs on this site. Not consenting or withdrawing consent, may adversely affect certain features and functions.
Functional
Always active
The technical storage or access is strictly necessary for the legitimate purpose of enabling the use of a specific service explicitly requested by the subscriber or user, or for the sole purpose of carrying out the transmission of a communication over an electronic communications network.
Preferences
The technical storage or access is necessary for the legitimate purpose of storing preferences that are not requested by the subscriber or user.
Statistics
The technical storage or access that is used exclusively for statistical purposes.The technical storage or access that is used exclusively for anonymous statistical purposes. Without a subpoena, voluntary compliance on the part of your Internet Service Provider, or additional records from a third party, information stored or retrieved for this purpose alone cannot usually be used to identify you.
Marketing
The technical storage or access is required to create user profiles to send advertising, or to track the user on a website or across several websites for similar marketing purposes.