

A whimsical crochet mushroom doll pattern is a fun way to create something playful, cozy, and full of personality. With its rounded mushroom cap, sweet embroidered face, and soft plush body, this design blends fantasy charm with the comfort of handmade toys. It’s the kind of project that stands out beautifully in nursery decor, gift boxes, or seasonal craft collections.
Crochet cheeky mushroom doll pattern
Many makers love trying a crochet mushroom plush pattern because it offers endless room for creativity. You can choose classic red and white tones for a woodland look, or experiment with pastel shades, flowers, and tiny accessories to give your mushroom doll a magical twist. These projects are also great for using soft velvet or chenille yarn to create an extra cuddly finish.
If you are searching for a crochet doll free amigurumi pattern, a mushroom-inspired doll is a unique option that feels both cute and memorable. It works well for beginners with simple shaping, but it also gives experienced crocheters space to add charming details. This handmade plush is sweet, imaginative, and perfect for sharing online or gifting.
Designer: miastitchstudio
Supplies
– Hook: 5mm.
– Super bulky chenille yarn, (size 6) in colors: red, beige, white, pink.
– Safety eyes: 12mm.
– Scissors.
– Polyester stuffing.
– Stitch markers.
– Sewing needle.

The finished plushiee will be approx. 15 cm/6 inches big if using the yarn and hook size listed above.
Abbreviations:
ch- chain
MR- magic ring
sc- single crochet
dec- decrease
inc- increase
BLO- back loop only
FLO- front loop only
slst- slip stitch
FO- fasten off
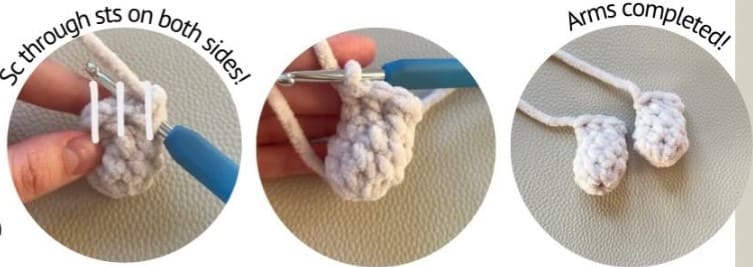
Arms (make 2)
Crochet in beige:
Rnd 1. 8 sc in MR (8)
Rnd 2-3. sc around (2 rounds) (8)
Rnd 4. (2sc,dec)x6 (6)
Stuff the arms lightly.
Rnd 5. sc around (6)
Fold the arms in half and sc 3 through the folded edge to close the opening.
Cut a short tail.
We will sc the arms to the body later.
Mushroom cap
Crochet in red:
Rnd 1. 7 sc in MR (7)
Rnd 2. inc around (14)
Rnd 3. (1sc,inc)x7 (21)
Rnd 4. (2sc,inc)x7 (28)
Rnd 5-6. sc around (2 rounds) (28)
Rnd 7. In FLO: inc around (56)
Slst and weave in the end.
Note: Mark the first BLO stitch with a stitch marker.

Head and body
Make a slst with beige yarn in the visible BLO sts.
Rnd 8. In BLO: of Rnd 6: (5sc,dec)x4 (24)
Rnd 9. sc around (24)
Rnd 10. (2sc,dec)x6 (18)
Rnd 11. (1sc,dec)x6 (12)
In thhe next round we will sc the arms into the body.
Rnd 12. In FLO: arms with 3 inc, 4 inc, arms with 3 inc, 2 inc (24)
Insert safety eyes in between Rnd 9-10, 4 visible stitches apart. Sew blush under the eyes.
Stuff the head.
Start crocheting the body.
Rnd 13-14. sc around (2 rounds) (24)
Rnd 15. (3sc,inc)x6 (30)
Rnd 16. sc around (30)
Rnd 17. (3sc,dec)x6 (24)
Rnd 18. (1sc,dec)x8 (16)
Stuff the body.

Note: You may have to adjust the placement of the arms with one or two sc to align them evenly on each side of the head.
Sc through both sts of the arm and into FLO on the head.

Legs (make 2)
Fold the body in half to create two legs.
Use stitch markers to separate the legs. The white stitch marker shows the center line and separate the 2 legs. You will now have 2 sections, 1 for each leg.
We will crochet 7 sc in each leg.
Start with the right leg, which is where your yarn is currently attached (marked with orange stitch marker).
Right leg
Rnd 1. Sc around, do not sc in the sts where the white stitch marker is placed (7) Use the pictures below as a guide.
Rnd 2-3. sc around (2 rounds) (7)
Stuff the leg and body.
Rnd 4. 3 dec, 1 sc (4)

FO and weave in the end.

Left leg
Make a slst in the st close to the white st marker.
Rnd 1. sc around, do not sc in the sts where the white stitch marker is placed (7)
Rnd 2-3. sc around (2 rounds) (7)
Finish stuffing the legs and body.
Rnd 4. 3 dec, 1 sc (4)
FO and leave a long tail for sewing.
Sew the gap between the legs.
With the same yarn tail, insert your needle from the bottom center and bring the yarn up about 3-4 rounds higher on the back of the body. (this forms the bum shape).
Repeat this a few times in the same path to secure the shaping.
FO and weave in the end.
Note: If your legs are still far apart afte sewing the gap between them, you could sew the legs together so they stay close and there is not much of a space between them.

Mushroom spots
In white yarn:
Use the pictures below as a guide.
Cut a long piece of white yarn and thread it onto your needle.
Choose a st on the mushroom cap that is about one st wide and insert the needle through it.
Bring the needle down one st below and insert it back through the same spot where you started.
Repeat this process, passing the yarn through the same st 3-4 times to create a small spot.
Continue making spots randomly across the mushroom cap until you’re happy with the look.
FO and weave in the ends.

The crochet mushroom plush doll is ready!


