
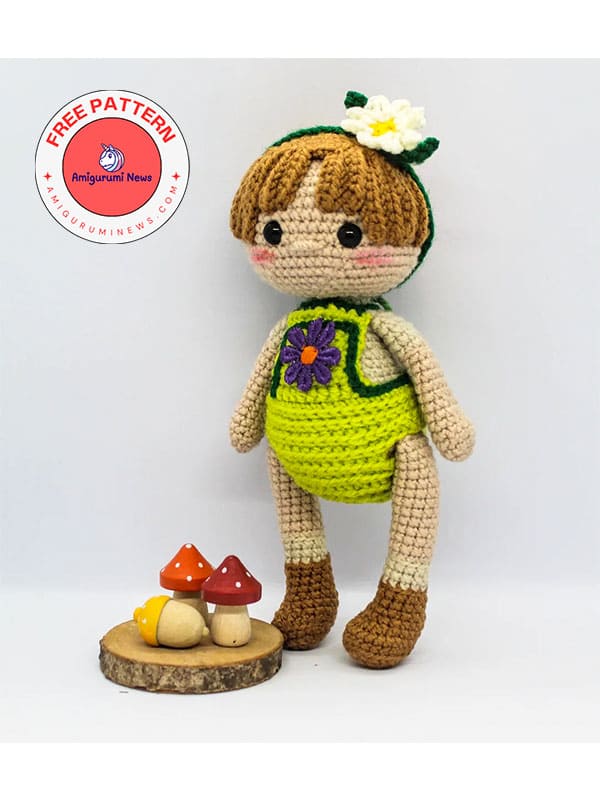
This cute crochet doll is with you. Doesn’t she look so cute with her flower patterned dress and flower headband? Although it looks complicated, this crochet doll pattern is extremely easy. It is made using basic level crochet terms that beginners can do. You can make the dress on the body of your doll in the colors you want. It is up to you. Or it is up to you to decorate it with different accessories. Here is the step by step crochet doll pattern with you now.
Flower girl crochet doll pattern
Via: tobbys_handcraft
Abbreviations:
ch- chain
st- stitch
inc- increase
dec- decrease
mr- magic ring
sc- single crochet
BLO- back loop only
FLO- front loop only
Materials:
3mm hook.
Stuffing.
Beige and brown yarns.
Light and dark green yarns.
White yarn.
Safety eyes.
Scissors.
Needle.
Legs X2
Start with brown yarn.
R1. 6 sc in magic ring (6)
R2. 2 inc, 1 sc (10)
R3. 4 inc, 1 sc (18)
R4. 2 sc, 1 inc (24)
R5. 24 sc in BLO (24)
R6. 24 sc (24)
R7. 3 sc, 6 dec, 9 sc (18)
R8. 4 sc, 2 dec, 10 sc (16)
R9. 2 sc, 1 dec (12)
R10-26. 12 sc (12)
Change to white yarn at row 11.
Change to beige yarn at row 14.
Leave a long tail for sewing.
Body
Start with begige yarn.
R1. 6 sc in MR (6)
R2. 6 inc (12)
R3. 1sc, 1inc (18)
R4. 2sc, 1inc (24)
R5. 3sc, 1inc (30)
R6. 4sc, 1inc (36)
R7. 5sc, 1inc (42)
R8. 6sc, 1inc (48)
R9. 48 sc (48)
R10. 6sc, 1dec (42)
R11-12. 42 sc (42)
Change to white yarn.
R13. 5sc, 1dec (36)
R14-15. 36 sc (36)
R16. 4sc,1dec (30)
R17-18. 30 sc (30)
R19. 3sc, 1dec (24)
R20-21. 24 sc (24)
R22. 2sc, 1dec (18)
Change to beige yarn.
R23-24. 18 sc (18)
Leave the body open with 18 sc.
Leave a long tail for sewing the head.
Head
With beige yarn.
R1. 6 sc in mr (6)
R2. 6 inc (12)
R3. 1sc, 1inc (18)
R4. 2sc, 1inc (24)
R5. 3sc, 1inc (30)
R6. 4sc, 1inc (36)
R7. 36 sc (36)
R8. 5sc, 1inc (42)
R9-10. 42 sc (42)
R11. 6sc, 1 inc (48)
R12. 48 sc (48)
R13. 7sc, 1inc (54)
R14. 8sc, 1inc (60)
R15. 60 sc (60)
R16. 8sc,1dec (54)
R17. 7sc, 1dec (48)
R18. 6sc, 1dec (42)
R19. 5sc, 1dec (36)
R20. 4sc, 1dec (30)
R21. 3sc, 1dec (24)
R22. 2sc, 1dec (18)
R23. 1sc, 1dec (12)
R24. 6dec (6)
Close the head and cut.
Arms X2
Start with beige yarn.
R1. 6 sc in mr (6)
R2. 6 inc (12)
R3. 12 sc (12)
R4. 12 sc (12)
R5. 12 sc (12)
Change with white yarn.
R6. 12 sc (12)
R7. 5sc, 1dec, 3sc, 1dec (10)
R8-17. (10 rows): 10 sc (10)
Leave a long tail for sewing.
Filling with stuffing only half arm.
Hair
With brown yarn.
R1. 6 sc in mr (6)
R2. 6 inc (12)
R3. 1sc, 1 inc (18)
R4. 2sc, 1 inc (24)
R5. 3sc, 1 inc (30)
R6. 4sc, 1 inc (36)
R7. 5sc, 1 inc (42)
Now we start the hair (H)
H1-2: 8ch, from the 2nd ch, 7 sc, attach the hair to the base in the next stitch with a slip stitch.
H3-30: 10 ch, 9 sc (9 sc)
H31-32. 8 ch, 7 sc (7 sc)
Leave a long tail for sewing.
Hair band
With the dark green work 60 chains, starting from the second work 1 slst, 1 sc, 1 hdc, 3 dc, 1 hdc, 45 sc, 1 hdc, 3 dc, 1 hdc, 1 sc, 1 slst.
You can add a smaller flower to decorate the band.
Dungarees
With light green yarn start 44 ch.
Insert the hook in the first ch and join with a slst the foundation ch.
Continue working in spiral and take only the back loop.
R1-4. (4 rows): 44 hdc (44)
R5. 8 hdc, 6 ch, skip 6 st, 16 hdc, 6 ch, skip 6 st, 8 hdc (44)
R6-7. 44 hdc (44)
R8. 4 hdc, 1 dec (33)
R9. 3 hdc, 1 dec (22)
R10. 2 hdc, 1 dec (11)
Close the hole with the needle.
Upper part:
Identify 10 stitches in the central part of the dungarees and work 5 rows of 10 hdc each.
Suspenders X2
With the dark green color work a chain of 10 stitches and from the second, work 9sc.
Decoration
With the dark green, work a round of slip stitches around the edges of the overalls.
How to assembling
1. Sew the head to the body with the needle following the 18st left open.
The part with the decreases is located at the base of the neck.
2. Sew the hair to the top of the head.
3. Attach the legs laterally to the base of the body by piercing it with a needle.
4. Sew the arms 3 rows below the neck.
5. Insert eyes between rounds 13 and 14, leaving 6 st between one eye and the other (the st can change depending the dimensions of the eys)
6. Don’t forget to dress up the little baby.
7. Sew the details with embroidery thread and enrich the amigurumi with shades using fabric colors (optional).


