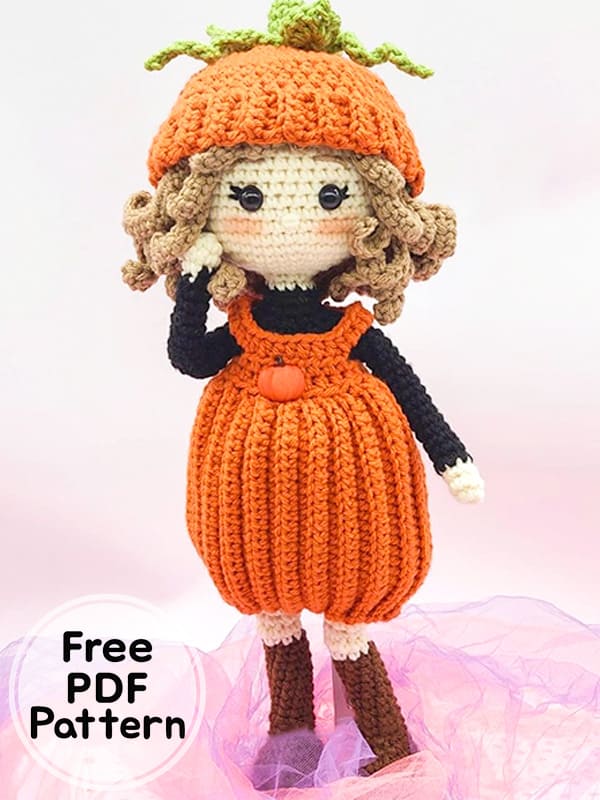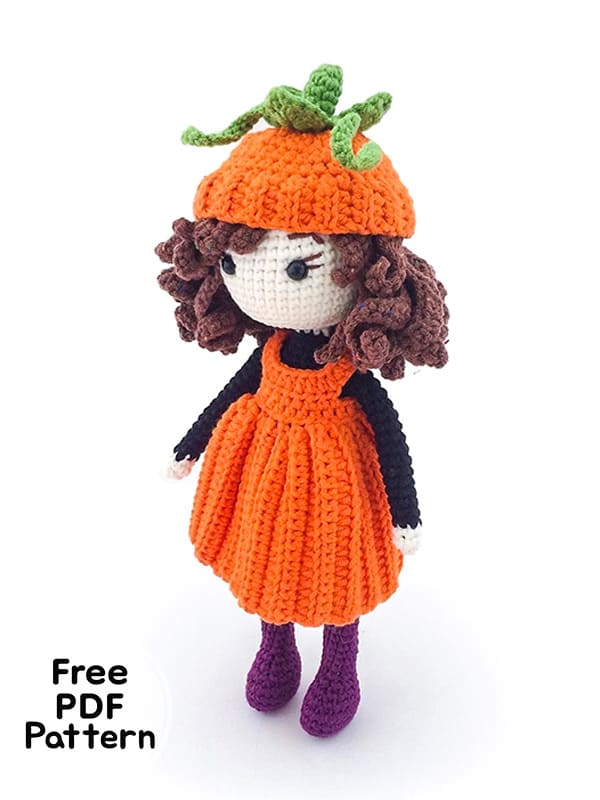
Greetings, I am with you with the crochet doll pattern. A big thank you to the pattern designer for the crochet doll. The finished crocheted doll will be approximately 37 cm, with a hat 39 cm. Complete the cute crochet doll with detailed step by step amigurumi pattern instruction and give your kids a nice surprise on Halloween. The cute crochet doll looks gorgeous in a pumpkin costume for halloween. Now I invite you to the free amigurumi pattern instruction. Stay tuned for more free patterns and crochet doll patterns.
Crochet Doll Pumpkin Amigurumi Free PDF Pattern
Designer: kkrochett
Materials
• Yarn: 100% acriylic worsted yarn (skin color, dark brown, light brown, purple, black, orange, green, cream)
• Hooks E- 3.5mm, G-4.0mm
• 10mm safety eyes
• Fiberfill
• Permanent fabric glue
• Tapestry needle
• Stitch markers
• Buttons
• Makeup- blush
Abbreviations
MR: Magic ring
Ch: Chain
BLO: Back loop only
FLO: Front loop only
Hdc: Half double crochet
Inc: Increase
Dec: Decrease
Dc: Double crochet
Dechdc: Decrease (2 hdc together)
Rnd: Round
Sc: Single crochet
Slst: Slip stitch
St: Stitch
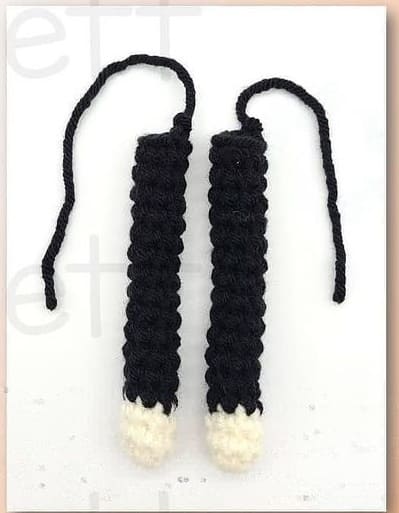
Arms (Make 2)
Start with skin color.
Rnd 1. 7 sc in MR (7)
Rnd 2-3. sc around (7)
Change to black color.
Rnd 4-17. sc around (7)
Fasten off. Don’t stuff the arms.
Right leg
Start with dark brown color.
Work around the foundation chain.
Rnd 1. chain 6
Rnd 2. start at the 2nd ch from hook: 1 sc in the next 4 ch, 4 sc in last ch from hook, 1 sc in the next 3 ch, 1 inc (13)
Rnd 3. 1 inc, 3 sc, 3 inc, 4 sc, 2 inc (19)
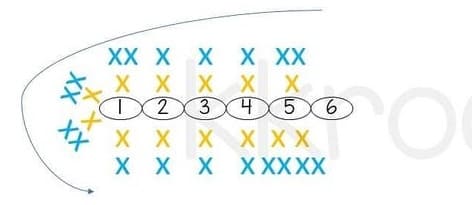
Change to light brown color with last sc of round 3
Rnd 4. BLO, sc all around (19)
Rnd 5. sc all around (19)
Rnd 6. 6 sc, 3 dec, 5sc, 1 dec (15)
Rnd 7. 5 sc, 3 dec, 4 sc (12)
Rnd 8. 4 sc, 2 dec, 4 sc (10)
Rnd 9. 4 sc, 1 dec, 4 sc (9)
Rnd 10-17. sc all around (9)
Change to skin color.
Rnd 18. 2 dec (in the back of the knee), 2 sc, 2 inc, (that’s the kneel), 1 sc (9)
Rnd 19. sc all around (9)
Rnd 20. 2 inc (in the back of the knee), 2 sc, 2 dec, (in the knee part), 1 sc (9)
Rnd 21. 3 sc, 1 inc, 5 sc (10)
Rnd 22. 3 sc, 1 inc, 6 sc (11)
Rnd 23. sc all around (11)
Rnd 24. 5 sc, 1 inc, 5 sc (12)
Rnd 25-27. sc all around (12)
Fasten off.
Left leg
Same as the right leg up until round 26.
Rnd 27. 14 sc (14)
Change to purple color with the last st of round 27 of left leg.
Join the legs
Continue with purple color.
Rnd 1. 12 sc, 4 ch, 12 sc in the other leg, 4 sc on the chains (32)
Rnd 2-5. sc all around (32)
Change to black color with the last sc of round 5
Rnd 6. 6 sc , 1 dec, 14 sc, 1 dec, 8 sc (30)
Rnd 7. sc all around (30)
Rnd 8. (3sc,1dec)*6 (24)
Rnd 9. sc all around (24)
Rnd 10. 4 sc, 1 dec, 11 sc, 1 dec, 5 sc (22)
Rnd 11-16. sc around (22)
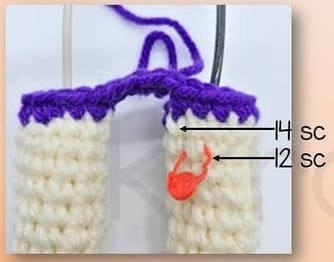
Add the arms
Continue with black color to join the arms.
Rnd 17. 5 sc in the body, 7 sc in one arm, 12 sc in the body, 7 sc in the other arm, 5 sc in the body (36)
Rnd 18. (4sc,1dec)*6 (30)
Rnd 19. (3sc,1dec)*6 (24)
Rnd 20. (2sc,1dec)*6 (18)
Rnd 21. (1sc,1dec)*6 (12)
Rnd 22. 10 sc, 1 dec (11)
Rnd 23. sc all around (11)
Change to skin color with last sc of rnd 23.
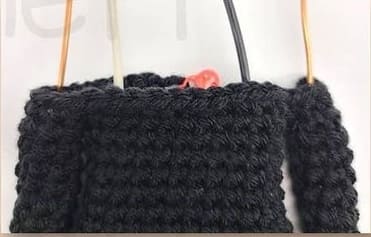
Continue with the head
Change to skin color with the last sc of round 23.
Rnd 24. BLO- (3sc,1dec)*2, 1 sc (9)
Rnd 25. sc all around (9)
Rnd 26. (1inc)*9 (18)
Rnd 27. (2sc,1inc)*6 (24)
Rnd 28. (3sc,1inc)*6 (30)
Rnd 29. (4sc,1inc)*6 (36)
Rnd 30. (5sc,1inc)*6 (42)
Rnd 31-40. sc all around (42)
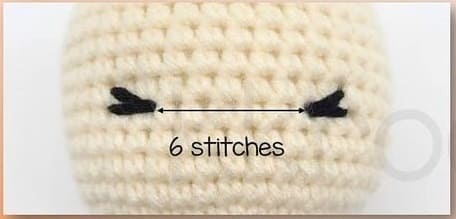
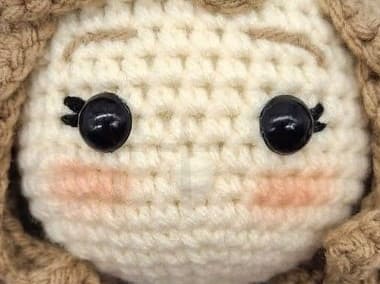
Place the 10mm safety eyes between rows 34 and 35, with 6 stitches in between.
You can embroider the eyelashes before or after you put the eyes.
Rnd 41. (5sc,1dec)*6 (36)
Rnd 42. (4sc,1dec)*6 (30)
Rnd 43. (3sc,1dec)*6 (24)
Rnd 44. (2sc,1dec)*6 (18)
Rnd 45. (1sc,1dec)*6 (12)
Rnd 46. (1dec)*6 (6)
Fasten off, leave a long tail to close the head.
Add the eyebrows, 2 stitches above the eyes (3 st long, 1 st wide).
Finally, add the nose between rows 32 and 33 (2 stitches long) and a touch of blush.
Dress
In orange. Use larger hook (4.0mm)
Rnd 1. chain 26
Rnd 2. (start on the 3rd ch from hook) hdc across, 1 ch, turn (24)
Rnd 3. (start on the 3rd ch from hook) hdc across (24)
Start working horizontally now.
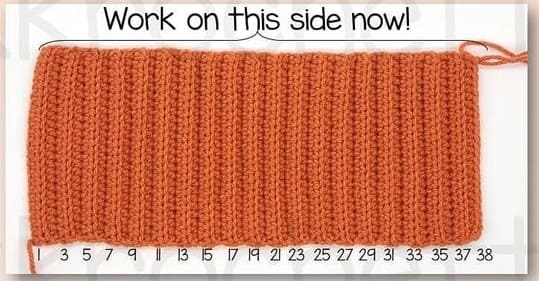
The 2 ch at the beginning of the rounds count as a stitch.
Rnd 1. ch 2, 2 hdc, (skip 1 st, 1hdc)*18, 1 inchdc, turn (22)
Rnd 2. ch 2, hdc across, turn (23)
Rnd 3. ch 2, 4 hdc, ch 6, skip 3 st, 8 hdc, ch 6, skip 3 st, 4 hdc, turn (17)
Rnd 4. ch 2, 3 hdc, 7 hdc in the 6 ch, 7 hdc, 7 hdc in the 6 ch, 4 hdc (29)

Now will finish off on the side of the dress.
Ch 1, 2 sc, 5 ch, 11 sc, 5 ch, 13 sc, 5 ch, 1 sc.

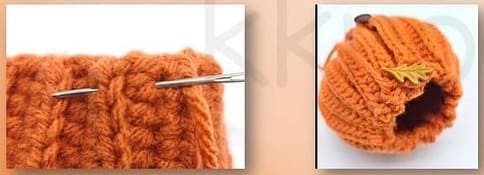
Do not fasten off. Leave a long tail. With a threading needle, make a running stitch along the bottom edge of the dress, in and out of the rounds (see picture below).
Once you go all the way around, pull the thread firmly until you have decreased the leg opening of the dress, and it is almost now against the doll’s legs.
Sew in the buttons.
Hair wig
Start with light cream brown. There are 2 layers of hair strands. Use larger hook.
First layer – 21 strands
Rnd 1. 7 sc in MR (7)
Rnd 2. FLO- 7 inc (14)
Rnd 3. (1sc,1inc)*7 (21)
Now we’ll start with the hair strands (S).
S 1. ch 15, sc on 2nd from hook, 13 sc, slst on round 3 (14)
S 2. ch 20, sc on 2nd from hook, 18 sc, slst (19)
S 3. ch 26, sc on 2nd from hook, 3 sc, 1 dec, (4sc,1dec)*2, 7 sc, slst (22)
S 4-18. ch 31, start on 3rd ch from hook: (3hdc,1 dechdc)*3, 14 sc, slst (26)
S 19. ch 20, sc on 2nd ch from hook, 18 sc, slst (19)
S 20. ch 12, sc on 2nd ch from hook, 10 sc, slst (11)
S 21. ch 10, sc on 2nd ch from hook, 8 sc, slst (9)
Fasten off.
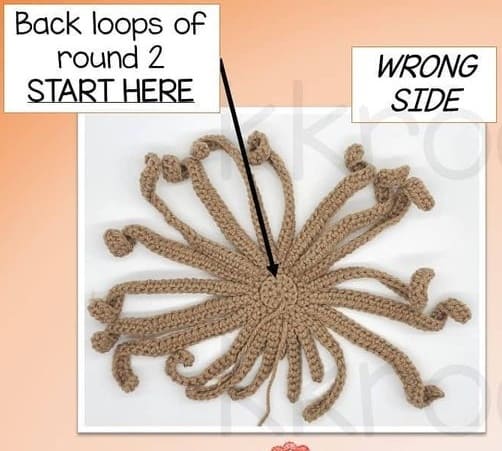
Second layer – 13 strands
Start with a new thread work on back loops of round 2 (wrong side)
S 1-11. ch 31, start on 3rd ch from hook, (3hdc, 1dechdc)*3, 14 sc, slst (26)
S 12. ch 20, sc on 2nd from hook, 18 sc, slst (19)
S 13. ch 15, sc on 2nd from hook, 13 sc, slst on round 3 (14)
Fasten off.

• Align the center of the wig with the center of the head, and arrange the strands as shown in the pictures above, starting with the first layer of hair (black 1st layer, green: 2nd layer).
• First pin the strands, then fix them to the head with permanent fabric glue when you are happy with the placement.
• The second layer goes above the first layer, play around with the placement of the strands and fix them with glue.
Hat
Start with orange yarn and larger hook.
Band
Rnd 1. ch 5
Rnd 2. hdc in 2nd ch from hook, 3 hdc, ch 1, turn (4)
Rnd 3-44. hdc across (4)
Bring the ends together (make sure it fits your doll’s head) and sew them together using sc.
Put the seam to the inside.
Do not fasten off.
Hat body
Work horizontally now across the edge of the band. Join with slst to 1st stitch after each round.
The chain at the beginning of each round does not count as a stitch.
Rnd 1-4. ch 1, hdc across, slst (44)
Rnd 5. ch 1, (2 hdc, dechdc)*11, slst (33)
Rnd 6. ch 1, (1 hdc, dechdc)*11, slst (22)
Rnd 7. ch 1, dechdcx11, slst (11)
Cut the yarn, and leave a long tail to close up the gap.
Stalk and leaves
Start with green yarn.
Crochet in rounds.
Stalk
Rnd 1. 6 sc in MR
Rnd 2. (2sc,inc)*2 (8)
Rnd 3-5. sc across (8)
Do not fasten off.
Twirls
(ch 20, in 2nd from hook: sc across, slst in same st of stalk, 3 slst in stalk)*3
Fasten off. Leave long tail to secure it to top of the hat.
Leaves (Make 3)
Ch 2, 6 dc in the 1st ch, ch 2, slst to the 1st ch, 6 dc, slst.
Fasten off. Leave long tail to sew to stalk.

