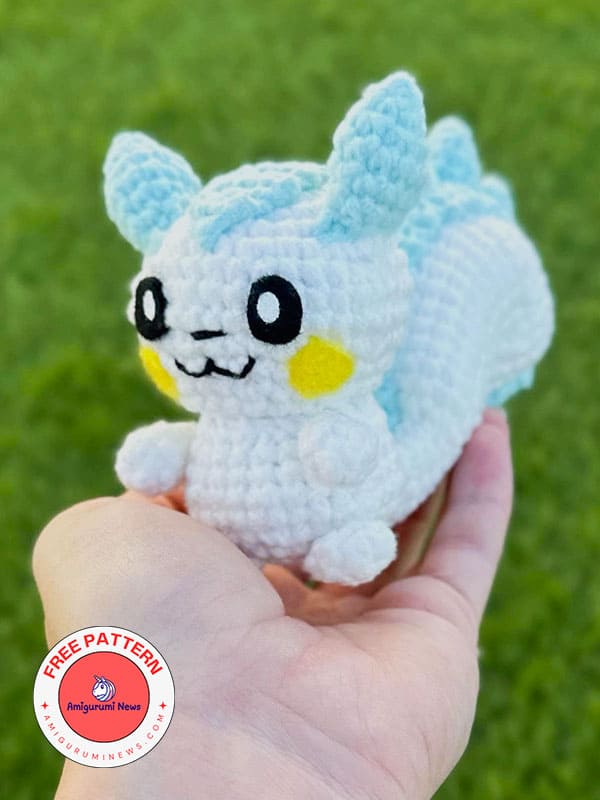
Greetings, today’s crochet Pokemon pachirisu pattern is for amigurumi crochet Pokemon lovers. It’s explained so thoroughly and step-by-step that anyone can easily make it. You’ll learn how to make a Pokemon pachirisu in this free pattern. The designer uses chenille yarn and a 2.25 mm crochet hook for this crochet Pokemon. If you prefer to use ready-made eyes, 9 mm safety eyes will work. Alternatively, you can cut black felt to make the eyes. Here’s the crochet Pokemon pachirisu pattern step by step, with much more details below.
Crochet pokemon pachirisu pattern
Designer: shifucrafts
Materials
– Yarn: white, cyan, yellow (for facial detail)
– Face details:
• Eyes: safety eyes or black/white felt.
• Cheeks: yellow yarn or yellow felt.
• Nose/mouth: black yarn/thread.
– Other:
• Stuffing
• Tapestry needle
• Sewing pins
• Stitch markers
Abbreviations
ch- chain
sc- single crochet
inc- increase
dec- decrease
slst- slip stitch
MR- magic ring
FO- fasten off
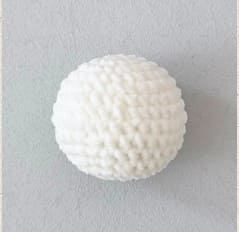
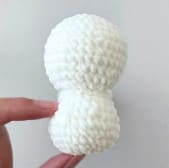
Head
In white.
R1: MR 8 (8)
R2: 8 inc (16)
R3: (sc, inc) x 8 (24)
R4: 24 sc (24)
R5: (sc, inc, sc) x 8 (32)
R6: 32 sc (32)
R7: (3 sc, inc) x 8 (40)
R8-9: 40 sc (40) (2 rounds)
R10: (3 sc, dec) x 8 (32)
R11: 32 sc (32)
R12: (sc, dec, sc) x 8 (24)
R13: 24 sc (24)
Insert safety eyes, if using them, between R8-9, 3 stitches apart. Start stuffing.
R14: (sc, dec) x 8 (16)
Finish stuffing.
R15: 8 dec (8)
FO, close the hole, weave in the tail.
Body
In white.
R1: MR 8 (8)
R2: 8 inc (16)
R3: (sc, inc) x 8 (24)
R4: 24 sc (24)
R5: (sc, inc, sc) x 8 (32)
R6: 32 sc (32)
R7: (sc, dec, sc) x 8 (24)
R8-9: 24 sc (24) (2 rounds)
R10: (sc, dec) x 8 (16)
Stuff the body, FO, leave a long tail for sewing.
Hands/Feet x 4
In white
R1: MR 6 (6)
R2-3: 6 sc (6) (2 rounds)
FO, no need to stuff. Leave a tail to sew.
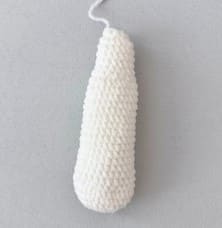
Tail
In white.
R1: MR 8 (8)
R2: 8 inc (16)
R3: (sc, inc) x 8 (24)
R4: 24 sc (24)
R5: (sc, inc, sc) x 8 (32)
R6: 32 sc (32)
R7: (sc, dec, sc) x 8 (24)
Lightly stuff as you go, and flatten. The tail should not be stiffly rounded, but more flat and flexible to allow for bending to shape.
R8-22: 24 sc (24) (15 rounds)
R23: (sc, dec) x 8 (16)
R24-28: 16 sc (16) (5 rounds)
R29: 8 dec (8)
FO, leave a tail for sewing.
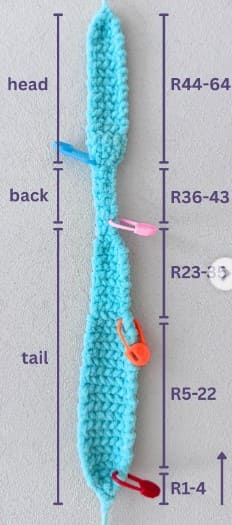
Back stripe
In cyan, work in rows and turn at the end of each row. I don’t ch 1 at the beginning of rows.
R1: ch 2, sc into second st (1)
R2: turn, inc (2)
R3: turn, 2 inc (4)
R4: turn, (sc, inc) x 2 (6)
Place a stitch marker to keep track of rows more easily.
R5-21: turn, 6 sc (6) (17 rows)
R22: turn, dec, 2 sc, dec (4)
Place a stitch marker.
R23-31: turn, 4 sc (4) (9 rows)
R32: turn, 2 dec (2)
R33-35: turn, 2 sc (2) (3 rows)
Place a stitch marker.
R36-43: turn, 2 sc (2) (8 rows)
Place a stitch marker.
R44: turn, 2 inc (4)
R45-62: turn, 4 sc (4) (18 rows)
R63: turn, 2 dec (2)
R64: turn, dec (1)
FO, leave a long tail for sewing (about 3x length around the stripe).
Ears x2
In cyan.
R1: MR 4 (4)
R2: (sc, inc) x 2 (6)
R3: 6 inc (12)
R4-6: 12 sc (12) (3 rounds)
Slst into the first stitch, FO, leave a tail for sewing, stuff if needed.

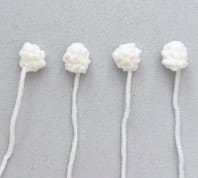
Large tail bump
In cyan.
R1. MR 4 (4)
R2. (sc,inc)x2 (6)
R3. (2sc,inc)x2 (8)
R4. 8 sc (8)
FO, leave tail for sewing, stuff if needed.
Small tail bump x 2
In cyan.
R1. MR 4 (4)
R2. (sc,inc)x2 (6)
R3. (2sc,inc)x2 (8)
FO, leave tail for sewing, stuff if needed.
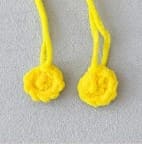
Cheeks x 2
In yellow.
R1. MR 6 (6)
R2. (sc,inc)x3 (9)
Slst into the first stitch, FO, leave a tail for sewing.
If you are using felt, skip this.
Assembly
I recommended sewing in this order:
1. Head and body.
2. Tail.
3. Back stripe.
4. Hands and feet.
5. Ears.
6. Tail bumps.
7. Facial details.
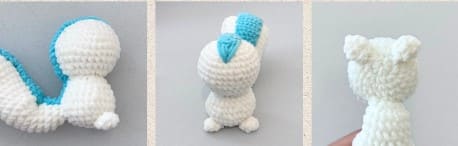
Head & body
Attach body between R12-13 of the head. Finish stuffing the body before you finish sewing.
Tail
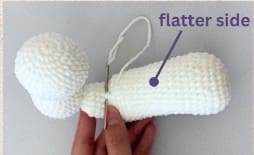
Sew the tail onto the body at R5-6 such that the wider, flatter side of the tail is facing up.
Flatten down in the direction of head to body.
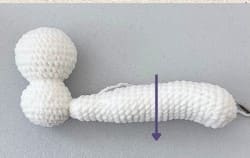
Flatter side.
Shaping the tail
Overview:
Curl the tail into an “S” shape by bending the tip down and the base of the tail up, this is where we will stitch to create the best positioning.
The base should help Pachirisu sit flat, and the tip should reach the top of the head or higher. First, hand-bend the tail to test the best position.
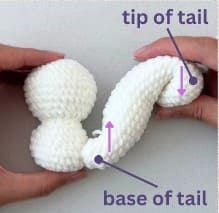
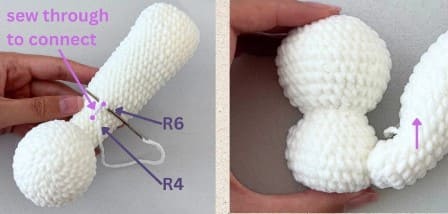
Base of tail:
Make the base of the tail fold upward by sewing between R4 and R6 (from the base of the tail) tightly multiple times which “ties” those areas together to create a secure bend. You can also attach the tail to Pachirisu’s back if it doesn’t stand up properly.
Afterward, check Pachirisu is sitting normally. You can adjust the balance of the sitting position using the feet later.
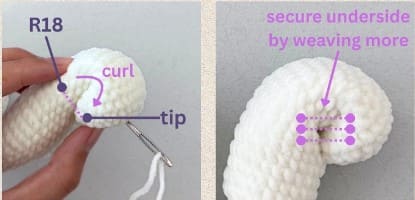
Tip of tail:
To make the tip of the tail curl downwards, sew the tip of the tail onto the underside of the tail. at R18. Then weave in and out multiple times inside the underside of the tail to secure the curl.
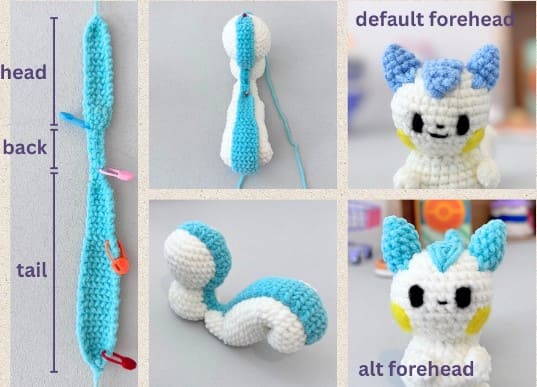
Back stripe
Center align it with the wider part at the tail and start the stripe at R4 of the head. Pin into place on the tail, back, and head.
Alternative forehead patch:
You can embroider the forehead’s triangular stripe if you want a sharper look. Shift the stripe back a few rows and use the yarn tail to embroider a “V” shape in its place.
Feet
Sew between R2-3 of the body. Check that Pachirisu can balance on the ground. If it is unbalanced, adjust the feet position as needed or adjust how the tail sits on the ground.
Hands
Sew between R5-8 of the body. Sew the hands upward and inward, flat onto the body with 3 stitches in between so it looks like the hands are touching its chest.

Ears
Sew between R2-5 of the head. Try to angle the ears so they are sticking straight up.
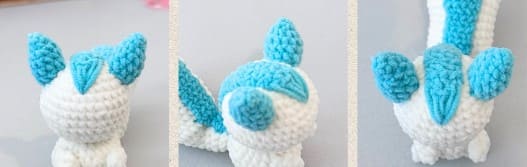
Ear detailing
Embroider a triangle at the front of the ear by making a “V” shape and filling it in.
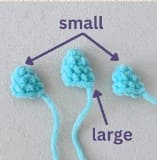
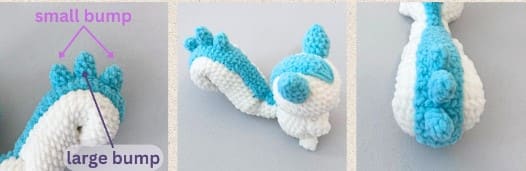
Tail bumps
Attach the large bump at the top of the curled tail, pointing upward, then place the small bumps on each side so they touch it.
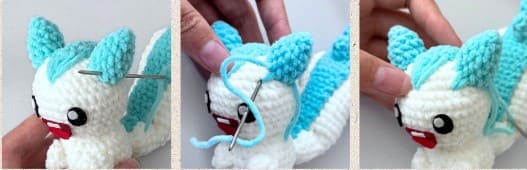
Facial details
Eyes: If felting, position R7-9, 1-2 stitches wide, 4 stitches apart.
Nose: Position in between eyes around R8, 1 stitch wide.
Cheeks: Position R9-12, 2 stitches away from the eyes.
Mouth: Position R9-10, 1 stitch away from eyes.

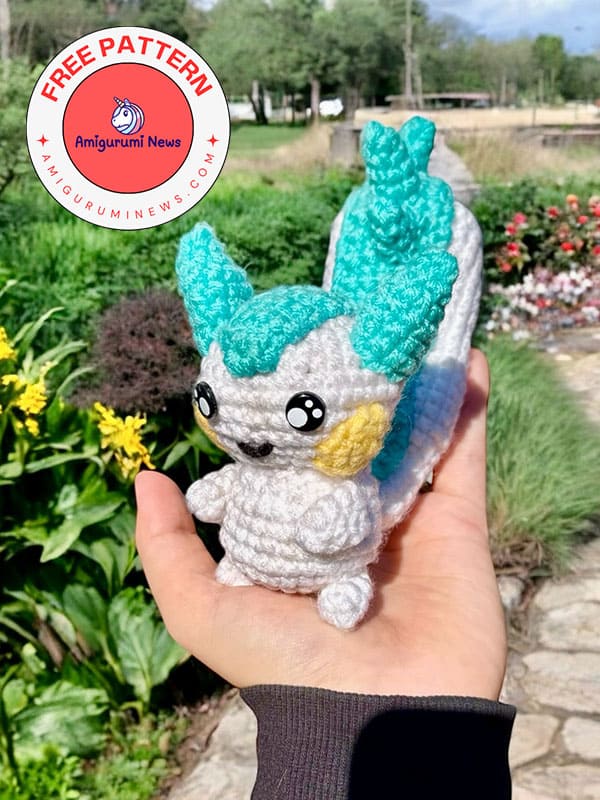
Here is the cute crochet pachirisu ready.