
If you want a sweet spring project, this crochet easter bunny pattern is the perfect place to start. Soft, simple, and full of charm, it’s a lovely choice for anyone who enjoys making cute handmade gifts. This fluffy bunny design works beautifully as an amigurumi easter bunny pattern, especially if you love quick projects that still look impressive.
One of the best things about this style is how beginner-friendly it feels. A free crochet easter bunny pattern lets you practice basic stitches while creating something adorable enough for Easter baskets, nursery decor, or seasonal displays. The rounded body, tiny embroidered nose, and soft texture make it extra lovable without requiring complicated shaping.
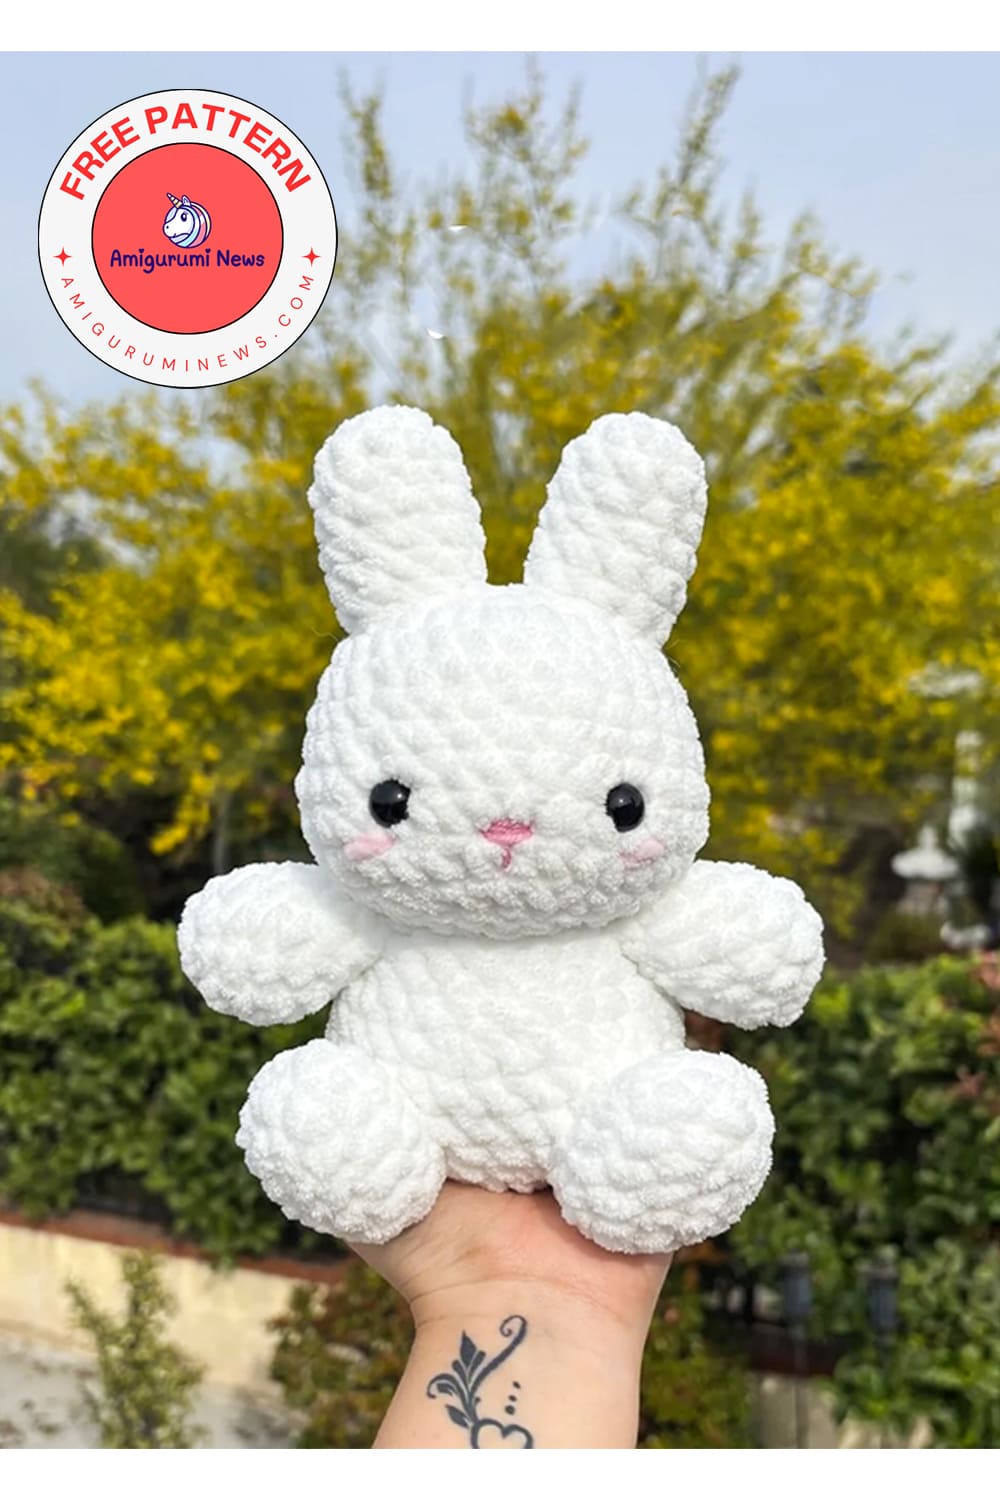
Amigurumi easter bunny pattern
If you’re just getting into amigurumi, a free crochet easter bunny pattern for beginners is a fun and relaxing way to build confidence. You can keep it classic in white like the photo, or personalize it with pastel yarn for a playful holiday twist. This bunny is cute, cozy, and honestly hard not to make more than one.
Designer: kayascrochet
Materials:
Any size yarn in white and pink (bernat blanket and sweet snuggles lite)
Smaller size yarn in pink for the nose (I used “I love this yarn)
Crochet hook: 5mm.
Fiberfill stuffing.
Safety eyes: 12mm
Scissors
Stitch marker
Sewing needle
Abbreviations:
MR- magic ring
ch- chain
sc- single crochet
inc- increase
dec- decrease
FO- fasten off
Head:
The head is worked from top to bottom, so Rd 1 is the top of the
head.
Rd 1: 8sc in MR (8)
Rd 2: 8inc (16)
Rd 3: (sc, inc) x 8 (24)
Rd 4: (3sc, inc) x 6 (30)
Rd 5-8: sc around (30) 4 rounds
Rd 9: 8sc, 5inc, 4sc, 5inc, 8sc (40)
Rd 10: sc around (40)
Rd 11: (2sc, dec) x 10 (30)
Rd 12: (3sc, dec) x 6 (24)
• Insert safety eyes between Rds 9 and 10, about 6 stitches apart. Make sure your increases from Rd 9 face forward as they form the cheeks.
• Stuff the head.
Rd 13: (2sc, dec) x 6 (18) Rd 14: (sc, dec) x 6 (12)
Rd 15: 6dec (6)
FO and sew the hole closed. Weave in the ends. Embroider some blush under the eyes between Rds 10 and 11. Embroider the nose between Rds 10 and 11 using your smaller yarn.

Ears (make 2):
Rd 1: 10sc in MR (10)
Rd 2-7: sc around (10) – 6 rounds
Stuff, FO, and leave a long tail for sewing. Sew the ears on Rds 2-4 of the top of the head.
Body:
Rd 1: 8sc in MR (8) Rd 2: 8inc (16)
Rd 3: (sc, inc) x 8 (24)
Rd 4: (3sc, inc) x 6 (30)
Rd 5-8: sc around (30) 4 rounds
Rd 9: (4sc, dec) x 5 (25)
Rd 10: sc around (25)
Rd 11: (3sc, dec) x 5 (20)
Rd 12: sc around (20)
Stuff, FO, and leave a long tail for sewing. Sew the body directly beneath the head.
Arms (make 2):
Rd 1: 8sc in MR (8)
Rd 2: (sc, inc) x 4 (12)
Rd 3-5: sc around (12) – 3 rounds
Rd 6: (4sc, dec) x 2 (10)
Rd 7: (3sc, dec) x 2 (8)
Stuff and leave some space near the top of the arms. Fold the arms in half and sc 4 across (See photo for example). FO and leave a long tail for sewing. Sew the arms directly beneath the head on the sides of the body.

Feet (make 2)
Rd 1: Ch 4. Starting in second ch from hook: 2sc, 3sc in last stitch, rotate to the other side of the chain, 2sc, 3sc in last stitch (10)
Rd 2: inc, 2sc, 3inc, 2sc, 2inc (16)
Rd 3: inc, 4sc, (sc, inc) x 2, 5sc, inc, sc (20)
Rd 4: dec, 4sc, (sc, dec) x 2, 5sc, dec, sc (16)
Rd 5: sc, 6dec, 3sc (10)
Stuff, FO, and leave a long tail for sewing. Angle the top of the feet a bit outwards and sew them on Rds 5-7 of the body about 4 stitches apart (the decreases in Rds 4 and 5 should face upwards).
Tail:
Rd 1: 10sc in MR (10)
Rd 2: sc around (10)
Rd 3: (3sc, dec) x 2 (8)
Stuff, FO, and leave a long tail for sewing. Sew the tail on Rds 5 and 6 of the back of the body.

The cute amigurumi easter bunny is ready.


