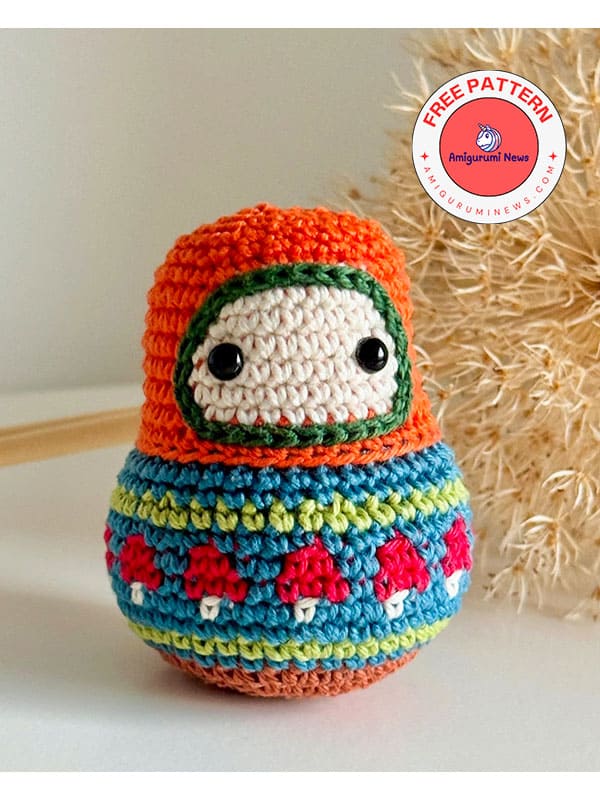
Here’s a fall-themed crochet nesting doll pattern. Even though autumn has passed, I still think it’s a great idea for a New Year’s gift. Crochet matryoshka dolls have always been very popular. This year, make this beautifully crochet matryoshka doll and gift it to your friends for Christmas. The red mushrooms on the body look beautiful and well-detailed. Here’s the step-by-step crochet matryoshka doll pattern.
Autumn crochet matryoshka pattern
If you’re wondering how to crochet a nesting doll, keep reading. This free crochet nesting doll pattern will teach you how. Pay attention to the font colors when changing yarn colors.
Rnd- rounds
st- stitch
slst- slip stitch
sc- single crochet
sc2tog- 2 st together with sc (decrease)
BLO- in back loop only
st+st- several stitches in same stitch
Materials:
2.5mm crochet hook
Sport weight yarn in 7 colors (A: caramel, B: petrol blue, C: green, D: off-white, E: red, F: orange, G: dark green)
6mm black eyes
Soft stuffing/polyester fiberfill
Optional: embroidery needle
Color change: Change the yarn while working the last stitch in the initial color.
That is: Insert hook into indicated stitch, yarn over and pull up a loop. Then wrap the new color around the hook and complete the stitch as usual by pulling the yarn through both loops on the hook. The next stitch is the first in the new color.
Crochet matryoshka instructions:
Start with color A.
Rnd 1. 6 sc in magic ring
Rnd 2. *2 sc in next sc* 6x (12)
Rnd 3. *2 sc in next sc, 1sc* 6x (18)
Rnd 4. *2 sc in next sc, 2sc* 6x (24)
Rnd 5. *2 sc in next sc, 3sc* 6x (30)
Rnd 6. *2 sc in next sc, 4sc* 6x (36)
Change to color B.
Rnd 7. 36 sc
Change to color C.
Rnd 8. *2 sc in next sc, 5 sc* 6x (42)
Change to color B.
Rnd 9. *2 sc in next sc, 6sc* 6x (48)
Use color B for instructions in blue font and color D for black.
Rnd 10. 2sc, *1sc,3sc* 11x, 1sc, 1sc
Use color B for instructions in blue font and color E for red.
Rnd 11. *1sc, 1sc, 1sc BLO, 1sc* 12x
Rnd 12. *2sc, 2sc*12x
Change to color B.
Rnd 13. *sc2tog, 1sc, 1sc BLO, 3 sc, 1sc BLO* 6x (42)
Next, change the starting point for a more harmonious result: still using color B, work the next sc in the 1st sc of the previous round.
Only then change to color C and mark the 2nd sc of rnd 13 as your new starting point.
Begin rnd 14 and all following rounds from here.
Rnd 14. 42 sc
Change to color B.
Rnd 15. *sc2tog, 5sc* 6x (36)
Rnd 16. 36 sc
Change to color F.
Rnd 17. 36 slst
Rnd 18. 36 sc BLO
Use the F for instructions in orange font and color D for black.
Rnd 19. 15 sc, 10 sc, 11sc
Rnd 20. 15 sc, 11 sc, 10sc
Rnd 21. 15 sc, 11 sc, 10sc
Rnd 22. 16 sc, 10 sc, 10sc
Rnd 23. 17 sc, 8 sc, 11sc
Rnd 24. 18 sc, 7 sc, 11sc
Place the eyes between rnd 21 and 22, 7 st apart (counted in rnd 21), and start stuffing.
Continue with color F.
Rnd 25. *sc2tog, 4sc* 6x (30)
Rnd 26. *sc2tog, 3sc* 6x (24)
Rnd 27. 24 sc
Rnd 28. *sc2tog, 2sc* 6x (18)
Rnd 29. *sc2tog, 1sc* 6x (12)
Rnd 30. *sc2tog* 6x (6)
Fasten off and close the remaining hole.
Finishing
Make a border of slip stitches in color G around the face. You can crochet or embroider it.
To provide the best experiences, we use technologies like cookies to store and/or access device information. Consenting to these technologies will allow us to process data such as browsing behavior or unique IDs on this site. Not consenting or withdrawing consent, may adversely affect certain features and functions.
Functional
Always active
The technical storage or access is strictly necessary for the legitimate purpose of enabling the use of a specific service explicitly requested by the subscriber or user, or for the sole purpose of carrying out the transmission of a communication over an electronic communications network.
Preferences
The technical storage or access is necessary for the legitimate purpose of storing preferences that are not requested by the subscriber or user.
Statistics
The technical storage or access that is used exclusively for statistical purposes.The technical storage or access that is used exclusively for anonymous statistical purposes. Without a subpoena, voluntary compliance on the part of your Internet Service Provider, or additional records from a third party, information stored or retrieved for this purpose alone cannot usually be used to identify you.
Marketing
The technical storage or access is required to create user profiles to send advertising, or to track the user on a website or across several websites for similar marketing purposes.