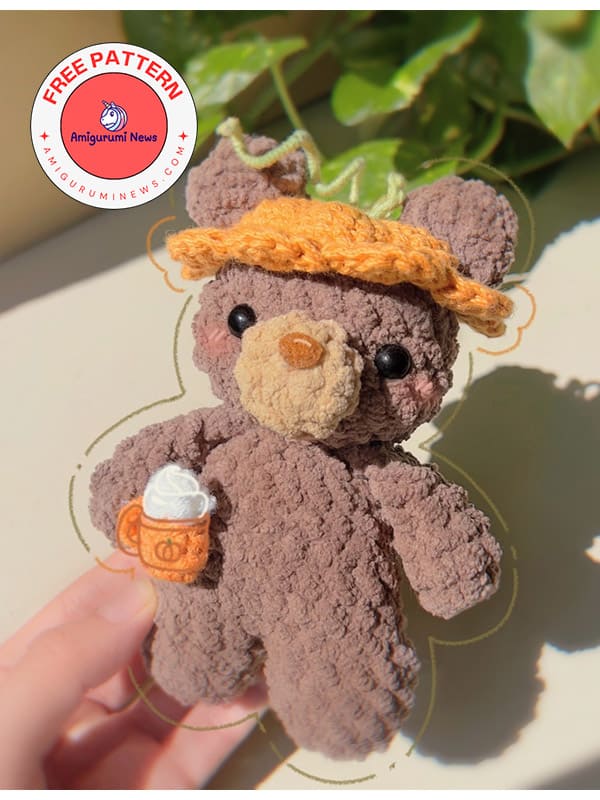
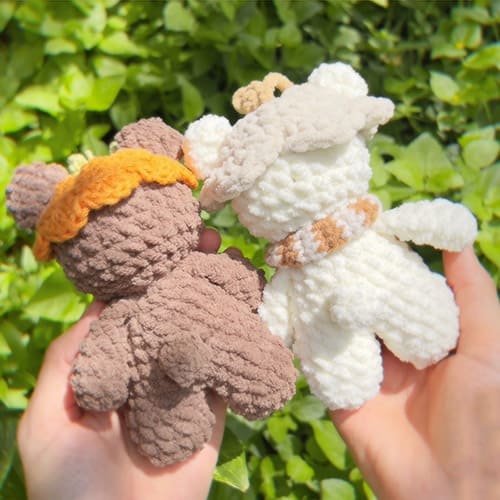
A very cute free crochet teddy bear pattern with a pumpkin hat and pumpkin spice latte is here. Follow the crochet pattern step by step for this wonderful teddy bear and prepare it. Doesn’t it look very nice with its pumpkin hat, latte, and scarf? There are two different yarn versions of the hat. You can make it however you want. Of course, I wrote how to make the other accessories below. This wonderful crochet amigurumi teddy bear is now with you.
Crochet amigurumi pumpkin teddy bear pattern
Via: amarte_studios
Materials and tools:
Feel free to use your favorite yarn and colors! 🙂
• Tapestry needle
• Scissors
• Stuffing
• Brown felt or yarn for the nose
• 8 mm safety eyes
• Stitch markers
-For the bear:
• 4.5 mm hook
• Dark brown chenille yarn
• Light brown chenille yarn
-For the chenille hat:
• 4.5 mm hook
• Orange chenille yarn
• Green chenille yarn
-For the cotton yarn hat:
• 3.5 mm hook
• Orange cotton yarn
• Green cotton yarn
-For the scarf:
• 3.5 or 4.5 mm hook
• Light brown yarn
• Dark brown yarn
-For the mug:
• 3.5 or 4.5 mm hook
• Orange yarn
• White yarn
Abbreviations
sc- single crochet
inc- increase
dec- decrease
sist- slip stitch
ch – chain
FO- fasten off
FLO-front loop only
BLO- back loop only
dc- double crochet
cc- change color
mr -magic ring
rnd – round
Head
Please follow the increases and decreases as the pattern says to
shape the head 🙂
In dark brown.
R1 8sc in a magic ring
R2 (sc,inc) x4 (12)
R3 (sc, inc) x6 (18)
R4 (inc, 2sc) x6 (24)
R5-R9 sc all around [5 rnds] (24)
Put the safety eyes between R7 and R8 five stitches appart.
Start stuffing.
R10 (2sc, dec) x6 (18)
R11 (1sc, dec) x6 (12)
Make a sist and FO.
Note:
When starting the head you can place your fingers in the magic ring so it doesn’t get pointy.
Ears-make two
In dark brown.
R1 6sc in a magic ring
R2 (sc, inc) x3 (9)
R3 sc all around (9)
Make a slst, FO and leave a long tail for sewing.
Sew later, when finishing the hat.
Muzzle
In light brown.
R1 8sc in a magic ring
R2 (sc, inc) x4 (12)
R3 sc around (12) (Do this round if you want a big muzzle and only up to R2 if you prefer it smaller)
Make a slst, FO and leave a long tail for sewing.
Stuff if needed.
You can indent the eyes for a cuter look.
Sew the muzzle between R7 and R9.
You can embroider the nose or use some felt.
Arms- make two
In dark brown.
R1. 8 sc in a magic ring
R2-4. sc all around (8)[3 rnds]
R5. 3 sc, dec, 3 sc (7)
Stuff slightly if needed.
R6. Fold in half and close with 3sc, turn (3)
R7. skip 1sc, 2 sc, FO and leave a long tail for sewing (2)
Tail
In dark brown.
R1. 5 sc in a magic ring
R2. sc all around (5)
FO and leave a long tail for sewing.
Body
Legs | In dark brown | Make two
R1. 8sc in a magic ring
R2. (sc,inc) x4 (12)
R3-R4. sc all around [2 rnds] (12)
FO on the first leg. Do not cut the yarn on the second leg.
R5. ch1, attach to first leg with 1sc, 11sc, sc in ch1, 12sc on second leg, sc in ch1 (26)
R6. 5sc, 1dec, 12sc, 1dec, 5sc (24)
R7. 5sc, 1dec, 10sc, 1dec, 5sc (22)
R8. sc all around (22)
R9. 4sc, 2dec, 6sc, 2dec, 4sc (18) Start stuffing
R10. sc all around (18)
R11. 4sc, dec, 6sc, dec, 4sc (16)
R12. (2sc, dec) x4 (12)
Make a slst and FO, leave a long tail for sewing.
Sew the body to the head.
Sew the arms between R11 and R12, the decreasing side will go outwards.
Sew the tail between R7 and R8.
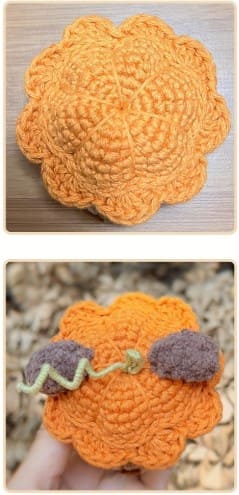
Pumpkin hat option 1
Cotton yarn.
R1. 8 sc in a magic ring
R2. (sc,inc)x4 (12)
R3. (sc, inc) x6 (18)
R4. (inc, 2sc) x6 (24)
R5. (3sc, inc) x6 (30)
R6. sc around (30)
R7. 2sc, inc, (4sc, inc)x5, 2sc (36)
R8. sc all around (36)
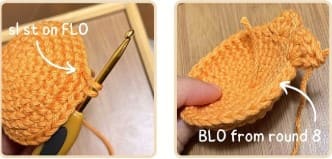
If you need it, put a stitch marker in the bl so you can find the back loops later.
R9. slst all around on FLO (36) make the stitches loosely.
R10. On BLO from round 8
(1sc, skip 1 st, 5 complete dc in the same stitch, skip 1 stitch) repeat this sequence until the end of the round.
FO, leave a long tail for details.
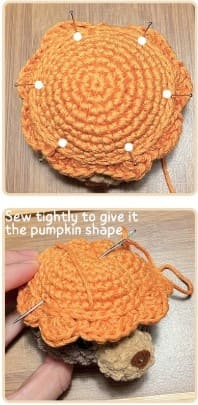
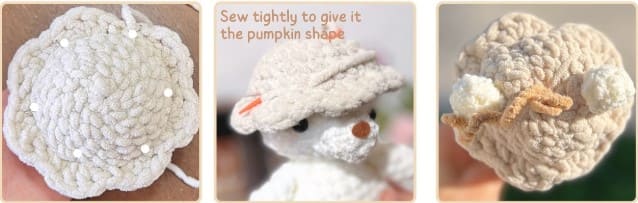
Put a stitch marker or pin every six single crochet above the slip stitch part.
Sew from each marked point to the center of the MR making sure to sew through the bear’s head.
Stem
Make a slip knot, chain 4, sc in second chain from the hook, 2 sc and FO.
Optional: cut some wire, about 10 cm, wrap some yarn around it and shape it with a marker or something circular.
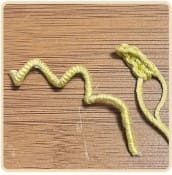
Sew or glue the stem in the middle of the magic ring.
Sew the ears on top of the hat above the slip stitch part.
Pumpkin hat option 2
Chenille yarn.
R1. 8 sc in a magic ring.
R2. (sc,inc)x4 (12)
R3. (sc,inc)x6 (18)
R4. sc all around (18)
R5. (inc,2sc)x6 (24)
R6. (3sc,inc)x6 (30)
Finish this rnd with a slst and ch1 (the first sc of the next round will be in the same stitch).
R7. On BLO (sc, skip 1 st, 4 complete dc in the same stitch, skip 1 stitch) repeat this sequence until the end of the round. FO, leave a long tail for sewing.
Put a stitch marker or pin every five single crochet above R7.
Sew from each marked point to the center of the MR making sure to sew through the bear’s head.
Stem
Make a slip knot, chain 3, sc in second chain from the hook, 1 sc and FO.
Optional: cut some wire, about 10 cm, wrap some yarn around it and shape it with a marker or something circular.
Sew or glue the stem in the middle of the magic ring.
Sew the ears on top of the hat above R7.
Scarf
With a 3.5mm hook.
Ch1 and turn after every row.
Start with brown (you can use just one color if you prefer).
R1. Make a slip knot, ch5, sc in second chain from the hook, 3 sc.
R2. 4sc, cc to light brown.
R3-4. 4 sc, cc to dark brown.
Continue to crochet the number of rows you see necessary, in my case 52 rows.
If you’re using a 4.5mm hook,
Ch4 instead of 5 in R1 and make 3 sc in the next rows (make the color changes as it is in the pattern).

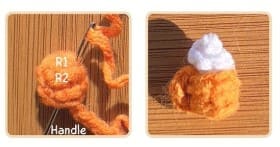
Mug
In orange – you can use a 3.5 or a 4.5 mm hook.
R1. 6 sc in a magic ring , slst, ch 1.
R2. BLO, 6 sc, slst, ch 1.
R3. 6 sc, slst, ch 6 (this will be the handle), cut the yarn, sew between R1 and R2.
Wripped cream
In white – you can use a 3.5 or a 4.5 mm hook.
Make a slip knot, ch 4, inc in second chain from the hook, 2 inc, FO and cut the yarn.
Twist it to create the whipped cream shape. Sew or glue on top of the mug.