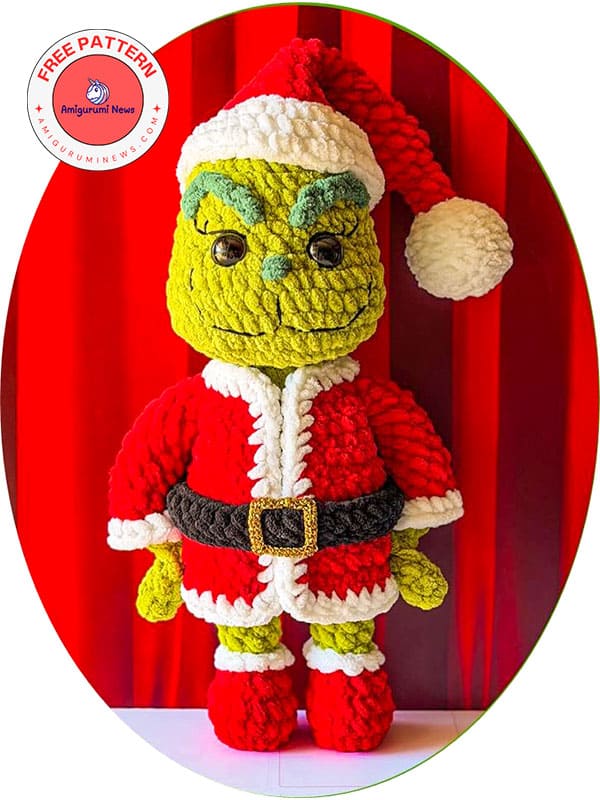
If you are looking for a holiday project that instantly grabs attention, this crochet doll inspired by the Grinch is a perfect choice. With its expressive face, bold green texture, and classic Santa outfit, this design captures the playful mischief of Christmas while staying cozy and handmade. A crochet Grinch doll is not just another seasonal toy—it becomes a decorative statement that adds personality to any festive corner.
The growing popularity of the crochet grinch doll pattern also comes from its versatility. You can adjust yarn thickness, facial expressions, or clothing details to create a version that feels uniquely yours. Some makers prefer a plush and chunky style, while others enjoy a more compact, detailed finish. Either way, this design appeals to both experienced crocheters and confident beginners looking to try something bold and festive.
Crochet grinch plush pattern
A well-designed crochet grinch plush pattern turns yarn into a story-filled decoration that feels warm and personal. Unlike simple ornaments, this plush-style crochet project allows for depth, texture, and expressive shaping. The soft body combined with festive colors makes it ideal for holiday décor, seasonal gifts, or even collector-style handmade toys.
Please forgive any inaccuracies in this amigurumi grinch plush pattern, as I translated it myself. However, I believe the detailed photos will be helpful. Merry Christmas and Happy New Year to all of you in advance. I wish everyone a wonderful year ahead. I am extremely happy to offer you new free amigurumi patterns as we enter 2026!
Yarn: Alize Velluto
5.00mm crochet hook
Pair of 20mm safety eyes
Yarn needle
Scissors
Stuffing
Hot glue stick, rigid straw, or a stick
Pins
Gold thread
Black yarn
Color palette: pistachio, forest, red, white, black
MR – magic ring
ch – chain
slst- slip stitch
sc – single crochet
inc – increase
inc3- three low points at the same point
dec- decrease
BLO-Back loop only
FLO- Front loop only
Rnd-round
(,): repeat what is in parentheses
(.): total stitch
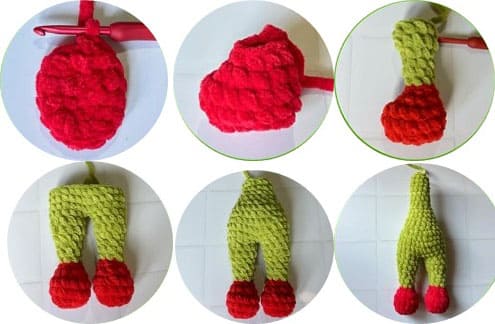
Head
Green pistachio color.
Rnd 1. MR 8sc (8)
Rnd 2. 8inc (16)
Rnd 3. (2inc, 2sc)x4 (24)
Rnd 4. 1sc, 2inc, (4sc, 2inc)x3, 3sc (32)
Rnd 5-10. 6rnds from 32sc (32)
Rnd 11. 9sc, 4 inc, 4sc, 4 inc, 11 sc (40)
Rnd 12-15. 4 rnds de 40sc (40)
Rnd 16. 9sc, 4 dec, 4sc, 4 dec, 11sc (32)
Rnd 17. 1sc, 2 dec, (4sc, 2dec)x3, 3sc (24)
Place your eyes between Rnd10 and Rnd11.
Rnd 18. (2dec, 2sc)x4 (16)
Rnd 19. BLO 16sc (16)
Rnd 20-27. 8 rnds from 16sc (16)
Rnd 28. 8 dec (8)
Cut the thread, leaving a long tail, and close the weaving.
Insert from Rnd19 to Rnd28 into the head to form the hollow in which the neck should go.
Details of the face
Forest color.
Eyebrows: chain 9 and place them with the fabric reversed, 1 sc above the eyes in the center and 2 sc above at the end.
Nose: draw it with three lines in the middle of the eyes.
Black.
Mouth: embroider it from side to side, forming a letter.
Eyelashes: outline it just above the eyes, with eyeliner and two eyelashes.
Body
Color red.
Rnd 1. 5ch, 3sc, 1 inc3, 2sc, 1inc (10)
Rnd 2. 1inc, 2 sc, 3 inc, 2 sc, 1 inc, 1 sc (15)
Rnd 3-4. 2 rnds from 15sc (15)
Rnd 5. 3sc, 5 dec, 2 sc (10)
Rnd 6. 3sc, 2 dec, 3sc (8)
Green pistachio color.
Rnd 7. BLO 8sc (8)
Rnd 8-9. 2 rnds from 8sc (8)
Rnd 10. (1sc, 1 inc)x4 (12)
Rnd 11-12. 2 rnds from 12sc (12)
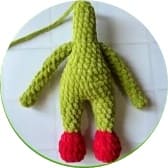
I repeat the same for the second leg and to Rnd12 add 5 additional sc and 2 ch, this to join it aligned to the first leg.
If you need one more or one less stitch, do it.
Now, the first single crochet you make will be the beginning of the rounds.
Rnd 13. 1sc (to join), 11sc, 2sc in the ch, 12sc, 2sc in the ch (28)
Rnd 14-16. 3 rnds from 28sc (28)
Rnd 17. (5sc, 1dec) x4 (24)
Rnd 18. 24sc (24)
Rnd 19. (2sc, 1 dec)x6 (18)
Rnd 20-21. 2 rnds from 18sc (18)
Rnd 22. 3sc, 1 dec, 8sc, 3sc (16)
Rnd 23. 16sc (16)
Rnd 24. (2sc, 1dec)x4 (12)
Rnd 25-31. 7 rnds from 12sc (12)
Insert a straw or silicone stick to give the neck firmness.
Rnd 32. 6 dec (6)
Arms X2
Green pistachio color
Rnd 1. MR 5sc (5)
Rnd 2-16. 15 rnds from 5 sc (5)
Attach them to the body between Rnd23 and Rnd24.
Shoe Details
White color:
Work 8 sc in the FLO of the rounds on both shoes.
Color red:
Rnd 1. hook into one of the stitches you left unknitted, and make 1 sc in each stitch found in these, knitting over the 3 stitches at the top, the 5 stitches at the bottom and the 2 stitches on the sides (10)
Rnd 2-10. 9 rnds from 10sc.
Cut the thread and finish off.
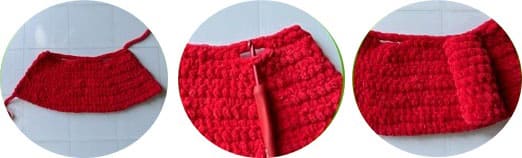
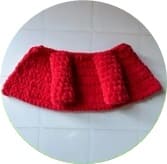
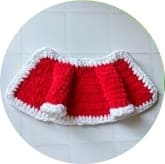
Coat details
White color:
Coat: crochet 1 sc over each visible stitch of the coat, and at the corners crochet 1 inc3
Cut the thread and finish off
Sleeves: taking the FLO, crochet (1sc, 1inc)x5 (15)
Cut the thread and finish off.
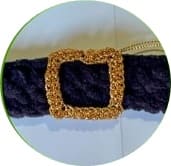
Belt
Color black.
Rnd 1. 41ch, she returns weaving 40sc (40)
Rnd 2. 40sc
Cut the thread and finish off.
Gold thread.
Buckle: 29 ch, return working 3 sc, 1 inc3, (6 sc, 1 inc3)x3, 3 sc (36)
Place it over the belt, right in the middle.
Finally, sew the belt to the coat.
Cap
Color black.
Rnd 1. MR 6sc (6)
Rnd 2. BLO 6 inc (12)
Rnd 3. BLO (1sc, 1 inc)x6 (18)
Rnd 4–6. BLO 3 rnds from 18sc (18)
Rnd 7. BLO (1sc, 1dec)x6 (12)
Rnd 8. BLO 6 dec (6)
Color red.
Rnd 9. FLO 6 sc (6)
Rnd 10-11. 2 rnds from 6sc (6)
Rnd 12. 6 inc (12)
Rnd 13-16. 4 rnds from 12sc (12)
Rnd 17. (1sc, 1 inc)x6 (18)
Rnd 18-20. 3 rnds from 18sc (18)
Rnd 21. (2sc, 1 inc)x6 (24)
Rnd 22-23. 2 rnds from 24sc (24)
Rnd 24. (1 inc, 3sc)x6 (30)
Rnd 25. 30sc (30)
White color.
Rnd 26. BLO 30slst (30)
Rnd 27. BLO (2sc, 1 inc, 2sc)x6 (36)
Rnd 28-29. 2 rnds from 36sc (36)
Cut the thread and finish off.
Sew the hat to the head, above the eyebrows.
Joining the body and head
Insert the neck of the body into the head opening.
Finally, to give the head more stability, sew both parts together.
To provide the best experiences, we use technologies like cookies to store and/or access device information. Consenting to these technologies will allow us to process data such as browsing behavior or unique IDs on this site. Not consenting or withdrawing consent, may adversely affect certain features and functions.
Functional
Always active
The technical storage or access is strictly necessary for the legitimate purpose of enabling the use of a specific service explicitly requested by the subscriber or user, or for the sole purpose of carrying out the transmission of a communication over an electronic communications network.
Preferences
The technical storage or access is necessary for the legitimate purpose of storing preferences that are not requested by the subscriber or user.
Statistics
The technical storage or access that is used exclusively for statistical purposes.The technical storage or access that is used exclusively for anonymous statistical purposes. Without a subpoena, voluntary compliance on the part of your Internet Service Provider, or additional records from a third party, information stored or retrieved for this purpose alone cannot usually be used to identify you.
Marketing
The technical storage or access is required to create user profiles to send advertising, or to track the user on a website or across several websites for similar marketing purposes.