
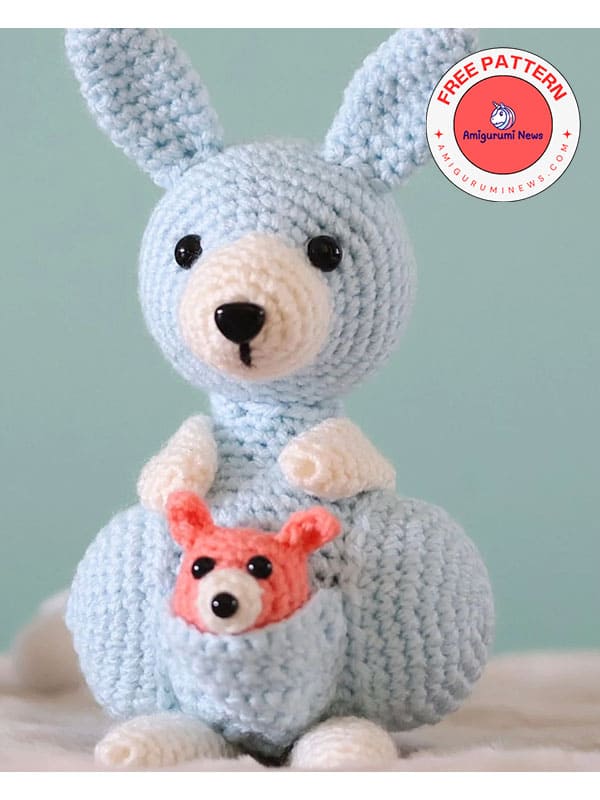
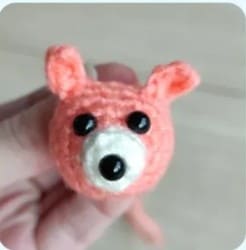
Free crochet kangaroo reily with you. If you have never crocheted a kangaroo before, you can do it by following this amigurumi pattern. This cute crochet kangaroo also has a baby kangaroo in its pouch. You will learn how to make it in this free crochet kangaroo pattern. You can make your cute kangaroo in any color you want. When made with a 3mm crochet hook and the specified materials, your kangaroo will be 18 cm in size.
Crochet kangaroo reily
Via: likealigercrochet
Materials:
Medium weight yarn in white, and 2 other colors (all from the same brand).
3mm (D-3) crochet hook.
Three 6mm safety eyes.
Pair of 8mm safety eyes.
10mm safety nose
Fiber fill.
Yarn needle.
Stitch markers.
Pins.
Scissors.
Abbreviations:
Rnd- round
MR- magic ring
st- stitch
sc- single crochet
slst- slip stitch
ch- chain
inc- increase
dec- decrease
Size- approx. 18 cm tall when made with the indicated yarn.
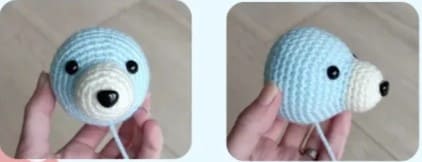
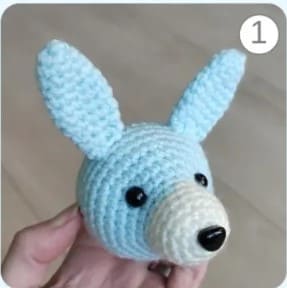
Head
Use white and any other color yarn.
Rnd 1 (in white yarn): start 6 sc in mr [6]
Rnd 2: inc in all 6 st [12]
Rnd 3: (sc in next st, inc in next st) x 6 [18]
Place the safety nose in the center of the mr.
Rnd 4-7 (4 rnds): sc in all 18 st [18]
Rnd 8 (in any other color yarn): sc in all 18 st [18]
Rnd 9: (sc in next 2 st, inc in next st) x 6 [24]
Rnd 10: (sc in next 3 st, inc in next st) x 6 [30]
Rnd 11: (sc in next 4 st, inc in next st) x 6 [36]
Rnd 12: (sc in next 5 st, inc in next st) x 6 [42]
Rnd 13-18 (6 rnds): sc in all 42 st [42]
Rnd 19: (sc in next 5 st, dec) x 6 [36]
Rnd 20: (sc in next 4 st, dec) x 6 [30]
Place the safety eyes between Rnd 9 and 10 with an interspace of 7 st.
Rnd 21: (sc in next 3 st, dec) x 6 [24]
Rnd 22: (sc in next 2 st, dec) x 6 [18]
Stuff the head firmly with fiberfill and continue stuffing as you go.
Rnd 23: (sc in next st, dec) x 6 [12]
Rnd 24: dec 6 times [6]
Slst in next st. Fasten off and weave in the yarn end.
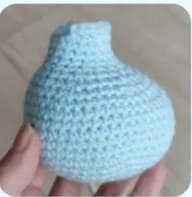
Body
Use the same color yarn as the bigger part of the head.
Rnd 1: start 6 sc in mr [6]
Rnd 2: inc in all 6 st [12]
Rnd 3: (sc in next st, inc in next st) x 6 [18]
Rnd 4: (sc in next 2 st, inc in next st) x 6 [24]
Rnd 5: (sc in next 3 st, inc in next st) x 6 [30]
Rnd 6: (sc in next 4 st, inc in next st) x 6 [36]
Rnd 7: (sc in next 5 st, inc in next st) x 6 [42]
Rnd 8: (sc in next 6 st, inc in next st) x 6 [48]
Rnd 9-14 (6 rnds): sc in all 48 st [48]
Rnd 15: sc in next 18 st, dec 6 times, sc in next 18 st [42]
Rnd 16: (sc in next 5 st, dec) x 6 [36]
Rnd 17: (sc in next 4 st, dec) x 6 [30]
Rnd 18: (sc in next 3 st, dec) x 6 [24]
Stuff the body firmly with fiberfill and continue stuffing as you go.
Rnd 19: (sc in next 2 st, dec) x 6 [18]
Rnd 20-23 (4 rnds): sc in all 18 st [18]
Now crochet one short row to make the back side of the neck a bit higher than the front. This will make it a bit easier to sew the head on later.
Row 1: turn, skip next st, sc in next 13 st
Slst in next st. Fasten off and leave a long tail.
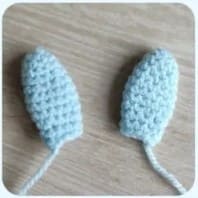
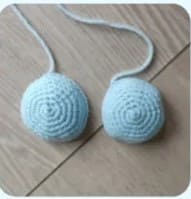
Ear (make two)
Use the same color yarn as the bigger part of the head.
Rnd 1: start 6 sc in mr [6]
Rnd 2: (sc in next st, inc in next st) x 3 [9]
Rnd 3-4: sc in all 9 st [9]
Rnd 5: (sc in next 2 st, inc in next st) x 3 [12]
Rnd 6-8 (3 rnds): sc in all 12 st [12]
Rnd 9: (sc in next 2 st, dec) x 3 [9]
Rnd 10-11: sc in all 9 st [9]
Slst in next st. Fasten off and leave a long tail. The ears don’t need to be stuffed.
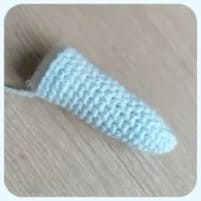
Thigh (make two)
Use the same color yarn as the body.
Rnd 1: start 6 sc in mr [6]
Rnd 2: inc in all 6 st [12]
Rnd 3: (sc in next st, inc in next st) x 6 [18]
Rnd 4: (sc in next 2 st, inc in next st) x 6 [24]
Rnd 5: (sc in next 3 st, inc in next st) x 6 [30]
Rnd 6: (sc in next 4 st, inc in next st) x 6 [36]
Rnd 7-8: sc in all 36 st [36]
Slst in next st. Fasten off and leave a long tail. The thighs will be stuffed while sewing.
Tail
Use the same color yarn as the body.
Rnd 1: start 6 sc in mr [6]
Rnd 2: (sc in next st, inc in next st) x 3 [9]
Rnd 3: sc in all 9 st [9]
Rnd 4: (sc in next 2 st, inc in next st) x 3 [12]
Rnd 5-10 (6 rnds): sc in all 12 st [12]
Rnd 11: (sc in next 3 st, inc in next st) x 3 [15]
Rnd 12-16 (5 rnds): sc in all 15 st [15]
Rnd 17: (sc in next 4 st, inc in next st) x 3 [18]
Rnd 18-20 (3 rnds): sc in all 18 st [18]
Slst in next st. Fasten off and leave a long tail. Stuff the tail firmly with fiberfill.
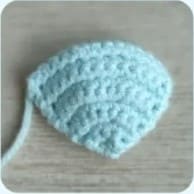
Pouch
Use the same color yarn as the body.
The pouch is worked in rows.
Ch 2, then start in the second st from the hook:
Row 1:3 sc in next st [3], ch 1, turn
Row 2: sc in next st, inc in next st, sc in next st [4], ch 1, turn,
Row 3: sc in next st, inc in next 2 st, sc in next st [6], ch 1, turn,
Row 4: sc in next 2 st, inc in next 2 st, sc in next 2 st [8], ch 1, turn,
Row 5: sc in next 2 st, inc in next st, sc in next 2 st, inc in next st, sc in next 2 st [10], ch 1, turn
Row 6: sc in next 3 st, inc in next st, sc in next 2 st, inc in next st, sc in next 3 st [12]
Row 7-9 (3 rows): sc in all 12 st [12], ch 1, turn
You can skip row 10 if you’re not making a joey. Continue with row 10 if you are making a joey.
Row 10: sc in next 4 st, inc in next st, sc in next 2 st, inc in next st, sc in next 4 st [14]
Sc down both sides of the pouch to give them a clean edge. Slst in next st. Fasten off and leave a long tail.
Hind leg (make two)
Use white yarn.
Rnd 1: start 6 sc in mr [6]
Rnd 2: (sc in next st, inc in next st) x 3 [9]
Rnd 3: sc in all 9 st [9]
Rnd 4: (sc in next 2 st, inc in next st) x 3 [12]
Rnd 5-15 (11 rnds): sc in all 12 st [12]
Stuff the legs not too firmly with fiberfill. Press the leg flat and sc through both sides. Slst in next st. Fasten off and leave a long tail.
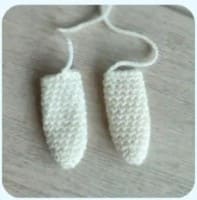
Arm (make two)
Use white yarn.
Rnd 1: start 6 sc in mr [6]
Rnd 2: (sc in next st, inc in next st) x 3 [9]
Rnd 3-10 (8 rnds): sc in all 9 st [9]
Press the arm flat and sc through both sides.
Slst in next st. Fasten off and leave a long tail.
The arms don’t need to be stuffed.
Baby kangaroo
Use white and a color that matches with the color of the mother.
Rnd 1 (in white yarn): start 6 sc in mr [6]
Rnd 2-3: sc in all 6 st [6]
Rnd 4 (in the other color yarn): inc in all st [12]
Rnd 5: (sc in next st, inc in next st) x 6 [18]
Rnd 6: sc in all 18 st [18]
You’re now going to crochet a round with two ears.
Rnd 7: sc in next 9 st, ch 4, then work back the chain starting in the second st from the hook, sc in next 3 st down the chain, slst in the same st as where the chain started, sc in next 4 st, ch 4, then work back the chain starting in the second st from the hook, sc in next 3 st down the chain, slst in the same st as where the chain started, sc in next 5 st [18]
Rnd 8 (skip the slip stitches from the previous round): sc in all 18 st [18]
Place the safety eyes between Rnd 4 and 5 with an interspace of 2 st and the other safety eye as a nose in the middle of the mr. Make sure the eyes line up with the ears.
Start stuffing the head and continue as you go.
Rnd 9: (sc in next st, dec) x 6 [12]
Rnd 10: dec 6 times [6]
Slst in next st. Fasten off. Make sure to leave a long tail.
Assembly
Sew the ears onto the head between Rnd 15 and 17 with an interspace of 5 stitches (picture 1).
Optional: shape the face by indenting the eyes.
(If you haven’t made a baby kangaroo, it’s best to sew the pouch onto the belly now, before sewing on the thighs).
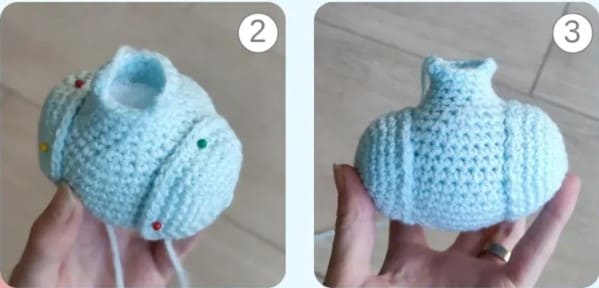
Use pins to position the thighs onto the sides of the body and then sew them on, approx. between Rnd 6 and Rnd 18 (pictures 2 and 3).
Make sure the bigger part of the body (and the higher part of the neck) is pointed backwards.
Use pins to position the head onto the body. You can make reily look forward or a bit more down. Sew the head on once you’re satisfied with the position.
Stuff the neck a bit more while sewing (picture 4).
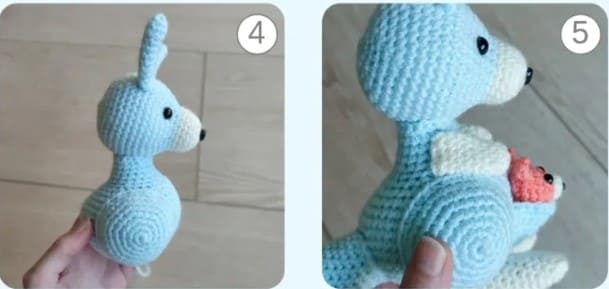
Use pins to position the arms pnto the sides of the body. Sew them on just above the thighs and make them point forward towards the belly (piture 5).
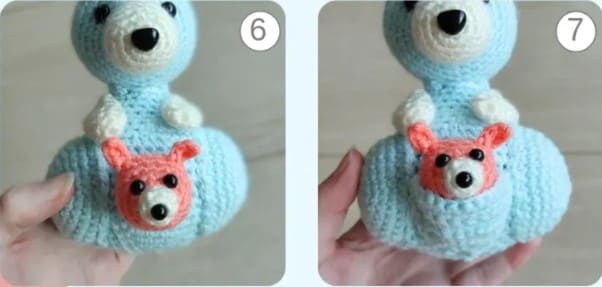
If you made a baby, sew the head of the baby kangaroo onto the middle of the belly, in between the thighs (picture 6).
Use pins to position the pouch around the underside of the baby kangaroo’s face.
Then sew the edges of the pouch onto the belly (picture 7).
Sew the base of the hind legs onto the middle of the underside of the body.
Make them point forward and secure them with a few stitches unto the underside of the belly (picture 8).
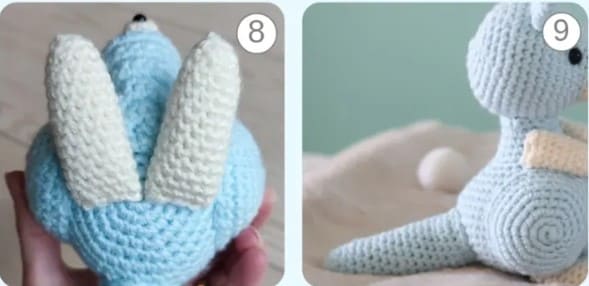
Sew the tail onto the back of the body (picture 9). If you like you can embroider a short vertical stripe down from the nose and / or eye brows and then you’re all finished.
Congratulations on your crochet kangaroo!


