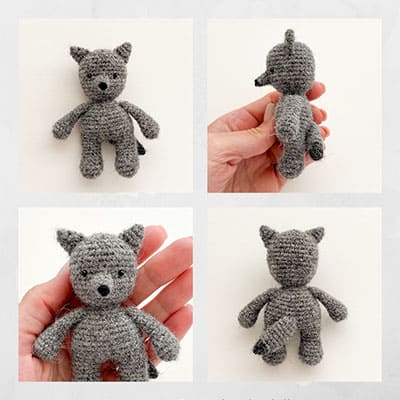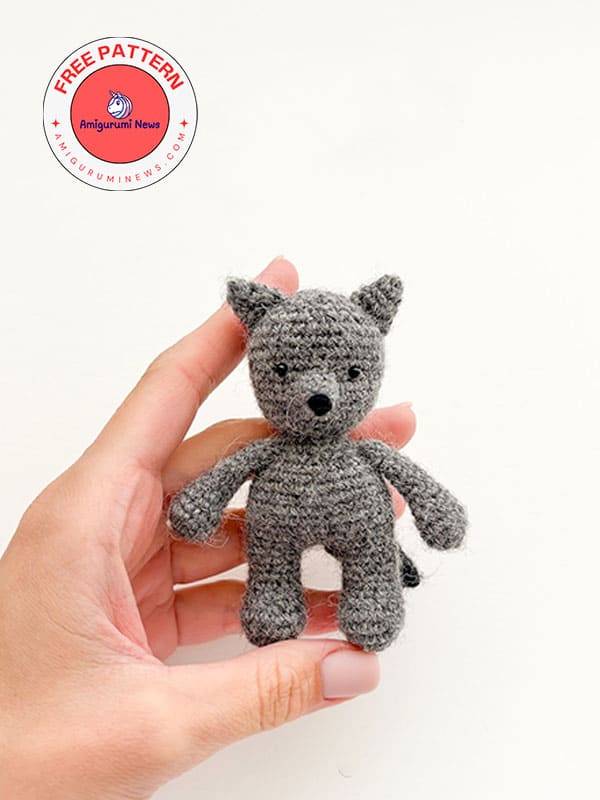
Good morning, we’ve reached the end of another beautiful week, and on the last day, we’re sharing this wonderfully cute crochet wolf pattern, designed by designer Scandistyle Dolls. This little crochet wolf will measure 10 cm tall when completed. If you’re looking to crochet animals for your children, I think this crochet wolf is definitely worth adding to your collection. It’s both easy to make and unique. Because it’s made with fuzzy alpaca yarn, it will have a very distinctive texture, creating a unique look. Here’s the step-by-step crochet wolf pattern below. You can also watch the designer’s step-by-step video tutorial explaining the wolf pattern.
Little crochet wolf amigurumi
Designer: scandistyle_dolls
Materials:
1. Yarn: drops alpaca (100% alpaca, 167 m/50 g, fingering weight) in main (gray) color and in black (a little for the tail).
2. Hook size: 2.0 mm.
3. Eyes size 3 mm, glue.
4. Polyester fiberfill, sewing needle, scissors, pins, black embroidery floss.
Size of the little wolf is about 10 cm (3.9″).
Abbreviations:
MR- magic ring
ch- chain
sc- single crochet
slst- slip stitch
inc- increase
dec- decrease
Legs (gray)
1 – 6 sc in MR
2- 6 inc (12)
3- (1 sc, inc)*6 (18)
4-5- 18 sc (2 rounds)
6- 6 dec, 6 sc (12)
7-11- 12 sc (5 rounds) – stuff.
Cut the thread on the first leg, make the second leg similarly, do not cut the thread on the second leg.
Continue crocheting the body. Make 3 ch from the second leg. Note: increases in the next round should be in front, on the belly. If this is not the case for you, then work them after the first leg, and not after the second leg as the pattern says.
12- 12 sc on the first leg, 3 sc
along the chain, 12 sc on the second leg, 1 inc, 1 sc, 1 inc (32) – place marker.
13- (7 sc, inc)*4 (36)
14-20- 36 sc (7 rounds)
21- (4 sc, dec)*6 (30)
22- 30 sc
23- (3 sc, dec)*6 (24)
24- (2 sc, dec)*6 (18)
25- (1 sc, dec)*6 (12)
26- 12 sc
Then work the round to the middle of the back, stuff the legs and body tightly. Next we will crochet the head, do not cut the thread.
2- Head (continue)
27- 12 inc (24)
28- (1 sc, inc)*12 (36)
29-37- 36 sc (9 rounds)
38- (4 sc, dec)*6 (30)
39- (3 sc, dec)*6 (24)
40- (2 sc, dec)*6 (18)
41- (1 sc, dec)*6 (12) – stuff.
42- 6 dec
Cut the thread, tighten the opening with a needle grabbing the front loops of the remaining stitches, secure the thread and weave in the ends.
3- Arms (make 2, gray)
1- 6 sc in MR
2- 6 inc (12)
3-5- 12 sc (3 rounds)
6- 3 dec, 6 sc (9)
7-13- 9 sc (7 rounds)
Stuff the lower part of the arm. Cut the thread, leaving the end for sewing. Fold the edges of the arm together and sew them up with a needle.
4- Ears (make 2, gray)
1- 4 sc in MR
2- (1 sc, inc)*2 (6)
3- (2 sc, inc)*2 (8)
4- (3 sc, inc)*2 (10)
Cut the thread, leaving the end for sewing. Fold the edges of the ear together and sew them up with a needle.
5- Muzzle (gray)
1- 4 sc in MR
2- (1 sc, inc)*2 (6)
3- (2 sc, inc)*2 (8)
4- (3 sc, inc)*2 (10)
Do not stuff. Cut the thread, leaving the end for sewing.
6 – Tail
Start with black.
1- 6 sc in MR
2- 6 sc
3- (1 sc, inc)*3 (9)
Change to gray, cut off the black thread.
4- (2 sc, inc)*3 (12)
5-10- 12 sc (6 rounds)
11- (2 sc, dec)*3 (9)
12- (1 sc, dec)*3 (6)
Do not stuff. Tighten the opening with a needle grabbing the front loops of the remaining stitches; secure the thread, leaving the end for sewing.
7 – Assembly
1- Sew on the ears on the sides of the head from rounds 4 to 7 (count from the crown).
2 – Using black embroidery floss, embroider a nose on the tip of the muzzle (in the first round). Then sew the muzzle to the head between rounds 11 and 13.
3- Glue the eyes between rounds 10 and 11, leaving about 5 stitches between them (or adjust the position to your liking).
4- Sew on the arms one round lower the neck.
5- Sew the tail to the back of the toy. I attached mine slightly at an angle, approximately at rounds 14-15 of the body.