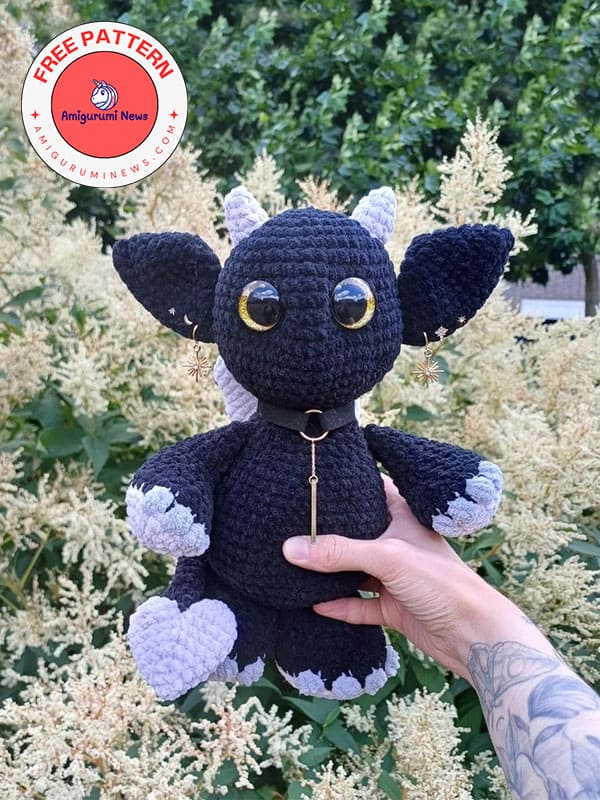
If you’re passionate about crocheted animals and adore fantasy creatures, you’ll adore this adorable crochet dragon. Designed with love, this soft and cuddly crochet dragon is perfect for anyone who enjoys handmade toys or wants to add a touch of the legendary to their amigurumi collection.
Whether you’re an experienced crocheter or just starting out in the magical world of amigurumi, this free amigurumi pattern is designed to be fun, beginner-friendly, and incredibly rewarding. Now you can easily learn how to make this unique crochet dragon plush.
3 colours of chenille yarn (pale pink, white and grey)
4-5 mm crochet hook.
Darning needle.
Stuffing material.
Safety eyes (I used glittering ones in 25mm)
Stitch markers
Abbreviations:
sc= single crochet
inc= increase
dec= decrease
mr= magic ring
st= stitch
ch= chain
pc= popcorn stitch
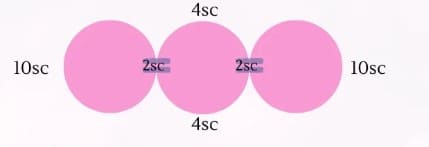
Make 2, white:
1) 6 sc in mr (6)
2) 6 inc (12)
3) 12 sc (12)
Finish off. Make a second one, but don’t finish off.
Crochet the first and secound one together with 2sc.
The finish off and make a third one. Don’t finish off, but crochet the second and third one together with 2sc. Make sure to connect them in the middle. This is how it should look like:
4&5) 28 sc (all around, don’t crochet into the 2sc connection stitches)
6) (5sc, dec)x4 (24)
7) (4sc, dec)x4 (20)
8) (3sc, dec)x4 (16)
9) (2sc, dec)x 4 (12) – start stuffing –
10) (sc, dec)x4 (8)
Finish off & leave a tail for sewing.
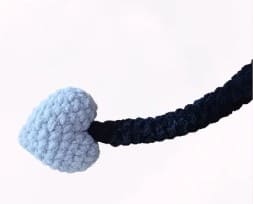
Tail
In white:
1) 6 sc in mr
2) 6 inc (12)
3) 12 sc (12)
Finish off, crochet a second one (don’t finish off). Connect
them with 2sc through both loops on the inside of the heart. Don’t crochet into these 2 stitches in the following rounds.
4&5) 20sc
6) (3sc, dec)x4 (16)
7) (2sc, dec)x4 (12)
Start stuffing.
8) (sc, dec)x4 (8)
9) 4dec (8)
Finish off, sew closed.
In main colour:
1) 6sc in mr
2-18) or until desired length: 6sc
19) (dec, sc)×2 (4)
Finish off, close and sew it onto the heart.
Sew the other end of the tail to the body.
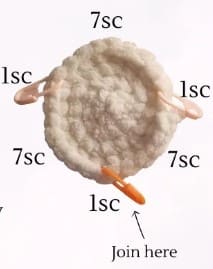
Feet
Make 2, white:
1) 6sc in mr (6)
2) (3sc in one st, sc)x3 (12)
3) sc, inc, 2sc, 3inc, 2sc, inc, 2sc (17)
4) 2sc, inc, 4sc, (3sc in one st)x2, 4sc, inc, 3sc (23)
5) 3sc, inc, sc, (inc, 2sc)x4, inc, sc, inc, 3sc (30)
6) inc, 6sc, (inc, 2sc)x2, 3sc in one st, (2sc, inc)x2, 10 sc (37)
Before finishing off this part, mark the stitches: count into the direction you crochet (beginning at the next stitch unworked you would crochet into) and mark the 6th st, then count into the other direction, place marker like this, with 10st inbetween.
Join with the main color where the yellow st marker is (13th stitch counted from a blue marker).
Change the grey only for the pc.
7) 14 sc in BLO, pc, (2sc in BLO,pc)x3, 13 sc in BLO (37)
8) 37 sc (37)
9) 2sc, dec, (3sc,dec)x2, 10 sc, dec, 5 sc, dec, 4 sc (32)
10) (6sc,dec)x4 (28)
11) (5sc,dec)x4 (24)
12) (2sc,dec)x6 (18) – start stuffing.
13) (sc,dec)x6 (12)
Finish off, leave a tail for sewing.
Arms
Make 2, white:
1) 6sc in mr
2) sc, 4sc in one st, 2sc, 4sc in one st, sc (12)
3) (sc, inc)x6 (18)
4) (2sc, inc)x6 (24)
Mark the stitches: count into the direction you crochet and mark the 3rd st. Then count further into the direction and place another marker 8st away (7st in between).
They just indicate where the claws will be.
Join with the main colour 8st away from both markers.
In R5 we will do some colour changes (main colour and grey)
Change to grey only for the pc.
5) 9 sc in BLO, pc, (sc,pc)x3, 8 sc in BLO
6) 24 sc
7) 9sc, 4 dec, 7 sc (20)
8) 3 inc, 4sc, dec, (sc,dec)x2, 5 sc (20)
9) (3sc,dec)x4 (16)
10) (2sc,dec)x4 (12)
11-13) 12 sc (3 rounds), stuff the paw only
14) 3 dec, 6 sc (9)
15) (sc,dec)x3 (6)
Sew or crochet the edges together with 3 sc.
Finish off and leave a tail for sewing.
Details and sewing
Eye shaping: to create a little more shape and a little “nose”, pinch the eyes together and sew back and forth inserting the yarn (main colour) right on the inner part of the eye and bringing it out at the inner part of the other eye. Then insert again (use another st close). Repeat some times and pull it as tight as you like it. If you want to watch a video tutorial, you can look for ” how to indent amigurumi eyes” on YouTube.
Recommended placements for sewing (feel free to adjust as you like)
• Arms: row 19
• Feet: rows 2-6
• Wings: rows 18-20
• Ears: rows 10-14
• Horns: rows 3-5
• Tail: rows 7-9
To provide the best experiences, we use technologies like cookies to store and/or access device information. Consenting to these technologies will allow us to process data such as browsing behavior or unique IDs on this site. Not consenting or withdrawing consent, may adversely affect certain features and functions.
Functional
Always active
The technical storage or access is strictly necessary for the legitimate purpose of enabling the use of a specific service explicitly requested by the subscriber or user, or for the sole purpose of carrying out the transmission of a communication over an electronic communications network.
Preferences
The technical storage or access is necessary for the legitimate purpose of storing preferences that are not requested by the subscriber or user.
Statistics
The technical storage or access that is used exclusively for statistical purposes.The technical storage or access that is used exclusively for anonymous statistical purposes. Without a subpoena, voluntary compliance on the part of your Internet Service Provider, or additional records from a third party, information stored or retrieved for this purpose alone cannot usually be used to identify you.
Marketing
The technical storage or access is required to create user profiles to send advertising, or to track the user on a website or across several websites for similar marketing purposes.