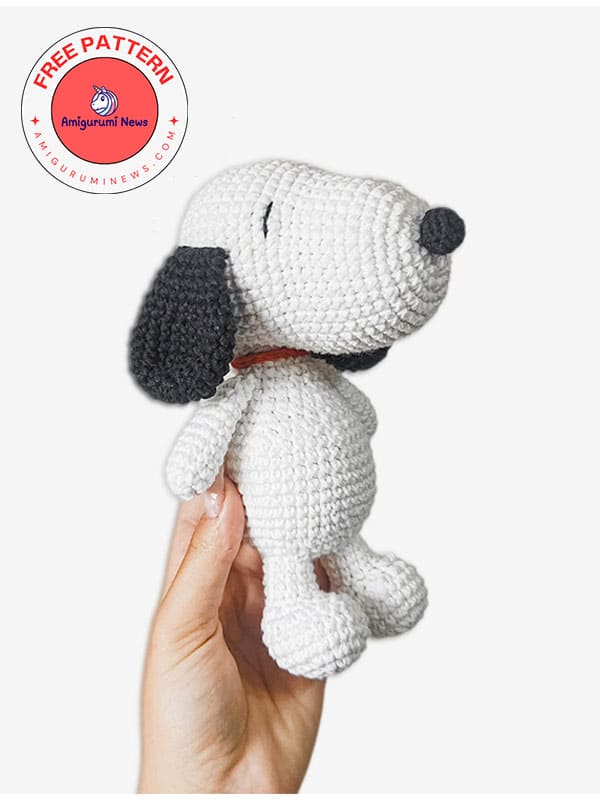
If you’re a fan of the iconic Peanuts amigurumi and Snoopy animated character, you’ll love this free Snoopy amigurumi pattern. Whether you’re an advanced amigurumi master or a beginner, this Snoopy crochet amigurumi toy will make a great addition to your crafting collection.
This adorable amigurumi version of Snoopy captures all the charm and nostalgia of the beloved cartoon character. With its simple stitches and simple design, this project is both fun and easy to make, making it ideal for crochet beginners and Snoopy fans alike.
Crochet Your Own Snoopy with This Free Amigurumi Pattern Tutorial
This Snoopy amigurumi tutorial is designed for beginners, with clear steps that guide you through the entire process. No advanced skills required! If you can work basic stitches like single crochet, increases, and decreases, you’re ready.
Unlike many amigurumi patterns that require complex shaping, this Snoopy pattern is kept simple, focusing on Snoopy’s distinctive appearance: his large nose, floppy ears, and slightly tilted head. You’ll create each piece—head, body, arms, legs, ears, and nose—separately and then assemble them to bring your amigurumi dog pattern to life. Have a wonderful Sunday, and here’s a wonderful Snoopy amigurumi pattern for you.
Rnd 1. 6sc in Magic Ring (6sc)
Rnd 2. (6 inc in a row) (12sc)
Rnd 3. (1sc, inc) repeat (18sc)
Rnd 4. (2sc, inc) repeat (24sc)
Rnd 5. (3sc, inc) repeat (30sc)
Rnd 6. (4sc, inc) repeat (36sc)
Rnd 7-13. (single sc) repeat (36sc)
Rnd 14. (10sc, inc, 2sc, inc, 2sc, inc, 2sc, inc, 2sc, inc, 2sc, inc, 10sc) (42sc)
Rnd 15. (8sc, 4sc, inc, 4sc, inc, 4sc, inc, 4sc, inc, 4sc, inc,, 8sc) (48sc)
Rnd 16-23. 23 (single sc) repeat (48sc)
Rnd 24. (6sc, dec) repeat (42sc)
Rnd 25. (5sc, dec) repeat (36sc)
Rnd 26. (4sc, dec) repeat (30sc)
Rnd 27. (3sc, dec) repeat (24sc)
Rnd 28. (2sc, dec) repeat (18sc)
Rnd 29. (1sc, dec) repeat (12sc)
Rnd 30. (6dec, in a row) repeat (6sc)
Finish with sl st and cut the yarn leaving a long strip, we thread that strip on our yarn needle and pass the needle through each of the 6 sc that remain, we adjust, make a knot and hide the yarn inside the fabric we embroider the details of the eyes and smile if we choose to do it.
Ears
Rnd 1. 6sc in Magic Ring (6sc)
Rnd 2. (6 inc in a row) (12sc)
Rnd 3. (1sc, inc) repeat (18sc)
Rnd 4. (2sc, inc) repeat (24sc)
Rnd 5-8. (single sc) repeat (24sc)
Rnd 9. (4sc, dec) repeat (18sc)
Rnd 10-11. (single sc) repeat (18sc)
Rnd 12. (1sc, dec) repeat (12sc)
Rnd 13-14. (single sc) repeat (18sc)
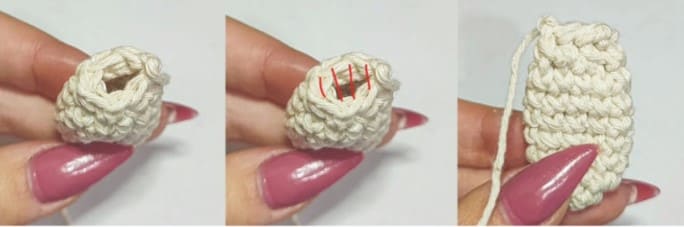
Finish with sl st and cut the yarn leaving a long strip and with that strip we sew the ears as follows (illustrative image of another project so the color can be seen better)
And we sew the ears to the head.
Body
Rnd 1. 6sc in Magic Ring (6sc)
Rnd 2. (6inc in a row) (12sc)
Rnd 3. (1sc, inc) repeat (18sc)
Rnd 4. (2sc, inc) repeat (24sc)
Rnd 5. (3sc, inc) repeat (30sc)
Rnd 6. (4sc, inc) repeat (36sc)
Rnd 7. (5sc, inc) repeat (42sc)
Rnd 8-14. (single sc) repeat (42sc)
Rnd 15. (5sc, dec) repeat (36sc)
Rnd 16. (4sc, dec) repeat (30sc)
Rnd 17. (3sc, dec) repeat (24sc)
Rnd 18-19. (single sc) repeat (24sc)
Rnd 20. (2sc, dec) repeat (18sc)
Rnd 21-22. (single sc) repeat (18sc)
Finish with sl st, cut the thread and sew the body to the head.
Paws
Rnd 1. 6sc in Magic Ring (6sc)
Rnd 2. (3sc inside 1sc, 1 inc 1sc) repeat (12sc)
Rnd 3. (3sc, 3 inc in a row, 3sc, 3 inc in a row) (18sc)
Rnd 4. (1sc, inc, 1sc, inc, inc, 1sc, inc, 3sc, inc, 1sc, inc, inc, 1sc, inc, 2sc) (24sc)
Rnd 5-7. (single sc) repeat (24sc)
Rnd 8. (6 dec in a row, 10slst, 2 dec) (18sc)
Rnd 9. (5 dec in a row, 2sc, 1 dec, 4sc) (12sc)
Rnd 10-13. (single sc) repeat (12sc)
Finish with sl st, cut the thread and sew the legs to the body.
Arms
Rnd 1. 6sc in Magic Ring (6sc)
Rnd 2. (6 inc in a row) (12sc)
Rnd 3-11. (single sc) (12sc)
Rnd 12. (2sc, dec) repeat (9sc)
Finish with sl st, cut the thread and sew the arms in the same way we sewed the ears, then sew the arms to the body.
Nose
Only the nose is made with 1m of fine 8/3 thread or material of the same thickness and a 2.0 needle.
Rnd 1. 7sc in Magic Ring (7sc)
Rnd 2. (7 inc in a row) (14sc)
Rnd 3-4. (single sc) repeat (14sc)
Rnd 5. (2sc, dec, 1sc, dec, 2sc, dec, 1 sc, dec) (10sc)
Tail
Rnd 1. 5sc in Magic Ring (5sc)
Rnd 2-6. (single sc) repeat (5sc)
Finish with sl st, cut the thread and with that thread we sew the tail to the body.
Necklace
For the necklace we only make 22 chains with red thread, we finish with sl st and sew to the neck
Spot
Rnd 1. 6sc Magic Ring (6sc)
Rnd 2. (6 inc in a row) (12sc)
Rnd 3. (3sc, 3 inc in a row, 3sc, 3 inc in a row) (18sc)
Finish with sl st, cut the thread and sew the stitch to the body.
To provide the best experiences, we use technologies like cookies to store and/or access device information. Consenting to these technologies will allow us to process data such as browsing behavior or unique IDs on this site. Not consenting or withdrawing consent, may adversely affect certain features and functions.
Functional
Always active
The technical storage or access is strictly necessary for the legitimate purpose of enabling the use of a specific service explicitly requested by the subscriber or user, or for the sole purpose of carrying out the transmission of a communication over an electronic communications network.
Preferences
The technical storage or access is necessary for the legitimate purpose of storing preferences that are not requested by the subscriber or user.
Statistics
The technical storage or access that is used exclusively for statistical purposes.The technical storage or access that is used exclusively for anonymous statistical purposes. Without a subpoena, voluntary compliance on the part of your Internet Service Provider, or additional records from a third party, information stored or retrieved for this purpose alone cannot usually be used to identify you.
Marketing
The technical storage or access is required to create user profiles to send advertising, or to track the user on a website or across several websites for similar marketing purposes.