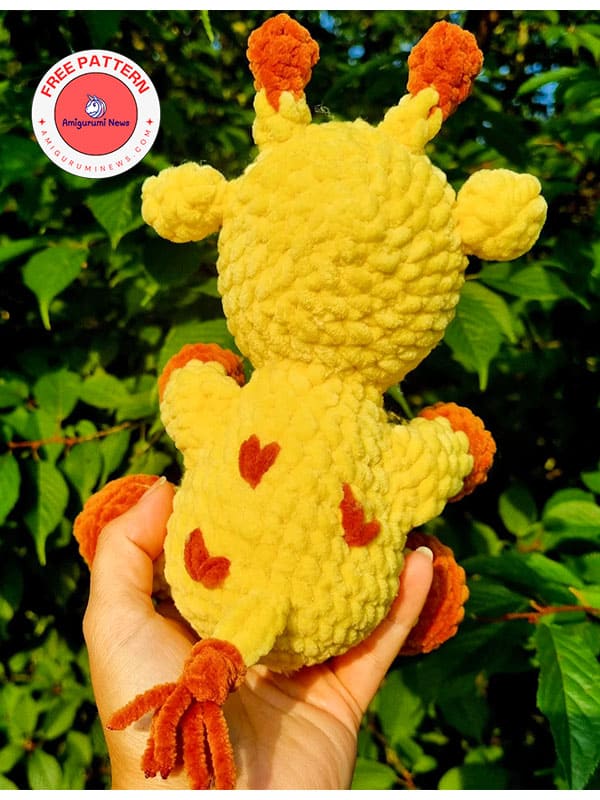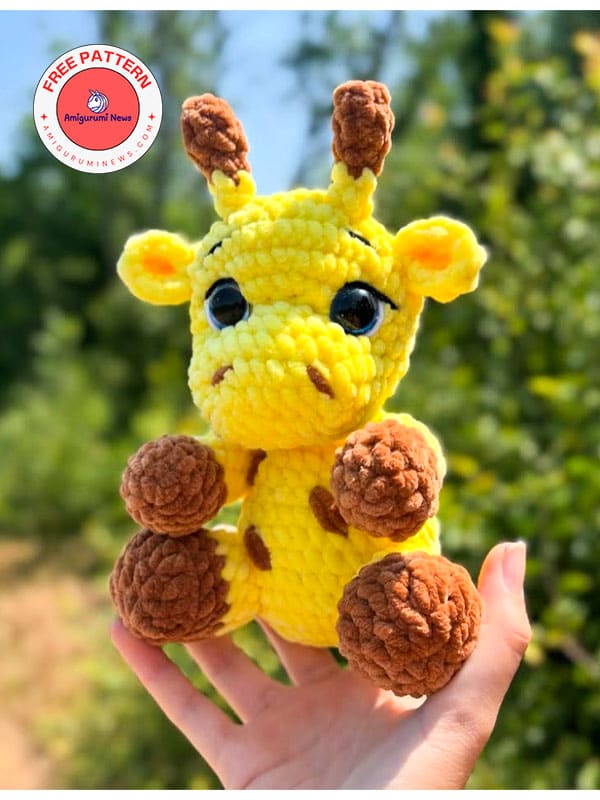
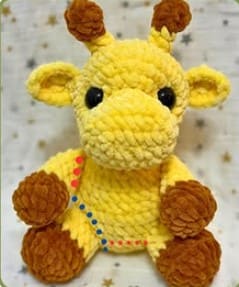
A very cute crochet giraffe pattern named Ginny is with you. This amigurumi crochet giraffe pattern is with us today with detailed and step-by-step explanation. I think you will understand easily since it is supported by many detailed visuals explaining how to do it. You should take a look at the very cute crochet giraffe pattern that everyone can do now. Since it is an easy giraffe amigurumi, I think everyone will be able to do it. Follow me for this type of crochet safari animals and share this cute ginny giraffe with your loved ones.
Ginny the crochet giraffe pattern
Via: vale_amigurumi2024
Abbreviations:
MR: magic ring
ch: chain
sc: single crochet
slst: slip stitch
hdc: half double crochet
hdc inc: half double crochet increase
dc: double crochet
inc: increase
dec: decrease
BLO: back loop only
FLO: front loop only
FO: fasten off
Materials:
• Chenille yarn (or any yarn of your choice)
• 3.5mm hook (or any hook fitting your yarn)
• Fiber filling
• Black and white cotton yarn
• Needle for sewing
• Scissors
• Stitch marker
• Safety eyes (18mm)
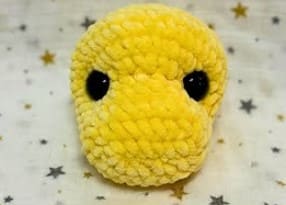
Head
In main color.
Chain 7. Start from 2nd ch from the hook.
R1. inc, 4sc, 4 sc in the last ch, on the other side of the chain 4 sc, inc (16)
R2. inc, 5sc, (1sc,inc)x2, 4 sc, inc, 1 sc (20)
R3. 2sc, inc, 4sc, (2sc,inc)x2, 6 sc, inc (24)
R4-5. 24 sc (2 rounds) (24)
R6. 3sc, FLO 7 inc, 14 sc (31)
R7. 3sc, (1sc,inc)x7, 14 sc (38)
R8-9. 38 sc (2 rounds) (38)
R10. (17sc,dec)x2 (36)
Insert the safety eyes between round 6-7 with 5 inc in between.
The increases should be in the center. Depending on your tension you can adjust it by adding or removing sc before the increases.
Stuff the muzzle firmly and the head as you go.
R11. (4sc,dec)x6 (30)
R12. (3sc,dec)x6 (24)
R13. (2sc,dec)x6 (18)
R14. (1sc,dec)x6 (12)
R15. dec x6 (6)
FO and leave a tail to close the hole using the FLO of round 15.
Body
In main color.
Stuff as you go.
R1. MR 8 sc
R2. inc x8 (16)
R3. (inc,sc)x8 (24)
R4. (2sc,inc)x8 (32)
R5-9. 32 sc (5 rounds) (32)
R10. (2sc,dec)x8 (24)
R11-12. 24 sc (2 rounds) (24)
R13. (1sc,dec)x8 (16)
R14-15. 16 sc (2 rounds) (16)
FO and leave a tail to sew the head.
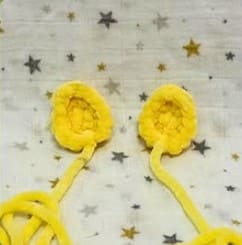
Arms X2
Start with contrast color.
R1. MR 6 sc
R2. inc x6 (12)
R3. (1sc,inc)x6 (18)
R4. (1sc,dec)x6 (12)
Stuff the head.
R5. (2sc,dec)x3 (9) – color change to main color.
R6-10. 9 sc (5 rounds) (9)
Do not overstuff.
Fold in half and do 4 sc through both sides.
Leave a long tail to sew.
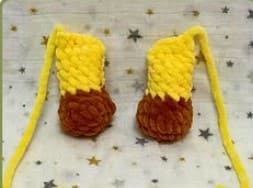
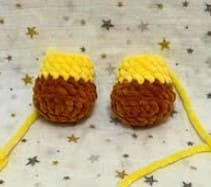
Legs X2
In contrast color.
R1. MR 6 sc.
R2. inc, hdc, inc, 2dc, inc, hdc, inc, inc (12)
R3. 1sc, inc, hdc, hdc, inc, dc, 2 dc, inc, dc, hdc, inc, hdc, inc, sc (18)
R4. BLO: 18 sc (18)
R5. (2sc,dec)x4, 2 sc (14)
Color change to main color.
R6-8. 14 sc (3 rounds) (14)
Stuff and FO. Leave a long tail to sew.
Ossicones X2
In contrast color.
R1. MR 4 sc
R2. (1sc,inc)x2 (6)
R3. 6sc (6)
R4. (1sc,dec)x2 (4)
Color change to main color.
R5-6. 4 sc (2 rounds) (4)
Do not stuff. Fasten off and leave a long tail to sew.

Ears X2
In main color.
R1. MR 6 sc
R2. 2 inc, [1hdc, 1 dc], [1 dc, 1 hdc], 2 inc (12)
Fold in half and do 2 slst through both sides. FO and leave a long tail to sew.
Tail
Attach the yarn on the centre of the back between R4 and R5 and chain 5. Then sc back in to the chain and slst where you have attached the yarn.
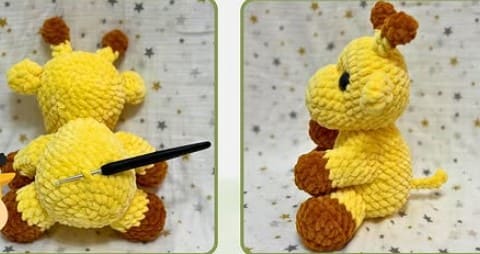
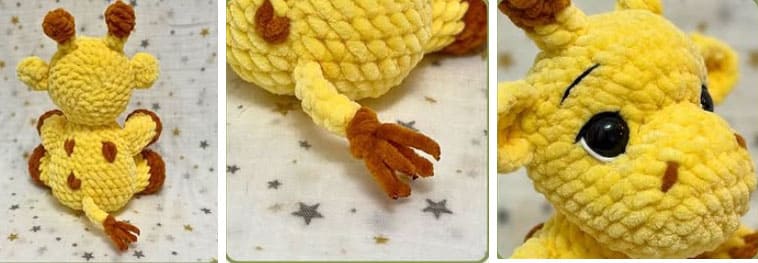
Assembly
• Sew the ossicones between R10 and R11 4 sc apart.
• Sew the ears 3 sc to the side of the ossicones, 2 rounds away from the eyes.
• Sew the head to the body, between R6 and R10 of the head.
• Sew the arms to the body between R10 and R13.
• Sew the legs between R5 and R8 with 6 sc in between.
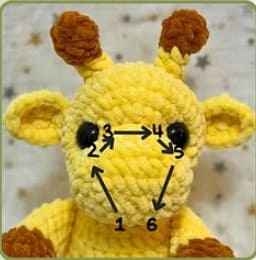
Face shaping
For the face shaping:
Insert the needle in point 1, come out through point 2, insert the needle in point 3, and come out through point 4.
Then insert the needle through point 5 and come out through point 6- one stitch to the side of point 1. Pull the tail until you reach your desired result and fasten off.
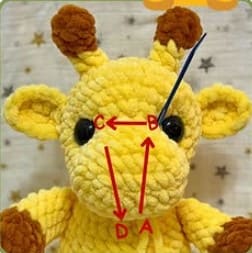
For the muzzle shaping:
Insert the needle through point A, come out through point B, insert the needle in point C and come out through point D- one stitch to the side of point A.
Pull the tail until you reach your desired result and fasten off.
Details
For the spots:
Cut a piece of yarn in contrast color (50cm/20inch) and make some spots on the back and on the belly of the giraffe.
Cut a piece of yarn (about 20cm/8 inch long) in contrast color and fold it in three. Pull a loop up in the last stitch of the tail and pull the loose ends through that loop, then pull tihgt.
With a scissors trim the ends. I recommended you to burn it lightly with a lighter, so the ends don’t shed.
For the eyes details:
Cut a tail of the white cotton yarn and embroider the sclera. Then cut a tail of the black cotton yarn and embroider the eyelid/eyelashes and eyebrows.
Congrats! You finished making giraffe ginny!