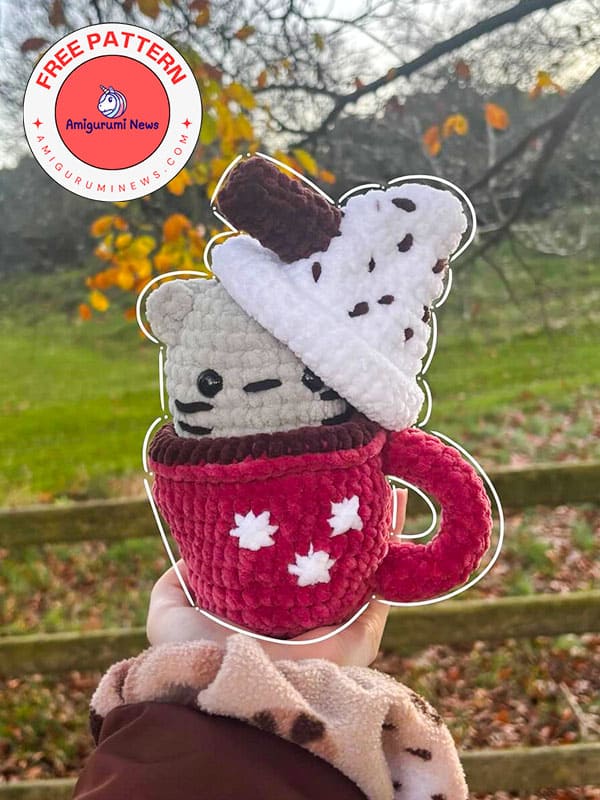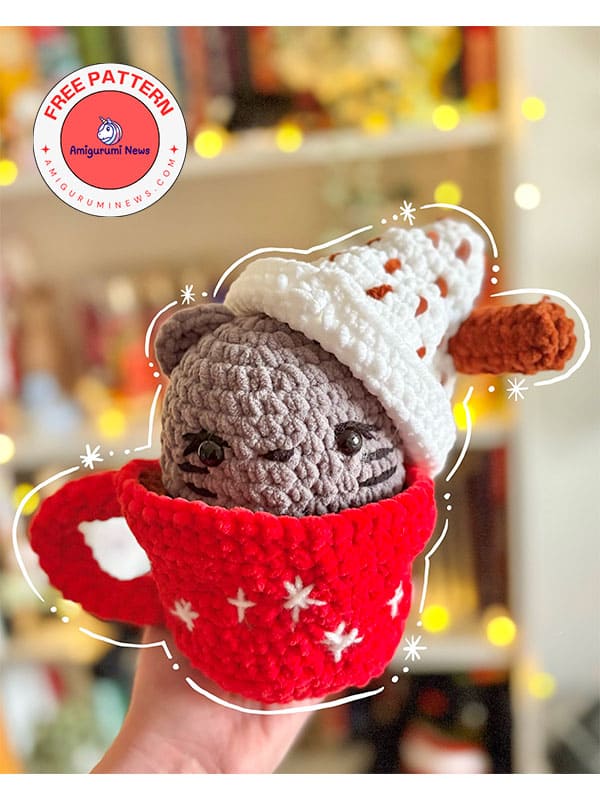
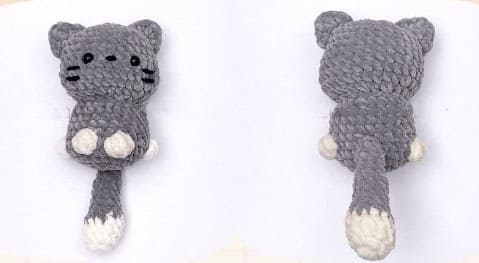
How about a cute little amigurumi cat in a hot chocolate mug? I think it would make a wonderful Christmas gift. You can make this cute little crochet amigurumi cat for home decor and gift-giving during the Christmas season. You’ll put a surprise crocheted cat inside a hot chocolate mug that looks delicious and creamy. It’s a great idea, I really liked it, and I think you will too. You can make the hot chocolate mug in different colors, and even adjust the colors of the crochet cat to your liking.
Hot chocolate crochet cat pattern
Okay, now let’s get to how to make this crochet cat in a crochet hot chocolate mug. First, we’ll start by making the cat. Then we’ll make the hot chocolate cream, the cinnamon stick, and the cup. You can display the crocheted cat inside the cup or next to it. Enjoy the pleasure of making two different amigurumi pieces from a single amigurumi pattern. Merry Christmas to all of you!
Designer: annaslittlething_crochet
Materials:
• Large cat: made with #5 weiht chenille yarn and a 5 mm hook. (finished size 19 cm).
• Small cat: made with #3.5 weight acrylic / cotton yarn and a 3.5 mm hook. (finished size: 8 cm).
• Colors: red, cream white, chocolate, white, light brown, light gray, black.
• 9mm or 5mm safety eyes.
• Fiberfill stuffing.
• Stitch markers.
• Yarn needle.
• Scissors.
Abbreviations:
MR: magic ring
R: round/row
ch: chain
st(s): stitch(es)
slst: slip stitch
sc: single crochet
hdc: half double crochet
dc: double crochet
inc: increase
dec: decrease
FLO: front loop only
BLO: back loop only
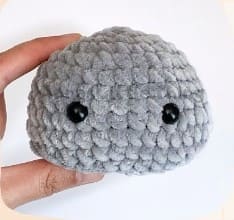
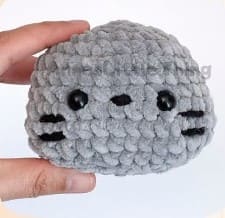
Head
Using light gray yarn.
Work in continuous rounds.
Use a stitch marker to mark the beginning of each round.
R1: 6 sc in a MR [6]
R2: 6 inc [12]
R3: (sc, inc) x 6 [18]
R4: (sc, inc. sc) x 6 [24]
R5: (3 sc. inc) x 6 [30]
R6-R8: 30 sc for 3 rounds [30]
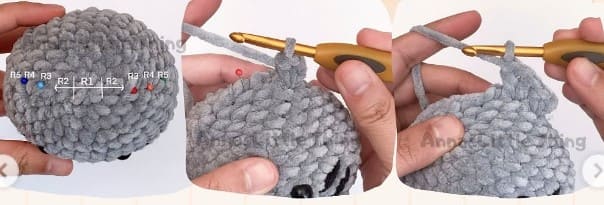
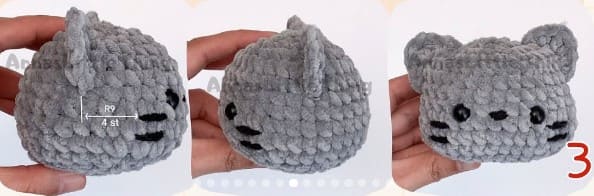
Place a stitch marker at the front of the middle st of R9, this will be the center of the face.
R9: 9 sc. 3 inc, 6 sc. 3 inc, 9 sc [36]
Insert safety eyes between R8 and R9, placing them 5 sts apart on either side of the marked center stitch in R9.
R10: 36 sc [36]
R11:9 sc. 3 dec, 6 sc, 3 dec. 9 sc [30]
R12 (3 sc, dec) x 6 [24]
R13: (sc, dec, sc) x 6 [18]
R14: (sc, dec) x 6 [12] Stuff with fiberfill.
R15: 6 dec [6]
F/O and close the hole.
• Use black yarn to embroider the nose between the eyes, covering 1 st in width.
• Sew the whiskers on each side of the eyes. positioned between R9-R10 and R10-R11, each covering 2 sts, as shown in the photos.
Right Ear
Join light gray yarn to R5 of the head.
• ch 1. in the same st make 2 hdc.
• Then insert hook into R4, make (dc, ch 1. dc) in the same stitch.
• Then insert hook into R3, make 2 hdc in the same st. sl st to finish off. F/O, weave in the ends.
Left Ear
Attach light gray yarn to R3 of the head on the opposite side.
• ch 1. in the same st make 2 hdc.
• Then insert hook into R4, make (dc, ch 1. dc) in the same stitch.
• Then insert hook into R5. make 2 hdc in the same st. sl st to finish off. F/O. weave in the ends.
Body
Work in continuous rounds.
Using light gray and cream white yarn.
Color Guide: the gray parts will stay the same, and the white parts will
be underlined.
BO (bobble stitch): Work 5 unfinished dc in the same st. yarn over and pull through all loops on hook.
Start with light gray yarn.
R1: 8 sc in a MR [8]
R2: 8 inc [16]
R3: (sc, inc) x 8 [24]
R4: 2 sc. BO, 2 sc. BO, 4 sc, BO. 10 sc. BO, 2 sc [24]
R5-R9: 24 sc for 5 rounds [24]
R10: (2 sc, dec) x 6 [18]
F/O. leave a long tail for sewing.
Stuff with fiberfill.
Assembly: Sew the body to R13 of the head.
Tail
Work in continuous rounds.
Start with cream white yarn.
R1: 6 sc in a MR [6]
R2: 6 inc [12]
R3-R4: 12 sc for 2 rounds [12]
Change to gray yarn.
R5: (2 sc, dec) x 3 [9]
R6-R8: 9 sc for 3 rounds [9]
R9: (sc, dec) x 3 [6]
R10-R12: 6 sc for 3 rounds [6]
Stuff with fiberfill as you go.
F/O. leaving a long tail for sewing.
Assembly: Sew the tail to the back of the body between R3-R5. leaving about 4 sts of space between the tail and each foot.
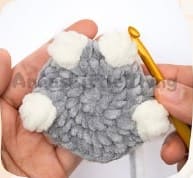
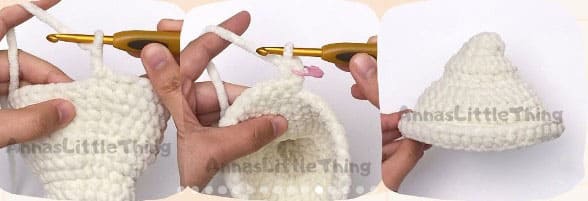
Cream
Work in continuous rounds.
Using cream white yarn.
R1: 6 sc in a MR [6]
R2: 6 inc [12]
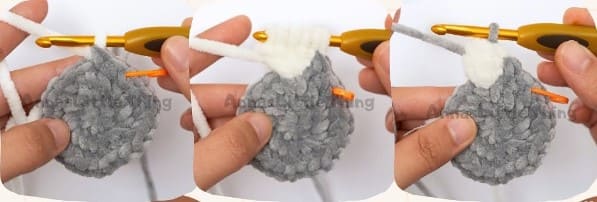
Place a stitch marker in the first inc of R3.
This will mark the right side of the cream.
R3: 2 inc. 3 sc. 2 dec. 3 sc [12]
R4: 12 sc [12]
R5: FLO. 12 inc [24]
R6: 24 sc [24]
R7: (sc, dec) x 8 [16]
R8: FLO. 16 inc [32] R9: 32 sc [32]
R10: (7 sc, inc) x 4 [36]
R11-R12: 36 sc for 2 rounds [36]
R13: (8 sc, inc) x 4 [40]
R14-R15: 40 sc for 2 rounds [40]
Turn your work so the cream’s top is facing up (reverse direction).
The beginning ch 1 does not count as a stitch for R16-R17.
R16: ch 1. BLO, sc in the same st. 39 sc, sl st to the first st [40]
R17: ch 1, sc in the same st. 39 sc. sl st to the first st [40]
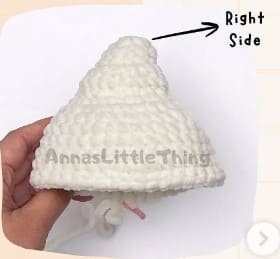
F/O. weave in the ends.
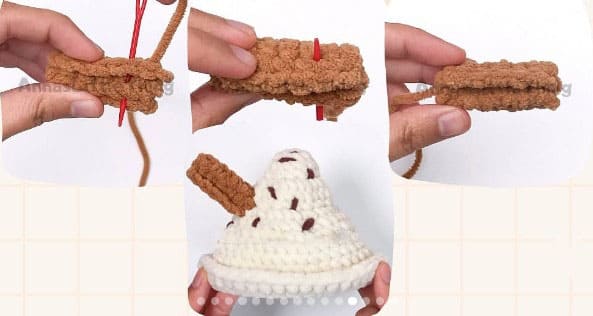
Cinnamon stick
Work in rows.
Using light brown yarn.
R1: ch 7, turn, starting from the 2nd chain from hook. 6 sc [6]
R2-R10: ch 1, turn, 6 sc for 9 rounds [6]
F/O, leaving a long tail for sewing.

Assembly:
Roll the piece horizontally starting from R1.
Using a yarn needle and the yarn tail, insert the needle from top to bottom through the piece, then from bottom to top into the next stitch.
Be careful not to pick up the stitches from R10 while sewing.
Do not F/O. Use the remaining yarn to sew the cinnamon stick to the left side of the cream, between R6-R8.
Using chocolate yarn, embroider chocolate powder on the cream.
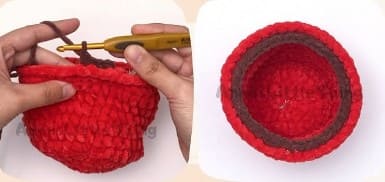
Mug
Using red, chocolate and white yarn.
Work in joined rounds from R1-R12.
Slst to the first stitch at the end of each round.
The beginning ch 2 counts as 1 hdc.
Using red yarn.
R1: In a MR, ch 2, then make 7 hdc join with slst to the first hdc [8]
R2: ch 2, hdc in the same st, 7 hdc inc, join with slst [16]
R3: ch 2, hdc inc, (hdc,hdc inc)x7, join with slst [24]
R4: ch 2, hdc inc, hdc, (hdc, hdc inc, hdc)x7, join with slst [32]
R5: ch 2, BLO, 6 hdc, hdc inc, (7hdc, hdc inc)x3, join with slst [36]
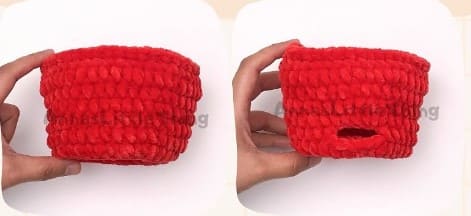
R6: ch 2, 25 hdc, ch 4, skip 4 sts, 6 hdc, join with slst [36]
R7: ch 2, 7 hdc, hdc inc, (8 hdc, hdc inc)x3, join with slst [40]
R8-R9: ch 2, 39 hdc, join with slst [40]
R10: ch 2, 8 hdc, hdc inc, (9hdc, hdc inc)x3, join with slst [44]
The beginning ch 1 does not count as a stitch for R11-R12.
R11: ch 1, sc in the same st, 43 sc, join with slst [44]
R12: FLO, ch 1, sc in the same st, 43 sc, join with slst [44]
F/O, weave in ends.
Top layer
With the cup opening facing you, attach chocolate yarn to the BLO of mug R12.
R1: ch 1, sc in the same st, make 43 sc around.
Join with slst to the first st [44]
F/O, weave in ends.
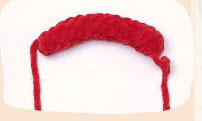
Handle
Using red yarn. Work in continuous rounds from R2.
Leave a long tail at the beginning for sewing.
R1: ch 6, join to the first ch with a slst to from a loop, then ch 1
R2-R16: 6 sc for 15 rounds [6]
Slst to the first st.
F/O, leaving a long tail for sewing.
Stuff the handle lightly with fiberfill.
Assembly:
• Using the yarn tail, sew both open ends to the mug body at R5-R6 and R11-R12.
• Using white yarn, embroider snowflake patterns on the mug.

Well done!