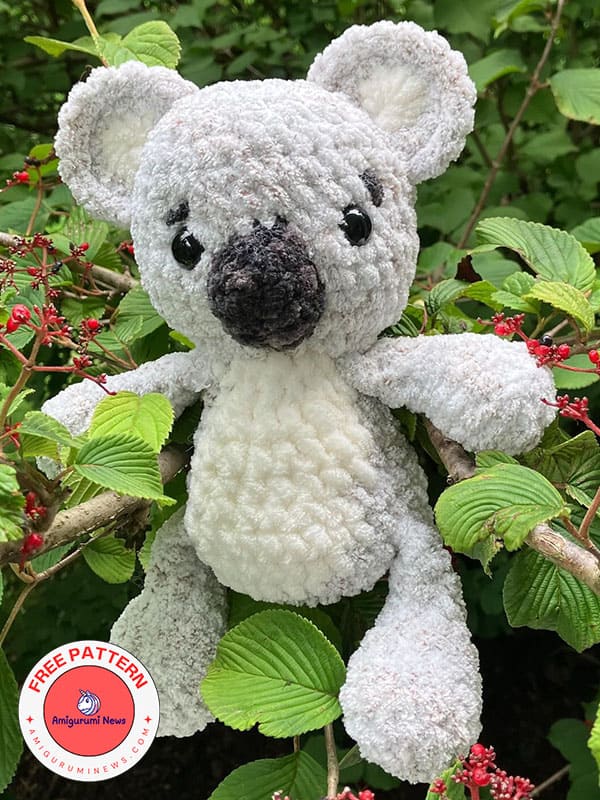
Here’s a low-seam crochet koala pattern. This way, you can easily create your own amigurumi koala without having to learn any sewing techniques. It’s incredibly easy and perfect for beginners looking for a tutorial. This crochet koala pattern can actually be used to make a teddy bear. All you need to do is change the small details, like the ears and nose. Follow this wonderful amigurumi koala pattern now to create a handmade amigurumi for your child.
• Multiple yarn colour(s) of your choice (I used Bernat Blanket/Sweet Snuggles Lite for mine)
• Hook: usually 2 sizes smaller than recommended by the yarn company (I use 5.5mm/6mm)
• Safety Eyes: Recommendation of 14mm (not recommended for children under 3 years of age)
• Yarn Needle
• Scissors
• Stuffing
• Stitch Markers
• Optional: Fabric Glue (I use it to make sure my embroidery details hold well)
• Optional: White, Pink & Black cotton or acrylic yarn/embroidery thread for face details
• Optional: Lighter (I use a lighter to burn the ends of my plush yarn to prevent shedding)
• Optional (for Keychain): Key ring, twist tie, small button
Abbreviations:
MR-Magic Ring (a.k.a Magic Circle) — or you can chain 2 to start
Rnd Round
F/O-Fasten Off
BLO-Back Loop Only
FLO-Front Loop Only
CC-Colour Change
ch-Chain
ss-Slip Stitch
Sc-Single Crochet Stitch
hdc-Half Double Crochet
dc-Double Crochet
tr-Treble Crochet
inc-Single Crochet Increase (2 sc in one stitch)
dec-Single Crochet Decrease (sc 2 together)
st/sts-Stitch/Stitches
rep – Repeat
(…) x 8-Repeat the instructions in the bracket the number of times indicated […] Total number of stitches at the end of that round
{…} Multiple stitches worked in the same stitch
Legs (Make 2- Grey):
Rnd 1: 8sc in MR [8]
Rnd 2: inc x 8 [16]
Rnd 3-4: 16sc around [16] (2 Rounds)
Rnd 5: 4sc, dec x 4, 4sc [12]
Rnd 6: 4sc, dec x 2, 4sc [10]
Note: Stuff firmly and do not stuff after this point.
Rnd 7: (2sc, dec) x 2, 2sc [8]
Rnd 8-10: 8sc around [8] (3 Rounds)
Note: Make sure that your ending stitch is at the “back” of the leg so that the leg can be folded for crocheting into the body. Depending on your tension you may need to add or take away a stitch or two in the last round. The curved part of the leg is the “front”. No need to leave a long tail as we will crochet these into the body later. F/O and set aside for later.
Arms (Make 2- Grey):
Rnd 1: 8sc in MR [8]
Rnd 2: (sc, inc) x 4 [12]
Rnd 3: 12sc around [12]
Rnd 4: 4sc, dec x 2, 4sc [10]
Rnd 5: 3sc, dec x 2, 3sc [8]
Note: Stuff firmly and do not stuff after this point.
Rnd 6: 2sc, dec x 2, 2sc [6]
Rnd 7-8: 6sc around [6] (2 Rounds)
Note: Make sure that your ending stitch is at the “back” of the arm so that the arm can be folded for crocheting into the body. Depending on your tension you may need to add or take away a stitch or two in the last round. The curved part of the arm is the “front”. No need to leave a long tail as we will crochet these into the body later. F/O and set aside for later.
Note: If you are not comfortable with colour changes you can just make a grey body for the Koala. If you are making colour changes make sure they are lining up properly as shown in the picture of the Koala.
Body + Head (Start in Grey)
Rnd 1: 8sc in MR [8]
Rnd 2: inc x 8 [16]
Rnd 3: (sc, inc) x 8 [24]
Rnd 4: (sc, inc, sc) x 8 [32]
Rnd 5: 13sc, (CC-White) 6sc, (CC-Grey) 13sc [32]
Note: In the next Rnd we will be crocheting in the legs. Your stitch marker to indicate the start of the Rounds should be at the back. Meaning the curved part of the feet should be facing away from the stitch marker. The underlined 4sc stitches indicate where we are crocheting in the legs.
Rnd 6: 6sc, 4sc, 2sc, (CC-White) 8sc, (CC- Grey)2sc, 4sc, 6sc [32]
Rnd 7: 11sc, (CC-White) 10sc, (CC-Grey) 11sc [32]
Rnd 8: (sc, dec, sc) x3 (CC-White) (sc, dec, sc) x 2, sc, (CC-Grey) (dec, 2sc) x 2, dec, sc [24]
Rnd 9-10: 8sc, (CC-White) 8sc, (CC-Grey) 8sc [24] (2 Rounds)
Rnd 11: (sc, dec, sc) x 2 (CC-White) (sc, dec, sc) x 2, (CC-Grey) (sc, dec, sc) x 2 [18]
Rnd 12: 6sc, (CC-White) 6sc, (CC-Grey) 6sc [18]
Note: Stuff firmly.
Note: In the next Rnd we will be crocheting in the arms. Depending on your tension you may need to move where you place your arms. Make sure they are appropriately at the side of the body in line with the legs. We will be decreasing in the arms as well. For this you cannot use the invisible decrease method. The underlined stitches indicate where we are crocheting in the arms.
Rnd 13: sc, dec, sc, dec, sc, (CC-White) (dec, sc) x 2, (CC-Grey) dec, sc, dec [12]
Rnd 14: FLO inc x 12 [24]
Rnd 15: FLO (sc, inc, sc) x 8 [32]
Rnd 16-22: 32sc around [32] (7 Rounds)
Rnd 23: (sc, dec, sc) x 8 [24]
Note: Insert safety eyes between Rnds 19-20 about 5 visible stitches apart.
Rnd 24: (sc, dec) x 8 [16]
Start Stuffing.
Rnd 25: dec x 8 [8]
Finish Stuffing. F/O and sew hole closed by weaving the tail through the FLO and pulling tightly. Make a few knots and hide the yarn tail in the body.
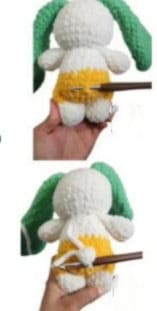
No Sew BO Tail (Body Coloured – Reference pictures are not part of the pattern): Find the mid-point between the legs on the body. With a slip stitch on your hook insert the hook in the appropriate stitch and make the following stitches:(ss,BO,ss). Fasten off and pass the two yarn tails through the same stitch, tie them together and make some knots before hiding the tails inside the body.
Option 1 – Two Tone Ears (Make 2):
Important: This type of ear requires sewing. If you do not want to sew use the second option for making plain ears.
Note: The ears are essentially 2 pieces crocheted together. We will first make the white ears and then make the grey ears one at a time.
Start in White (Make 2)
Rnd 1: 8sc in MR [8]
Fasten Off.
Start in Grey (Make 2)
Rnd 1: 8sc in MR [8]
Note: The “wrong side is the one that has the yarn tail from starting the MR. Place the “wrong” side of the white ear against the “wrong” side of the grey ear. Go through both sets of ears for Rnd 2.
Rnd 2: Ch1 and turn (sc, inc) x 4 [12]
Rnd 3: Ch1 and turn 12sc around [12]
Fasten off and leave a long tail for sewing. The ear will be sewn 3 to 4 stitches away from the eyes and about 10 stitches away from each other (counting from the top of the head between the ears). They are sewn between Rnds 20-23 in a curve.
Nose (Black):
1. Chain 4
2. Starting in the second chain from the hook and working around the chain make: inc, sc, inc x 2, sc, inc [10]
3. 10sc around [10]
4. F/O leaving a long tail for sewing
5. The nose is lightly stuffed and sewn between the eyes spanning Rnds 16-20.
Note: The pictures are just for reference and not part of this pattern, but the technique works exactly the same way.
Option 2-One Tone Ears (Make 2):
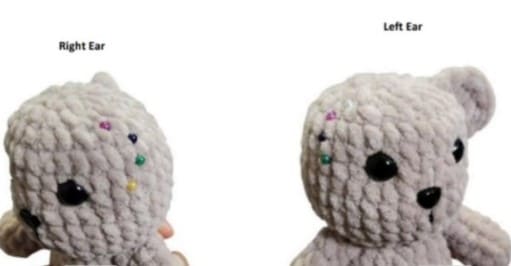
The ear should be curved in shape as shown in the picture. Start by marking (with pins/stitch markers) exactly where you want your ear to be starting and ending. Ensure that you are about 2-3 stitches away from the eyes. The ears are constructed between Rnds 20-23.
For the RIGHT ear, with the eyes facing you, insert your hook into your marked spot in Rnd 20 and go up to Rnd 23 as you make the ear.
1. Start by making a slip stitch on your hook and inserting into the marked stitch
2. Rnd 20: slip stitch
3. Rnd 21: (sc, 2dc)
4. Rnd 22: (2dc, sc}
5. Rnd 23: slip stitch and fasten off.
6. F/O and bring both yarn tails out through the same stitch, knot the tails together and hide in the body.
For the LEFT ear, with the eyes facing you, insert your hook into your marked spot in Rnd 23 and go down to Rnd 20 as you make the ear. You will be following the same instructions to make the left ear as you did for the right.
Note: The pictures are just for reference and not part of this pattern, but the technique works exactly the same way.
Face Sculpting (Optional):
This is an optional step to ensure that the eyes “sink” into the face and make the nose/snout area more prominent.
I use cotton yarn for this as it is much stronger in a colour as close to the body colour as I can find. I find that plush yarn tends to break if you pull too hard.
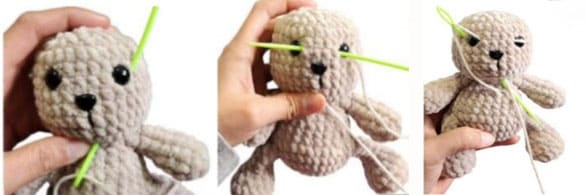
Start by inserting your needle in the bottom center of the face and coming out on the outside of the left eye as seen in the first picture.
Go over the eye and insert the needle into the inner corner of the left eye and come out at the inner corner of the right eye as seen in the second picture. Pass the yarn over the eye again and insert the needle into the outer corner of the right eye and bring the needle out in the same stitch you initially started at the beginning.
Pull tightly on the two yarn tails until the eyes sink in and you cannot see the thread you used. Tie two knots while pulling tightly. Cut the yarn and hide the yarn tails inside the body.
Details:
• Eyes (White cotton/ embroidery floss): You can add white around the outside of the eyes if desired. You can also put a minimal amount of fabric glue to hold it down if desired.
• Eyebrows (Optional – black cotton/ embroidery floss): Sewn diagonally across 2 stitches in Rnd 21. You can also put a minimal amount of fabric glue to hold it down if desired.
• Blush (Optional – use the same yarn type as used for the body in pink): Start on the outside corner of the eye. The blush should span 2 sts across horizontally.
To provide the best experiences, we use technologies like cookies to store and/or access device information. Consenting to these technologies will allow us to process data such as browsing behavior or unique IDs on this site. Not consenting or withdrawing consent, may adversely affect certain features and functions.
Functional
Always active
The technical storage or access is strictly necessary for the legitimate purpose of enabling the use of a specific service explicitly requested by the subscriber or user, or for the sole purpose of carrying out the transmission of a communication over an electronic communications network.
Preferences
The technical storage or access is necessary for the legitimate purpose of storing preferences that are not requested by the subscriber or user.
Statistics
The technical storage or access that is used exclusively for statistical purposes.The technical storage or access that is used exclusively for anonymous statistical purposes. Without a subpoena, voluntary compliance on the part of your Internet Service Provider, or additional records from a third party, information stored or retrieved for this purpose alone cannot usually be used to identify you.
Marketing
The technical storage or access is required to create user profiles to send advertising, or to track the user on a website or across several websites for similar marketing purposes.