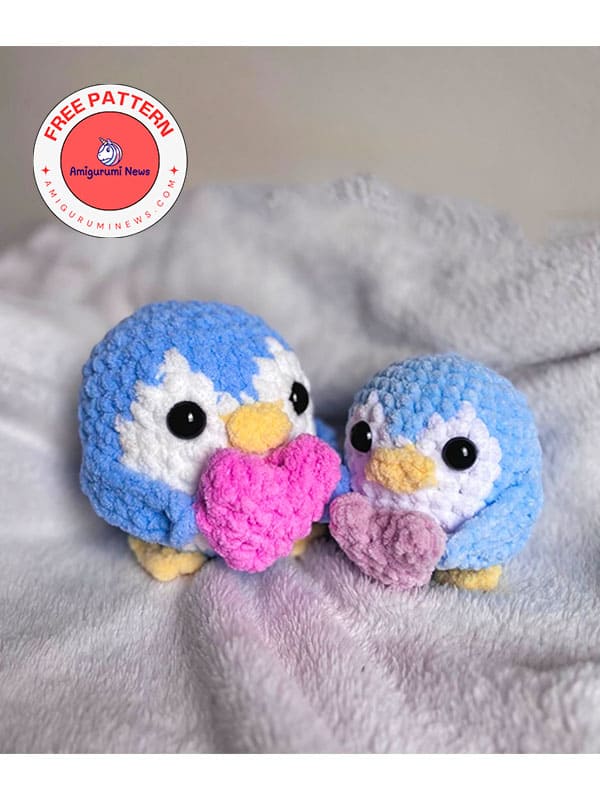
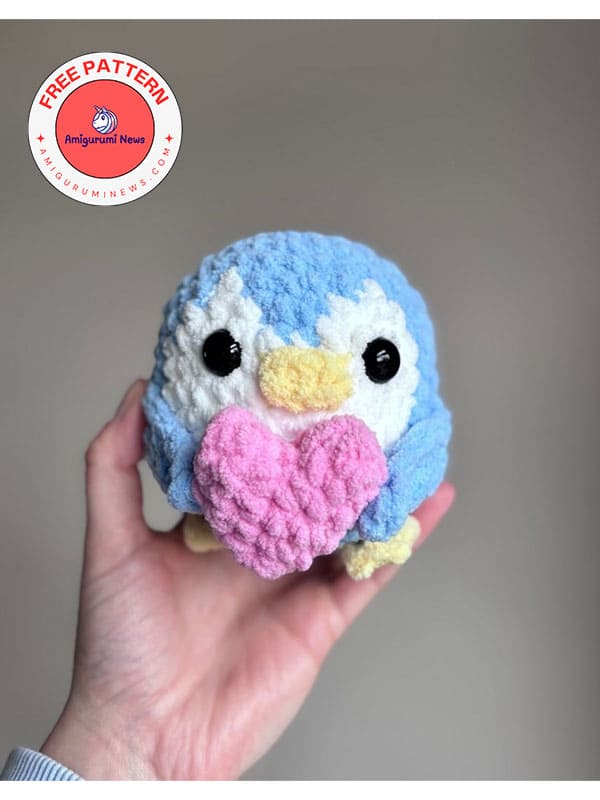
This cute crochet penguin plush is designed for Valentine’s Day. It has a crochet heart in its hand. You can make this wonderfully cute crochet penguin plush amigurumi toy for that special person you love. I can’t think of a cuter gift than this free crochet penguin pattern. I think it will make a great gift. It is also a very fun pattern for children. It is very suitable for beginners as it requires low stitches. Follow this free crochet penguin pattern step by step right now and complete it.
Yarn of your choice.
Crochet hook.
Tapestry needle.
Stitch markers.
Safety eyes (10mm).
Stuffing.
Abbreviations:
MR: magic ring
Slst: slip stitch
Sc: single crochet
Ch: chain
Inc: increase
Dec: decrease
FO: fasten off
Smaller penguin: fluttery chunky yarn and 4mm hook.
Bigger penguin: so crafty chenille yarn and 5mm hook.
Colors: blue, white, yellow, pink.
Note: we will be working with two colours.
The main body (blue) will be in black text.
The belly (white) will be in blue text.
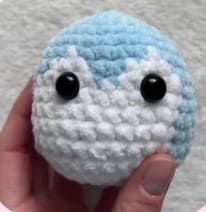
Head/body
R1. 6 sc in MR (6)
R2. 6 inc (12)
R3. (1sc,1inc)x6 (18)
R4. (2sc,1inc)x6 (24)
R5. (3sc,1inc)x6 (30)
R6. sc all around (30)
R7. 12sc, 1sc, 4sc, 1sc, 12 sc (30)
R8. 11sc, 3sc, 2sc, 3sc, 11 sc (30)
R9-13. 10sc, 10sc, 10sc (30) (5 rounds)
R14-15. 11sc, 8sc, 11sc (30) (2 rounds)
Place eyes between R9-10 around 5 st’s (or 3 visible st’s) apart.
R16. (1sc,1dec)x10 (20)
Start stuffing and continue to stuff as you go along.
R17. dec all around (10)
R18. dec all around (5)
FO and sew the hole closed.
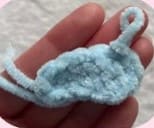
Beak
With orange or yellow yarn.
R1. ch3
R2. Starting in the second ch from the hook, 2sc, slst in the last ch (2)
FO and leave a long tail for sewing.
Flippers (make 2)
Using the main body colour.
R1. ch7
R2. starting in the second ch from the hook, 5sc, 3 sc in last ch.
Now work on the other side of the ch: 4sc, 3sc in last ch (15)
FO and leave long tail for sewing.
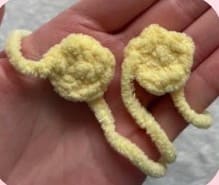
Feet (make 2)
Using the same colours as the beak.
R1. 5 sc in MR
R2. (1sc,slst in same st)x3 (leave last two stitches unworked)
FO, and leave long tail for sewing.
Heart
1st part:
R1. 6 sc in MR (6)
R2. 6 sc (6)
FO and leave a tail (you might need the tail for closing a space between the two pieces later on). 2nd part:
Repeat R1-2 but do not FO.
Join to part 1 with a sc (this will be your first sc of the round).
R3. 5 sc around the part 1, 6 sc around part 2 (12)
R4. 12 sc all around (12)
R5. (2sc,1dec)x3 (9)
If you are stuffing the heart, start stuffing here.
R6. (1sc,1dec)x3 (6)
R7. 3 dec (3) (this might be hard to do due to the size- you can sew closed in this cade).
Finish stuffing the heart.
FO, leave a long tail for sewing, and sew the hole closed.
Assembly
Beak: The beak should be sewn on the centre of the face/body, between the eyes, and should be between R9-10 and R11-12.
Feet: Make sure the 3sc’s you made on the final round of the feet are facing forward.
The back of the feet need to be sewn in line the final round of the body. The inner sides of the feet are sewn onto R17 of the body and outer sides between R15-16.
Only sew the back half of the feet on so that they stick up from the front a little bit.
Flippers: The top of the flipper needs to be sewn 2 st’s away from the eyes and between R9-10.
Have the flipper at a slight angle so it can hold the heart in front of the body.
Make sure the flippers can reach the sides of the heart before sewing them on (use stitch markers to keep them in place to do this).
Heart:
1. Using the long tail from the heart, insert the needle and yarn back through the heart and out of the side (around the middle of the side).
2. Insert the yarn through a st of the flipper towards the bottom (not through the last st of the flipper). Making a few sts to secure.
3. Move the yarn through to the opposite side of the heart, repeat step 2 and fasten off.
To provide the best experiences, we use technologies like cookies to store and/or access device information. Consenting to these technologies will allow us to process data such as browsing behavior or unique IDs on this site. Not consenting or withdrawing consent, may adversely affect certain features and functions.
Functional
Always active
The technical storage or access is strictly necessary for the legitimate purpose of enabling the use of a specific service explicitly requested by the subscriber or user, or for the sole purpose of carrying out the transmission of a communication over an electronic communications network.
Preferences
The technical storage or access is necessary for the legitimate purpose of storing preferences that are not requested by the subscriber or user.
Statistics
The technical storage or access that is used exclusively for statistical purposes.The technical storage or access that is used exclusively for anonymous statistical purposes. Without a subpoena, voluntary compliance on the part of your Internet Service Provider, or additional records from a third party, information stored or retrieved for this purpose alone cannot usually be used to identify you.
Marketing
The technical storage or access is required to create user profiles to send advertising, or to track the user on a website or across several websites for similar marketing purposes.