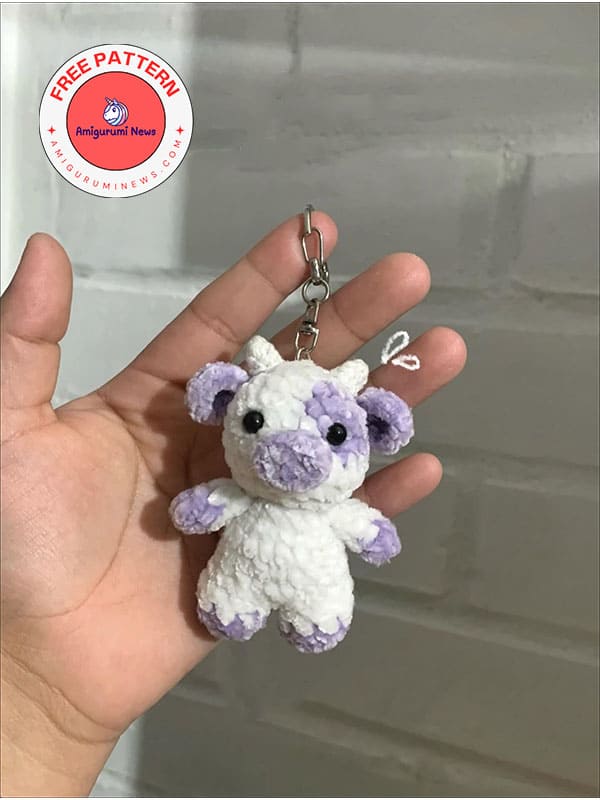
Since so many people have been asking about crochet cow keychain patterns, I’ve brought you a free amigurumi cow keychain pattern. Because the purple crochet cow looks so beautiful, our designer chose purple and white yarn. You can choose black and white, or red for a strawberry cow look. Follow the step-by-step instructions below for a free amigurumi pattern to make a super easy crochet cow keychain.
Purple amigurumi cow keychain
You can quickly learn how to make this purple crochet cow keychain below. There are plenty of detailed photos to help you. Check out this beginner-friendly amigurumi cow pattern now and get started. I think it would make a great gift idea for New Year’s and birthdays.
Designer: dassy.cositas
Materials:
White and lilac chenille.
2.50 mm crochet hook
Two 6 mm safety eyes
Stuffing
Keychain ring
Hot glue or fabric glue
Yarn needle
Scissors
Abbreviations:
MR: magic ring
sc: single crochet
inc: increase
dec: decrease
ch: chain
cc: color change
slst: slip stitch
Head:
White:
R1: 6 sc in a magic ring
R2: 6 inc (12)
R3: (1 sc, 1 inc) x3, 1 sc, cc 1 inc, 1 sc, 1 inc, cc 1 sc, 1 inc (18)
R4: (2 sc, 1 inc) x3, 1 sc, cc 1 sc, 1 inc, 2 sc, 1inc, cc, 2 sc, 1 inc (24)
R5: 14 sc, cc 7 sc, cc, 3 sc (24)
R6: 15 sc, cc 6 sc, cc, 3 sc (24)
R7-R8: 24 sc *Start stuffing.
• Place the safety eyes between rounds 5 and 6, leaving 4 stitches between them.
R9: (2 sc, 1 dec) x6 (18)
R10: (1 sc, 1 dec) x6 (12)
*Finish with a sl st, cut and weave in the yarn tail.
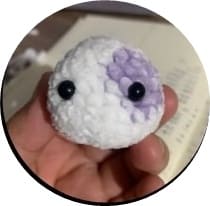
We’ve made the cow’s head. Now let’s make the ears and horns. After sewing them on, the cow’s head will be completely finished.
Ears (x2):
Lilac:
R1: 6 sc in a magic ring
R2: (1 sc, 1 inc) x3 (9)
Skip 1 st, make 1 sl st in the next stitch, and leave a long tail for sewing to the head.
*Sew the ears on the sides between rounds 3-4.

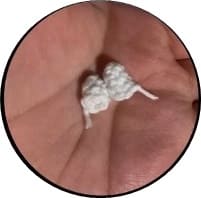
Horns (x2):
White:
I made the horns using a thinn yarn: cotton/acrylic.
R1: 4 sc in a magic ring
R2: 3 sc, 1 inc (5)
R3: 4 sc, 1 inc (6)
• Finish with a sl st and hide the yarn tail.
*Glue the little horns above the ears.
Now we’ll make the legs and body so your cow is almost complete.
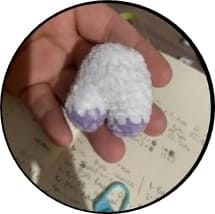
Legs and body:
Lilac:
R1: 8 sc in a magic ring
R2: 8 sc
cc R3-R4: 8 sc (8)
• Join the second leg with 1 sc – this stitch will be the starting point.
R5: 16 sc
R6: 7 sc, 1 inc, 6 sc, 1 inc, 1 sc (18)
Make sure the increases are centered on the front and back of the body.
R7-R8: 18 sc *Start stuffing
R9: (1 sc, 1 dec) x6 (12)
*Finish with a sl st and hide the yarn tail.
*Using cotton yarn, sew it to the head.
Finally, we make and complete the arms of our amigurumi cow.
Arms (X2)
Lilac:
R1. 5 sc in a magic ring
R2. 5 sc
R3-4. 5 sc
• Fold in half and make 2 sc across.
* Sew the arms right below the head, as shown in the photo.