
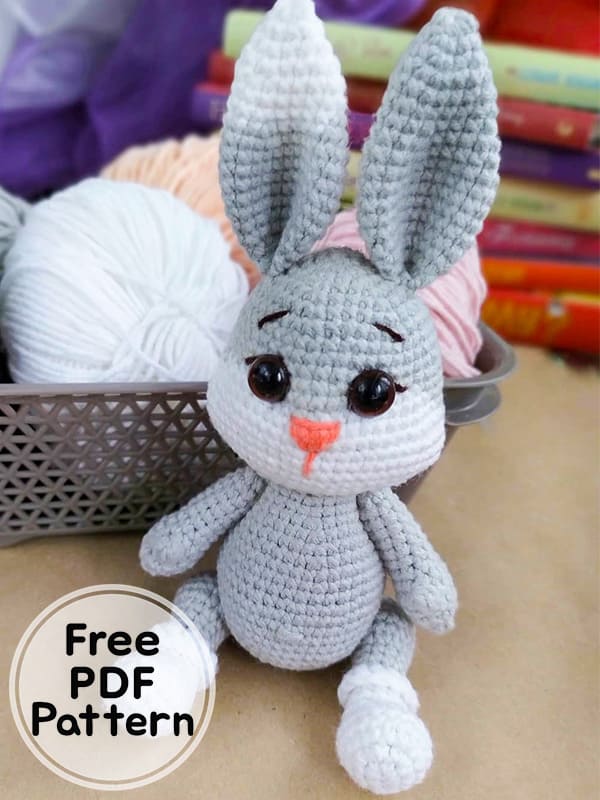
Greetings friends, today we will learn step by step how to make crochet bunny amigurumi. First of all, I would like to thank the owner of the pattern. It is an instructive amigurumi pattern for beginners. You can make a beautiful bunny for your child by following the cute crochet rabbit amigurumi pattern instruction, which is very easy to make. The height of the crochet toy is about 19 cm, including the ears. To make such a bunny, the author used YarnArt Jeans yarn and a 2 mm hook. The body and head of the toy are crocheted as one piece. Our bunny’s arms and legs are movable thanks to the rope fastening. I wish you success.
Crochet Cute Bunny Amigurumi Free PDF Pattern
Designer: vika_yarami
Materials and tools:
1. Yarn:
– YarnArt jeans 01
– YarnArt jeans 49
– YarnArt jeans 23 for spout embroidery
– dark iris for face decoration
2. Filler (holofiber or others)
3. Needle
4. Scissors
5. Pins
6. Hook N°2
7. Eyes 10 mm
Abbreviations
MR: Magic ring
Sc: Single crochet
Ch: Chain
Slst: Slip stitch
Inc: Increase
Dec: Decrease
Head and body
Rnd 1- 6 sc in MR (6)
Rnd 2- 6 inc (12)
Rnd 3- (1 sc+1 inc)*6 (18)
Rnd 4- (2sc+1 inc)*6 (24)
Rnd 5- (Зsc+1 inc)*6 (30)
Rnd 6- (4sc+1 inc)*6 (36)
Rnd 7- (5sc+1 inc)*6 (42)
Rnd 8-10- – 48sc (3 rows)
Rnd 11- (6sc+1 inc)*6 (48)
We insert the eyes between 11-12 side by side at a distance of 8sc.
In the 12th row we knit white yarn 01. Gray (c), white (b)
Rnd 12- 15sc(с), 6sc (b), 6sc (с), 6sc(b), 1 5sc (с) (48)
Rnd 13- 14sc(с), 9sc (6), 2sc (с), 9sc(b), 1 4sc (с) (48)
Rnd 14- 13sc(с), 22sc(b), 13sc(с) (48)
Rnd 15- 12sc(с), 4inc(b), 16sc(b), 4inc(b), 12sc(с) (56)
Rnd 16-18- 12sc(с), 32sc(b), 12sc(с) (56)
Rnd 19-12sc(с), 4 dec(b), 16sc(b), 4dec(b), 12sc(с) (48)
Rnd 20- 6sc(с)+1 dec(с) , 5sc(с), 1 sc(6), 1 dec(b), (6sc+1 dec)*2(6), 3sc(b), 3sc(с), 1 dec(с), (6sc+1 dec)(с) (42) 21 row – (5sc+1 dec)*2(с), (5sc+1 dec)*2(b), 1 sc (6), 4sc(с)+1 dec(с), 5sc(с) +1 dec(с) (36)
Fasten the white thread, cut it off.
We continue to crochet in gray.
Rnd 22- (4sc+1 dec)*6 (30)
Rnd 23- (Зsc+1 dec)*6 (24)
Rnd 24- (2sc+1 dec)*6 (18)
Rnd 25- 1 8sc (18)
Rnd 26- (2sc+1 inc)*6 (24)
Rnd 27- 24sc (24)
Rnd 28- (Зsc+1 inc)*6 (30)
Rnd 29- (4sc+1 inc)*6 (36)
Rnd 30- З6 sc (36)
Rnd 31- (5 sc+1 inc)*6 (42)
Rnd 32-34- 42 sc (42) (3 rows)
We crochet offset loops so that the marker is exactly in the middle of the back, I have 4sc.
This is our new beginning of the series.
Rnd 35- 11 sc, (2sc+1 inc)*6, 13 sc (48)
Rnd 36-40- 48sc (48) (5 rows)
Rnd 41- (6sc+1 dec)*6 (42)
Rnd 42- (5sc+1 dec)*6 (36)
Rnd 43- (4sc+1 dec)*6 (30)
Rnd 44- (Зsc+1 dec)*6 (24)
Rnd 45- (2sc+1 dec)*6 (18)
Rnd 46- (1 sc+1 dec)*6 (12)
Rnd 47- 6 dec (6)
We cut the thread, tighten the hole, fix the tip. We make a tightening of the eye at points 1 and 2, 3 and 4.
Next, we make a tightening at points 2 and 5, 4 and 6.
We embroider eyelashes and eyebrows with black iris thread. Embroider the spout with coral yarnart jeans 23.
Ears (Make 2)
Ears are not filled.
We start crochet the first ear with white.
Rnd 1- 6 sc in MR (6)
Rnd 2- (1 sc+1 inc)*3 (9)
Rnd 3- (2sc+1 inc)*3 (12)
Rnd 4- (Зsc+1 inc)*3 (15)
Rnd 5-6- 15sc (15) (2 rows)
Rnd 7- (4sc+1 inc)*3 (18)
Change the thread to gray.
Rnd 8- (5sc+1 inc)*3 (21)
Rnd 9- (6sc+1 inc)*3 (24)
Rnd 10-14- 24sc (5 rows)
Rnd 15- (2sc+1 dec)*6 (18)
Rnd 16- 1 8sc (18)
Rnd 17- (1 sc+1 dec)*6 (12)
Fold both edges and knit for both walls of the 6sc. Fold the ear with a drop and sew 3 sc. We cut the thread, leaving a long end for sewing. We knit the second eye according to the same pattern, only in gray.
Tail
Rnd 1- 6 sc in MR (6)
Rnd 2- (1 sc+1 inc)*3 (9)
Rnd 3- 9sc (9)
We fill a little.
Rnd 4- (1 sc+1 dec)*3 (6)
We cut the thread, leaving a long end for sewing.
Arms
Rnd 1- 6 sc in MR (6)
Rnd 2- (1 sc+1 inc)*3 (9)
Rnd 3- (2sc+1 inc)*3 (12)
Rnd 4- 11 sc, 1 3 dc cluster
Rnd 5- 12sc (12)
Rnd 6- (2sc+1 dec)*3 (9)
Rnd 7-13- 9sc (7 rows)
Rnd 14- (1 sc+1 dec)*3 (6)
Pull the hole, fasten the thread and cut. Hide the ends inside.
Legs (Make 2)
We start crochet in white.
Rnd 1- pick up 4 ch from the 2nd loop from the hook, crochet 2 sc, 3 sc in one loop, 1 sc, 1 inc (8)
Rnd 2- 1 inc, 1 sc, 3inc, 1 sc, 2inc (14)
Rnd 3- 1 sc, 1 inc, 2sc, (1 inc+1 sc) *3, (1 sc+1 inc)*2 (20)
Rnd 4-5- 20sc (20) (2rows)
Rnd 6- 4sc, (1 sc+1 dec)*3, 7sc (17)
Rnd 7- 3sc, 3dec, 8sc (14)
Rnd 8- 3sc, 2dec, 7sc (12)
Rnd 9-11-12sc (3 rows)
We bring the white thread to the front side, we begin to crochet in gray.
Rnd 12- 12 sc behind the back wall of the loop (12)
Rnd 13-14- 12sc (12) (2 rows)
Rnd 15- (1 sc+1 inc) *6 (18)
Rnd 16-18- 1 8sc (18) (3 rows)
Rnd 19- (1 sc+1 dec) *6 (12)
Rnd 20- 6 dec (6)
Pull the hole, fasten the thread and cut. Hide the ends inside.
We return to the 11th row of legs and make a strapping with a white thread that we left, make 2 ch and crochet 12 dc, hold the hook as in the photo. We make a connecting loop and hide the tip. The lapel can be wrapped or left like that.
Assembly:
1. Sew on the ears at the level of 5-6 rows
2. We fasten the handles and legs with a thread fastener. We fasten our hands between 29-30 rows. We fasten the legs between 40-41 rows.
3. We sew the tail so that the bunny could lean on it in the “sitting” position. For less, it is 39-41 rows.
4. Embroider the navel at the level of 37-38 rows. Width 2 sc. We embroider it with 3-4 stitches of gray color.


