
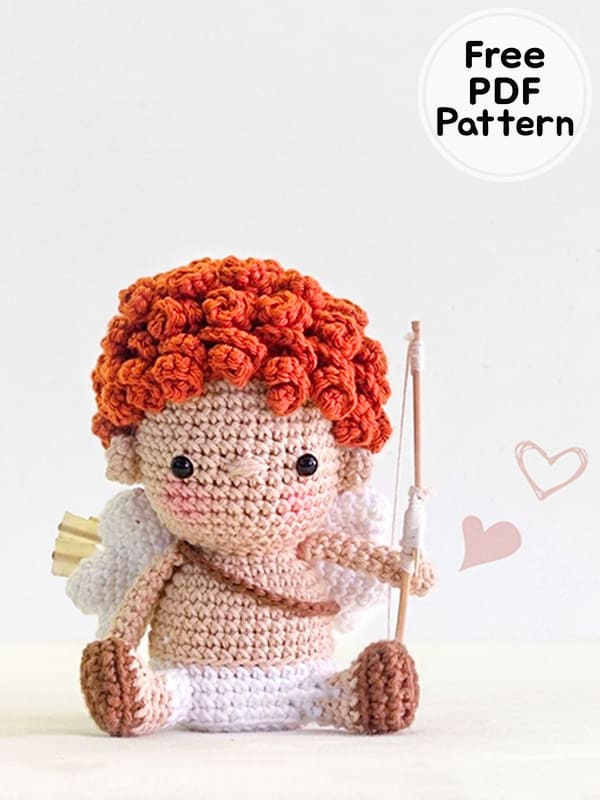
I wish you all a nice day my dears. Today I bring you archer cupid crochet doll pattern for you. Valentine’s day is approaching, and I am trying to share various free amigurumi patterns for this special day for you. Free patterns and detailed pictures that you can follow step by step will help you a lot. The crochet dolls is a pattern suitable for beginners. Gather the necessary supplies and create your own cupid right now before Valentine’s Day arrives!
Cupid Archer Crochet Doll Amigurumi PDF Free Pattern
Designer: pinkpepper_crochet
Materials
• 4 ply yarn in beige, rust, brown and white.
• 2.5 mm crochet hook.
• Yarn needle
• Pins
• Fiberfill
• Scissors
• Stitch markers
• 6 mm safety eyes
• Toothpicks
• Paper tape
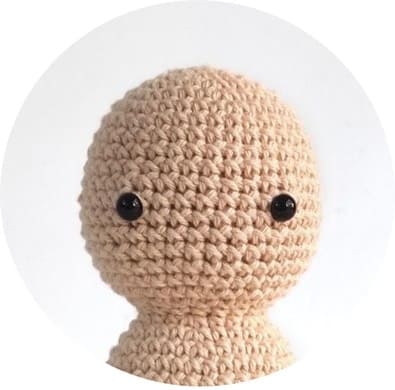
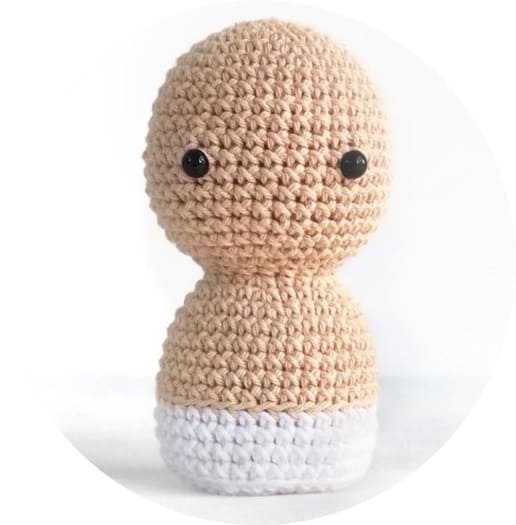
Head
With beige yarn.
Rnd 1. 6 sc in MR (6)
Rnd 2. 6 inc (12)
Rnd 3. sc,inc*6 times (18)
Rnd 4. 2sc,inc*6 times (24)
Rnd 5. 3sc,inc*6 times (30)
Rnd 6. 4sc,inc*6 times (36)
Rnd 7-17. sc all around (36) (11 rounds)
Place the eyes, 7 stitches apart, between rows 12 and 13.
Rnd 18. 4sc,dec*6 times (30)
Rnd 19. 1sc,2dec*6 times (18)
Rnd 20. sc all around (18)
Stuff head.
Continue crocheting the body.
Body
Rnd 21. 2sc,inc*6 times (24)
Rnd 22. 3sc,inc*6 times (30)
Rnd 23. 4sc,inc*6 times (36)
Rnd 24-28. sc all around (36) (5 rounds)
Change colour to white.
Rnd 29-32. sc all around (36) (4 rounds)
Rnd 33. BLO- 4sc,dec*6 times (30)
Rnd 34. 3sc,dec*6 times (24)
Rnd 35. 2sc,dec*6 times (18), start stuffing.
Rnd 36. sc,dec*6 times (12)
Rnd 37. 6 dec (6)
Fasten off and close the hole.
Ears (Make 2)
With beige yarn.
Rnd 1. MR, 6 sc (6)
Rnd 2. sc all around (6)
Fasten off leaving a tail for attaching.
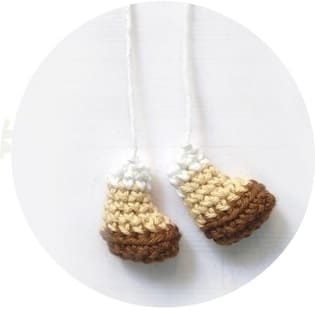
Legs (Make 2)
With brown yarn, ch 6.
Crochet all around the chain from the second chain from the hook.
Rnd 1. inc, 3sc, inc, turn: inc, 3sc, inc (14)
Rnd 2. slst all around (14)
Change colour to beige.
Rnd 3. BLO- sc all around (14)
Rnd 4. 3 sc, 4 dec, 3 sc (10)
Rnd 5. 3 sc, 2 dec, 3 sc (8)
Rnd 6. sc all around (8)
Change colour to white.
Rnd 7-8. sc all around (8) (2 rounds)
Fasten off leaving a tail for attaching.
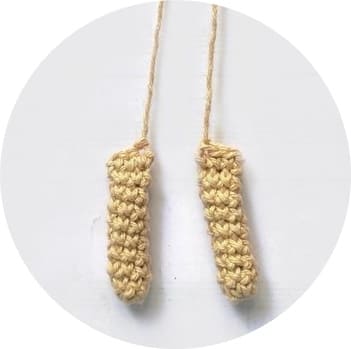
Arms (Make 2)
With beige yarn.
Rnd 1. MR, 6 sc (6)
Rnd 2-9. sc all around (6) (8 rounds)
Flatten and make 3 sc through the front and back of the arm so that it is closed.
Fasten off leaving a tail for attaching.
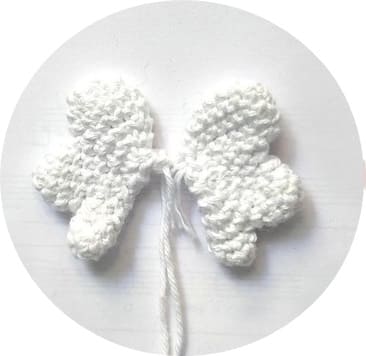
Wings (Make 2)
With white yarn, we crochet three parts:
A:
Rnd 1. MR, 6 sc (6)
Rnd 2. sc all around (6)
Fasten off.
B:
Rnd 1. MR, 6 sc (6)
Rnd 2. sc,inc*3 times (9)
Rnd 3. sc all around (9)
Fasten off.
C:
Rnd 1. MR, 6 sc (6)
Rnd 2. 6 inc (12)
Rnd 3. sc all around (12)
Don’t cut the yarn.
Now we will crochet the parts together.
The letters (A,B,C) indicate which part to crochet on.
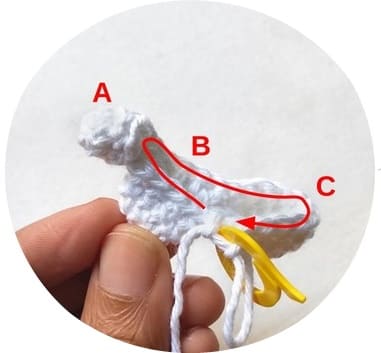
1. B- 5sc, A- 6sc, B- 4sc, C- 12sc (27)
Mark the last stitch. Now crochet normally in the round.
2. 7sc,dec*3 times (24)
3. 2sc,dec*6 times (18)
4. sc,dec*6 times (12)
5. 6 dec (6)
Fasten off, leaving a tail for attaching.
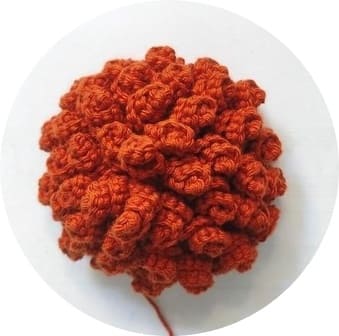
Hair
With rust yarn, we first make a cap for the head.
Rnd 1. MR, 6 sc (6)
Rnd 2. 6 inc (12)
Rnd 3. sc,inc*6 times (18)
Rnd 4. 2sc,inc*6 times (24)
Rnd 5. 3sc,inc*6 times (30)
Rnd 6. 4sc,inc*6 times (36)
Rnd 7. 5sc,inc*6 times (42)
Rnd 8-11. sc all around (42) (4 rounds)
Fasten off leaving a long tail for attaching.
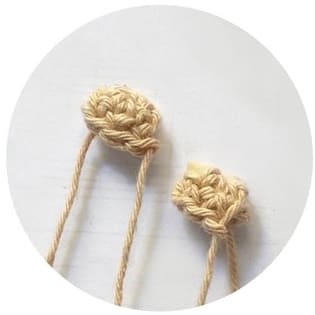
Now we will add curis to the cap.
To make a curl of hair:
Ch 9. From the second chain on the hook,
*inc, 3 sc (in one stitch)*4 times (20)
Slip stitch on the head cap, leaving two stitches gap between two curls.
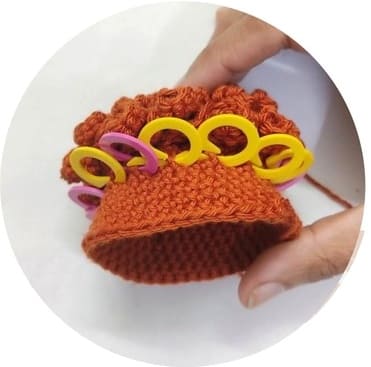
Make curls between the rows (except for the first row), leaving a gap of two stitches between curls (i.e. curl on every third stitch).
Mark the stitches with stitch markers before crocheting the curls, as shown.
Attach the yarn at the top and begin crocheting the curls from the first row.
Don’t cut the yarn when you finish a curl.
Slip stitch and continue with the next curl.
Row 1: 3 curls
Between rows 2 and 3: 6 curls
Between rows 4 and 5: 10 curls
Between rows 6 and 7: 14 curls
Between rows 8 and 9: 14 curls
Between rows 10 and 11: 14 curls
Fasten off, and hide the tail.
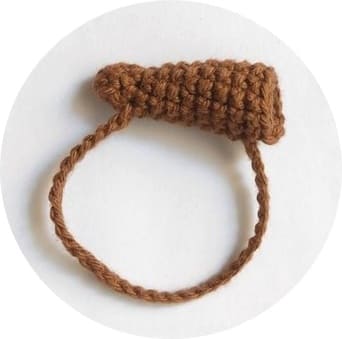
Back quiver
With brown yarn.
Rnd 1. MR, 6 sc (6)
Rnd 2-3. sc all around (6) (2 rounds)
Rnd 4. sc,inc*3 times (9)
Rnd 5-6. sc all around (9) (2 rounds)
Rnd 7. sc,inc*4 times (12)
Rnd 8-11. sc all around (12) (4 rounds)
Fasten off.
Strap:
Join the yarn at round 10.
Ch 30.
Slst on round 2.
Fasten off and hide the tails.
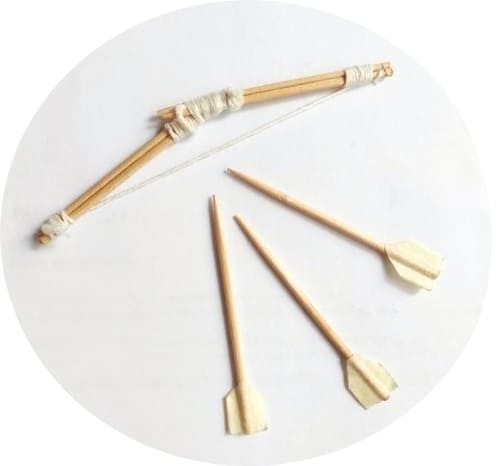
Bow and arrows
Bow
Bind two toothpicks together on both ends, using white yarn.
Make two of this.
Now bind the two pairs together, at a slight angle.
Tie a piece of yarn from one pair to the other as seen in the photo.
Arrows
Stick paper tape to the edges of the toothpicks, sandwiching the toothpick between two pieces of tape.
Cut the two corners to shape the rear of the arrow.
Assembly
1. Attach the ears on the sides, 5 stitches from the eyes, between rows 12 and 14.
2. Embroider the nose between the eyes.
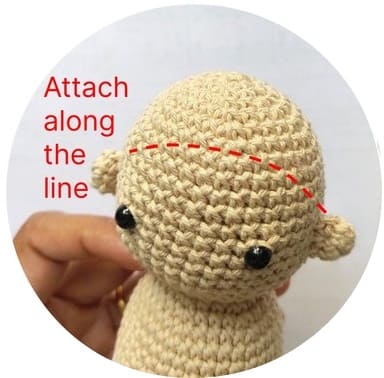
3. Attach the head cap to the head leaving a gap of 6 rows above the eyes (see photo). Pull some curls down and attach to the face to hide the edge of the head cap.
4. Attach the arms on the side on row 22 of the body, approx. 12 stitches apart.
5. Attach the legs, 6 stitches apart, on the last three rows of the body.
6. Attach the wings at two points on row 22 behind the arms. This will allow you to move them.
7. Slide the quiver in place from the bottom.
8. Add blush to the cheeks.
9. Put the arm through the bow and the arrows in the quiver.
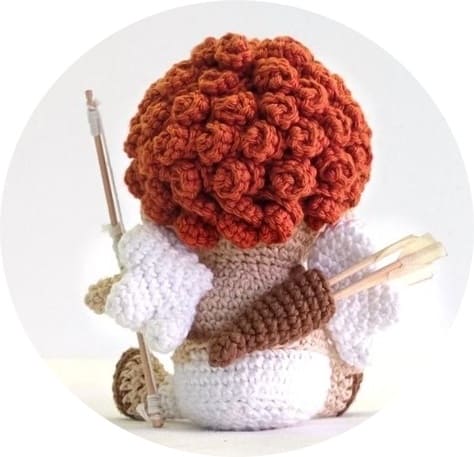
Cupid is ready to shoot!


