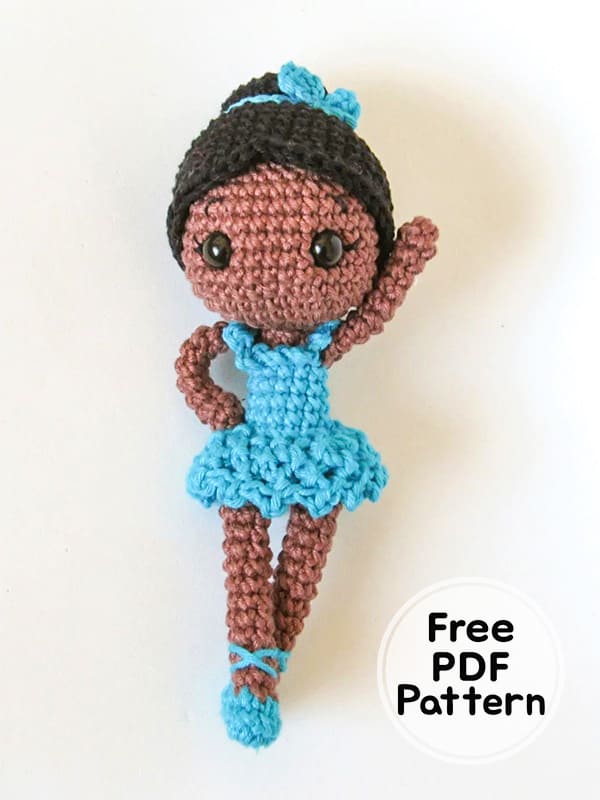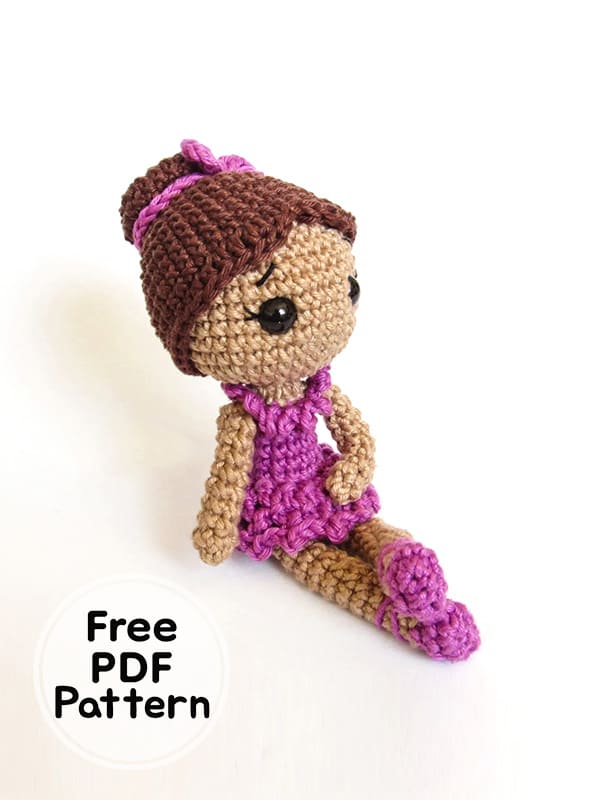
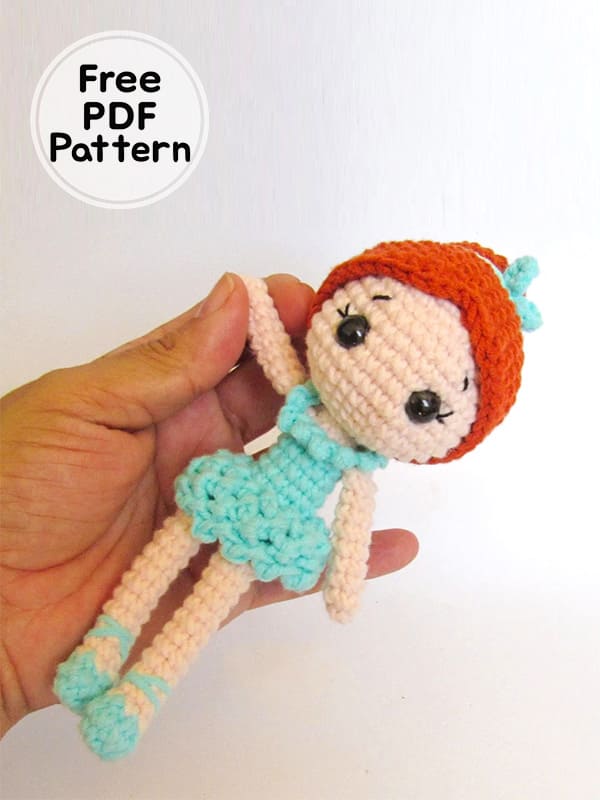
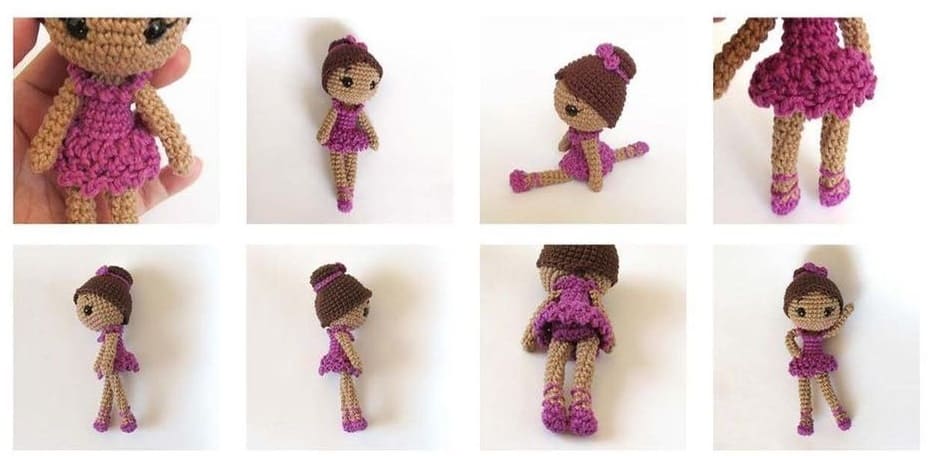
Greetings to all friends, today I will share with you a crochet doll amigurumi pattern. First of all, many thanks to the owner of the pattern. Our free amigurumi pattern for today is the Maribel crochet doll. You can easily complete the amigurumi maribel doll with the step-by-step detailed and understandable amigurumi pattern instruction and the construction pictures. It is an easy amigurumi pattern for beginners. Check out the instructions for making an amigurumi doll right now!
Maribel Crochet Doll Amigurumi Free PDF Pattern
Designer: crochelandia
Materials
• Yarn colors for the skin, hair and clothes
• 3 mm crochet hook
• Embroidery needle
• Stuffing
• 9 mm safety eyes
• Black embroidery thread
• Pins
• Stitch markers
• Craft glue
Abbreviations
MR: Magic ring
Sc: Single crochet
Inc: Increase
Dec: Decrease
Slst: Slip stitch
Ch: Chain
Hdc: Half double crochet
Dc: Double crochet
Finished doll size approx. 16 cm (6.2″)
Arms (Make 2)
Rnd 1. 5 sc in MR (5)
Rnd 2-9. sc around (5)
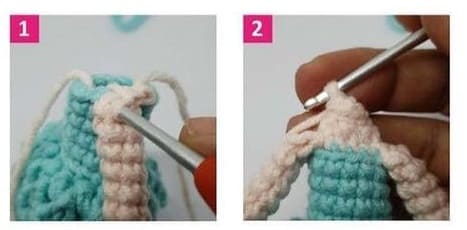
Rnd 10. Fold and close the opening with 2 sc (pic 1)
Fasten off.
You don’t need to stuff.

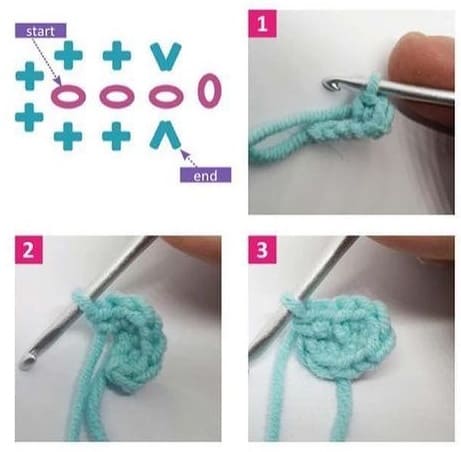
Legs (Make 2)
Start with the color of the ballet shoes.
Chain 4 (start in the 2nd chain from the hook)
Rnd 1. inc, 1 sc, 4 sc in the last chain, continue on the other side, 1 sc, inc (10) (pics 1-3 and graph)
Rnd 2. 10 sc
Change to the color of the skin.
Rnd 3. 1 sc, 4 dec, 1 sc (6) (pic 4)
Hide the end tails inside the foot (pic 5)
They will serve as stuffing. If necessary, add a bit more stuffing on the front of the foot.
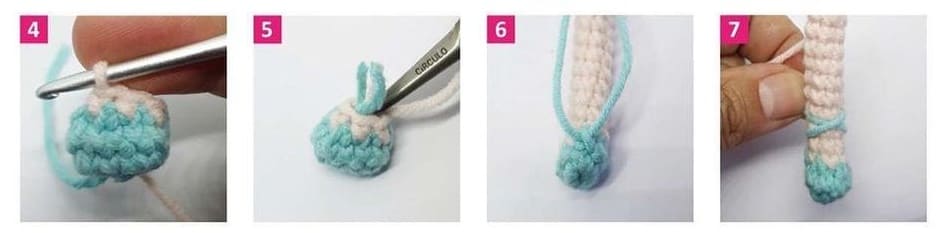
Rnd 4-14. sc around (6)
Fasten off. You don’t need to stuff.
Make the details of the shoes, attach the yarn on the back of the leg (pic 6), cross it on the front (pic 7) and tie it on the back.
Fasten off, hide the end tails inside the legs.
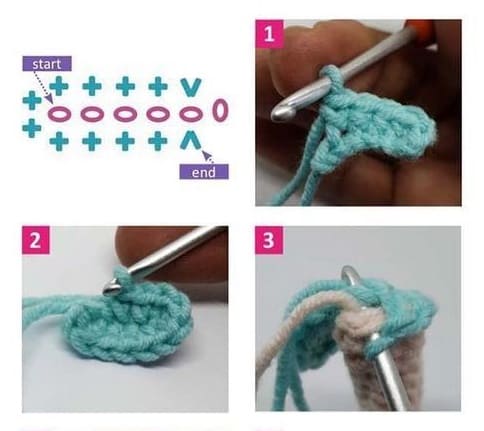
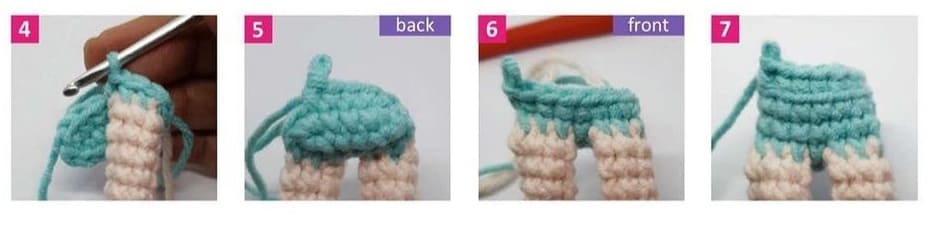
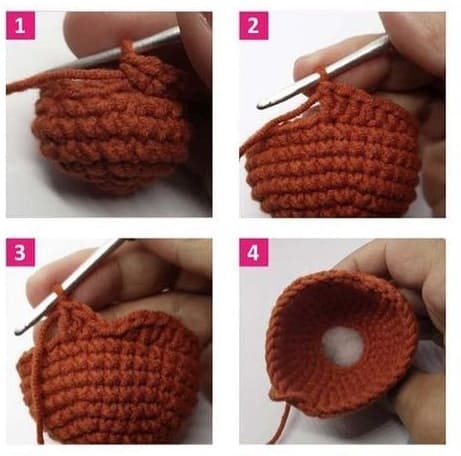
Body
Chain 6 (start in the 2nd chain from hook)
Rnd 1. inc, 3 sc, 4 sc in the last chain, continue on the other side, 3 sc, inc (pics 1-2 and graph)
Rnd 2. sc joining the leg, 1 sc, 3 sc joining the other leg, 7 sc, (14) (pics 3-5)
Rnd 3-4. sc around (14) (pic 6)
Rnd 5. sc around in back loops only (14) (pic 7)
Rnd 6. 9 sc, dec, 1 sc, dec (12)
Rnd 7-9. sc around (12)
Fold the opening and work the stitches through both sides of the leg (pics 3 and 4).
Pause your work to make the skirt.
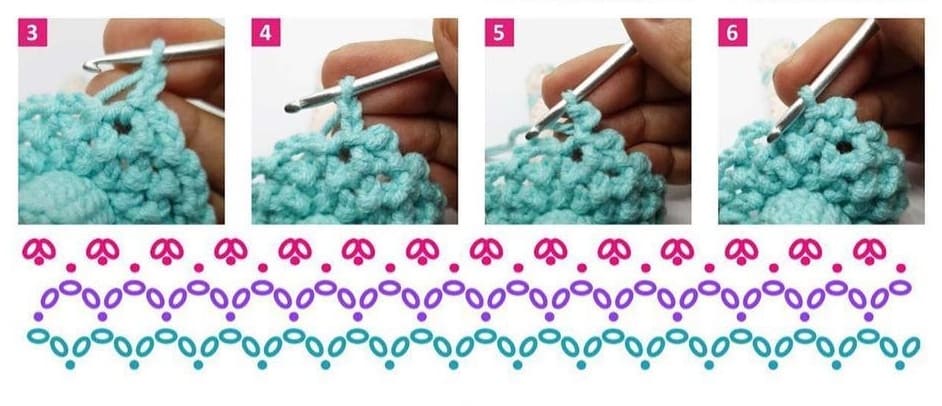
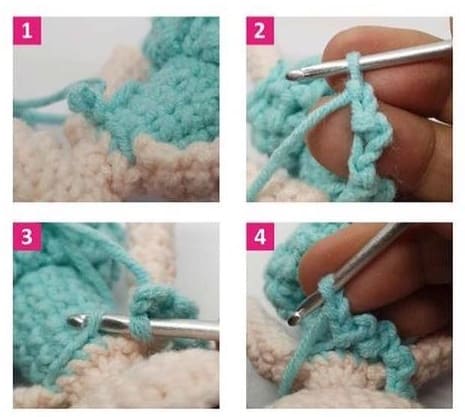
Skirt
Rnd 1. Chain 3, slst 1- around (pics 1 and 2)
Rnd 2-3. Chain 3, slst 1 (in the middle of the chains from the previous round)- around (pic 3)
Rnd 4. Chain 2, slst 1 on the first chain, slst 1 in the middle of the chains- around (pic 4-6)
Fasten off.
Body (Part 2)
Change to the color of the skin.
Rnd 10. 1 sc in the back loop, 2 sc, joinning the arm,
4 sc in the back loop, 2 sc, joinning the arm,
3 sc in the back loops (pic 1)
Rnd 11. dec around (6)
Check to see if the arms are aligned with the legs. If necessary, start the round with 2 sc, or start directly joinning the arms.
Neck support
Work a round of slst in the back loops only (6) (pic 2)
Don’t fasten off. Continue to start head.
Head
Continue on the last round of the body.
Working on the front loops of round 11 (in front of the neck support) (pic 2)
Rnd 1. inc around (12) (pics 1 and 2)
Rnd 2. inc around (24)
Rnd 3. (3sc,inc) around (30)
Rnd 4. (4sc,inc) around (36) (pic 3)
Rnd 5-11. sc around (36)
Embroider eyelashes and insert the safety eyes between rounds 7 and 8, seven stitches apart. Embroider the eyebrows two rounds above the eyes. (pic 4)
Rnd 12. (4sc,dec) around (30)
Rnd 13. (3sc,dec) around (24)
Stuff the head.
Rnd 14. (2sc,dec) around (18)
Rnd 15. (1sc,dec) around (12)
Stuff more, if necessary
Rnd 16. dec around (6)
Fasten off, close the opening with a tapestry needle.
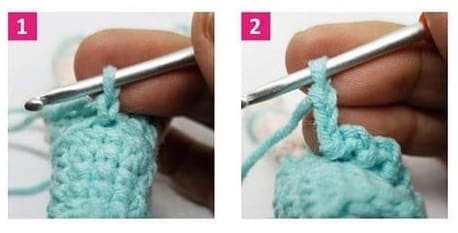
Cleavage
Work on the loops, left on round 10 of the body, join yarn on the middle of the back.
Back: (slst 1, chain 2, slst 1 on the first chain, slst 1 on the body)*2 (pic 1)
Strap: (chain 2, slst 1 on the first chain)*4, go over the arm and continue on the other side of the body (pic 2)
Front: (slst 1, chain 2, slst 1 on the first chain, slst 1 on the body)*4 (pics 3 and 4)
Strap: (chain 2, slst 1 on the first chain)*4, go over the arm and continue on the other side of the body.
Back: (slst 1, chain 2, slst 1 on the first chain, slst 1 on the body)*2
Fasten off.
Picot stitch.
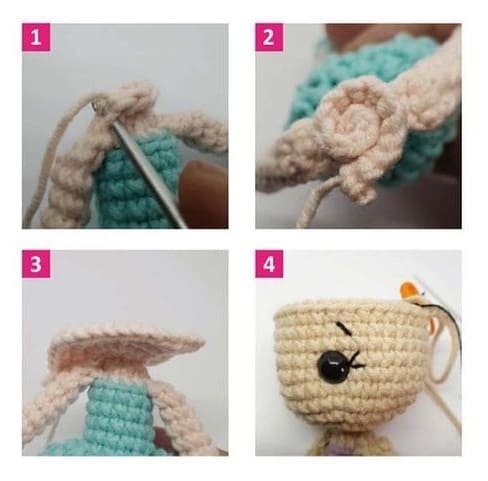
Hair
Chain, slip stitch, single crochet, half double crochet and double crochet.
Important: work looser stitches so the wig can fit easily on the head.
Rnd 1. 6 sc in MR
Rnd 2. 6 inc (12)
Rnd 3. (1sc,inc) around (18)
Rnd 4. (2sc,inc) around (24)
Rnd 5. sc around (24)
Rnd 6. (2sc,dec) around (18)
Rnd 7. slst around (18)
Rnd 8. (2sc,inc) around (24) (pic 1)
Rnd 9. (3sc,inc) around (30)
Rnd 10. (4sc,inc) around (36)
Rnd 11-15. sc around (36)
Rnd 16. 11sc, 3 hdc, 1 dc, 2 dc in the next stitch, slst 2, 2 dc in the next stitch, 1 dc, 3 hdc, 11 sc (pics 3 and 4)
Fasten off.
Stuff the bun lightly (pic 4)
Glue the wig on the doll’s head.
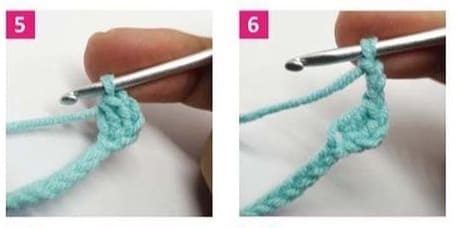
Bow
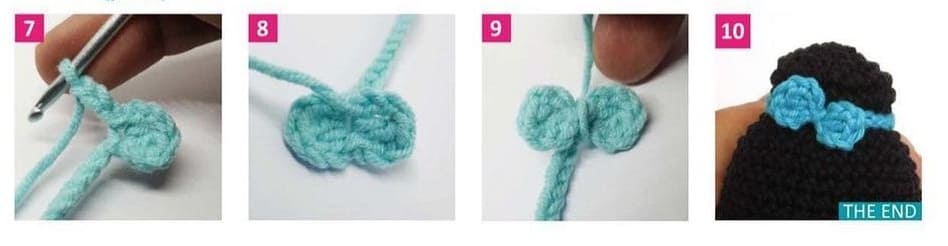
Chain 28, skip 3, 1 dc, ch 3, slst 1, ch 3, 1 dc, ch 3, slst 1 (pics 5-7)
Fasten off and leave a long tail for sewing.
Wrap the end tail through the middle of the piece to create the bow (pics 8 and 9).
Wrap the band around the bun and attach the bow (pic 10).