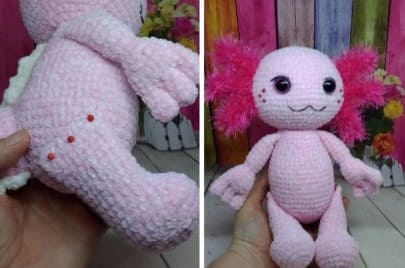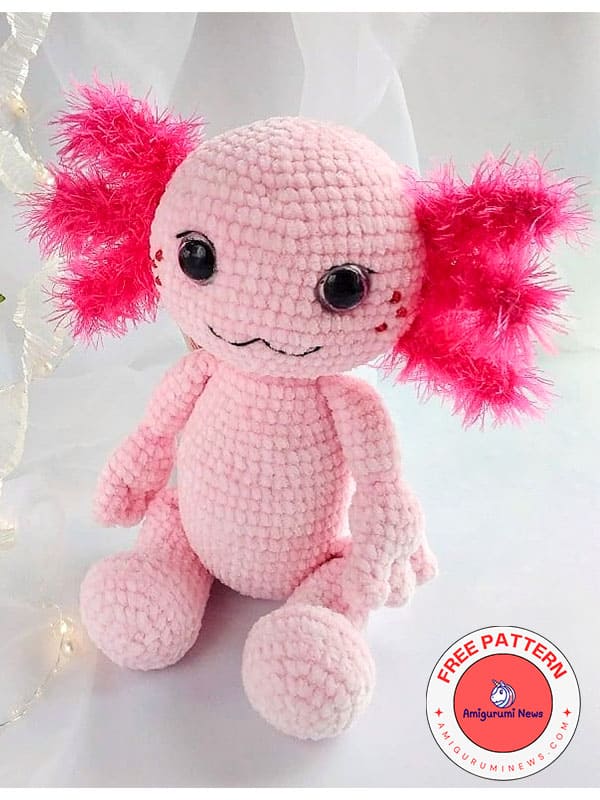
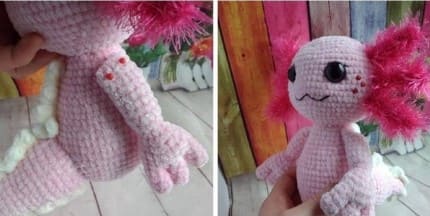
The pink crochet axolotl version, in particular, will make for a fun amigurumi experience. Imagine a real axolotl dipped in cotton candy! Made from soft chenille yarn, this axolotl plush animal feels incredibly huggable, making it perfect for kids, collectors, or anyone looking for a little whimsy.
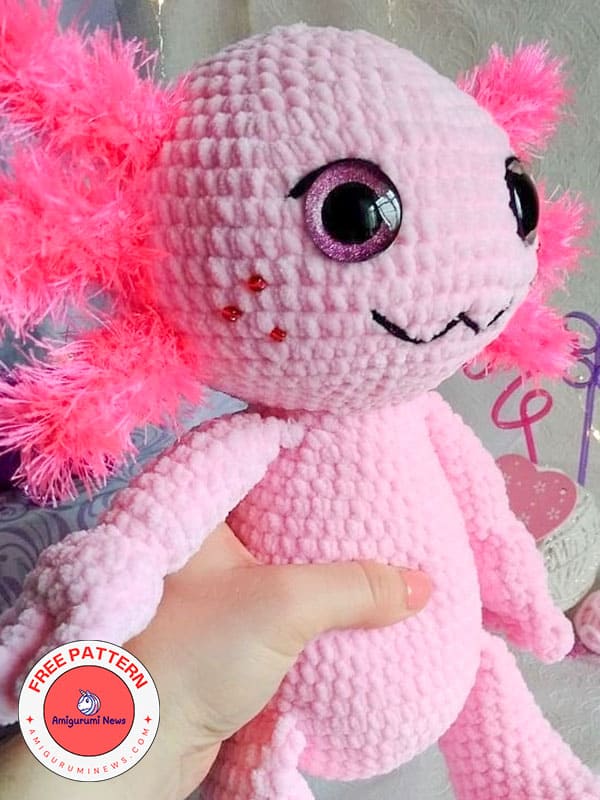
The design featured here showcases meticulous crochet techniques. The body is worked in continuous rounds for a seamless look, while single crochet stitches create that signature textured surface. Fluffy yarn tassels mimic the axolotl’s external gills, while embroidered details like confident eyes, rosy cheeks, and a delicate mouth give it personality. Standing approximately 25-30 cm tall, this toy is the ideal size for display on a shelf or as a bedtime companion. Unlike mass-produced toys, handmade amigurumi crochet plush toys like this one have a personal touch, infused with the creativity and love of their maker.
Pink axolotl crochet plush free pattern
Why should you choose a crochet axolotl plush for your next project? Because they’re so versatile! You can customize the colors; stick to natural tones like white or albino for originality, or go bold with pastels like this pink variant. Adding accessories like a small bow or scarf will further personalize your crochet axolotl plush toy. Plus, making amigurumi fosters mindfulness; the repetitive movements reduce stress and provide fun while creating something tangible. In an era of increased screen time, making crochet plush toys reconnects us with hands-on creativity and fosters lifelong skills.
Amigurumi Designer: lorenver
Мaterials and tools:
• YarnArt Velour 170m/100g or 185,91yds/3,52oz, one skein of Pink colour, some White for сrest, and YarnArt Samba for external gills some yards Red or Pink color;
• 3 mm (or 2 UK or C US) crochet hook;
• Sewing thread for sewing parts;
• Safety eyes (ø 16 mm);
• Polyester fiberfill;
• Darning and embroidery needle;
• Scissors and Pins
Abbreviations:
R = round
ch = chain
ch1 (2,3 etc) = quantity of ch
sc = single crochet
inc = increase (single crochet twice in the same single crochet stitch)
dec = decrease (single crochet two stitches together)
dec1 (2,3 etc) = quantity of dec
hdc = half double crochet
dc = double crochet
sl st = slip stitch
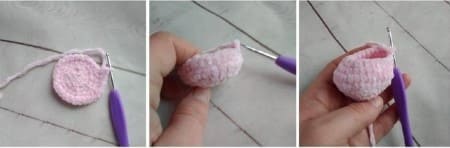
Head
R1: sc6 in a magic ring (6)
R2: inc6 (12)
R3: (sc, inc) x6 (18)
R4: (sc2, inc) x6 (24)
R5: (sc3, inc) x6 (30)
R6: (sc4, inc) x6 (36)
R7: (sc5, inc) x6 (42)
R8: (sc6, inc) x6 (48)
R9: (sc7, inc) x6 (54)
R10: (sc8, inc) x6 (60)
R11: (sc9, inc) x6 (66)
R12-R15: sc in each sc around (66)
R16: (sc9, dec) x6 (60)
R17: (sc8, dec) x6 (54)
R18: (sc7, dec) x6 (48)
R19: (sc6, dec) x6 (42)
R20: (sc5, dec) x6 (36)
R21: (sc4, dec) x6 (30)
R22: (sc3, dec) x6 (24)
Fasten off and cut the tail of yarn;
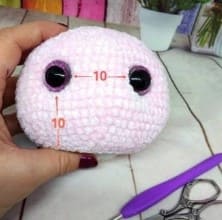
It’s time to attach the eyes. It is better to do this before sewing the head to the body.
Count 10 rows from the hole and 10 stitches between the eyes.
Then put stuffing and embroider the mouth.
To make it easier I marked outline with pins where I want the mouth.
You also can easily embroider eyelashes, just make a stitch over the eye.
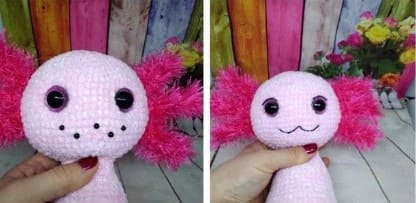
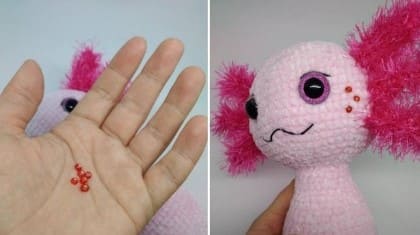
Now let’s make dots on the face. I used red beads. But it also can be embroidered with french knots or simply painted with acrylic paint.
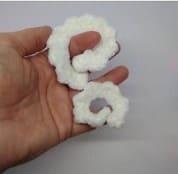
External gills (make 6)
R1. sc 6 in a magic ring (6)
R2-R9. sc in each sc around (6)
Fasten off and cut the tail of yarn: sew the gills on the sides of the head.

Torso
R1: sc6 in a magic ring (6)
R2: inc6 (12)
R3: (sc1, inc) x6 (18)
R4: (sc2, inc) x6 (24)
R5: (sc3, inc) x6 (30)
R6: (sc4, inc) x6 (36)
R7: (sc5, inc) x6 (42)
R8: (sc6, inc) x6 (48)
R9: (sc7, inc) x6 (54)
R10-14: sc in each sc around (54)
R15: (sc, dec) x6, sc36 (48)
R16-17: sc in each sc around (48)
R18: sc21, (sc, dec) x6, sc9 (42)
This makes a tummy;
R19-20: sc1 in each sc around (42)
R21: (sc5, dec) x6 (36)
R22: sc in each sc around (36)
R23: (sc4, dec) x6 (30)
R24-25: sc in each sc around (30)
R26: (sc3, dec) x6 (24)
R27: sc in each sc around (24)
Fasten off and cut the tail of yarn.
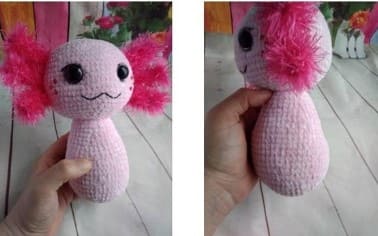
Then put stuffing and sew the head to the torso, make sure the tummy is in place.
Tail
R1: sc6 in a magic ring (6)
R2: (sc, inc) x3 (9)
R3: sc in each sc around (9)
R4: (sc2, inc) x3 (12)
R5: sc in each sc around (12)
R6: (sc3, inc) x3 (15)
R7: sc in each sc around (15)
R8: (sc4, inc) x3 (18)
R9: sc in each sc around (18)
R10: (sc2, inc) x6 (24)
R11: sc in each sc around (24)
R12: (sc3, inc) x6 (30)
R13-R18: sc in each sc around (30)
Fasten off and cut the tail of yarn. Then put some stuffing and sew the tail to the torso.
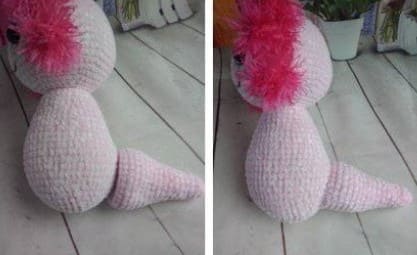
Crest #1
Make ch 35, dc 2 in a third ch, (slst in next ch, dc3 in next ch) x repeat to the end.
Crest #2
Make ch 21, hdc 2 in a third ch, (slst in next ch, hdc 3 in next ch) x repeat to the end.
Pin the crest #1 along the spine and to the tail then sew it.
Pin the crest #2 along the center on the other side of the tail then sew it.

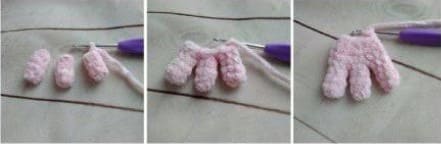
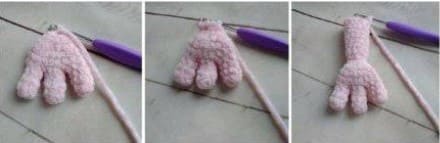
Arms (make 2)
First crochet the fingers (3 pieces):
R1: sc6 in a magic ring (6)
R2-R4: sc in each sc around (6)
Cut the thread off the first two fingers, but leave the thread on the third finger.
Then connect fingers and keep crocheting the arm:
R8: sc3 on the third finger, sc3 on the second finger, sc6 on the first finger, sc3 on the second finger, sc3 on the third finger (18)
R9-R10: sc in each sc around (18)
R11: (sc, dec) x6 (12)
R12: sc in each sc around (12)
Put some stuffing, just a little bit, and keep crocheting.
R13: dec6 (6)
R14: inc6 (12)
R15-R22: sc in each sc around (12)
Put some stuffing, fold both sides together and make sc5.
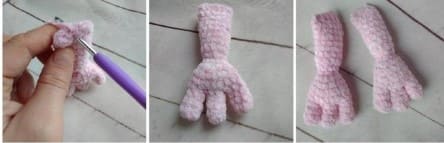
Fasten off and cut the tail of yarn. Then sew the arms to the torso.
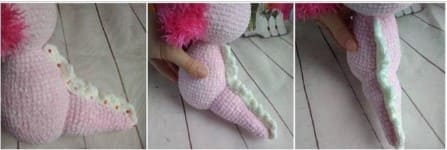
Legs (make 2)
R1: sc6 in a magic ring (6)
R2: inc6 (12)
R3: (sc1, inc) x6 (18)
R4: (sc2, inc) x6 (24)
R5: (sc3, inc) x6 (30)
R6: sc in each sc around in BLO (30)
R7: sc in each sc around (30)
R8: sc10, dec5, sc10 (25)
R9: sc8, dec2, sc, dec2, sc8 (21)
R10-R21: sc in each sc around (21)
Put some stuffing then fold both sides together and make sc 10.
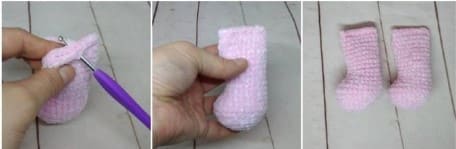
Fasten off and cut the tail of yarn. Then sew the legs to the torso.