
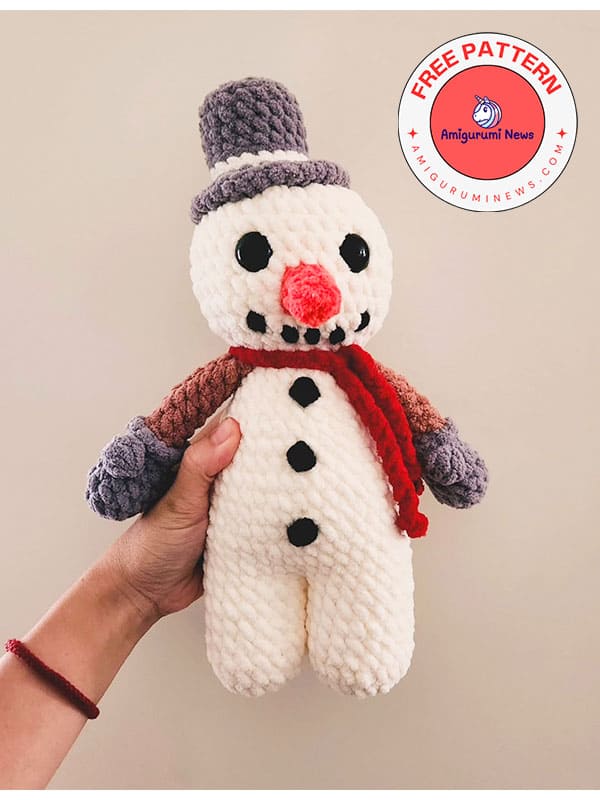
What could be more fun than making a beautiful crochet snowman plush amigurumi as winter approaches? Here’s a super cute and fluffy crochet snowman amigurumi pattern, free to download. It’s both a great Christmas gift and a wonderful amigurumi toy your children can safely play with during the winter. I think this free large snowman crochet pattern will be a popular choice for those looking for a crocheted amigurumi. Because it’s a fairly easy pattern, it’s beginner-friendly and easy to make.
Free Large snowman crochet pattern
Let me briefly explain how to make this crochet snowman: its body and legs are all one piece. Then, we’ll make the head and move on to the other details. After completing the snowman, we’ll make the hat. Even if the pattern doesn’t include a scarf, you can make one using any scarf pattern. You can also customize your amigurumi snowman by adding different accessories. More awaits you below; let’s start crocheting your snowman without delay.
Designer: smallladycrochet
Materials:
• 5.5 mm hook.
• Yarn (body, mittens, arms, hat, scarf) (thinner yarn for face embroidery and buttons)
• Scissors
• Polyfil
• Darning needle
• Optional: safety eyes 20 mm.
Abbreviations:
MR: magic ring
cc: color change
ch: chain
sc: single crochet
dc: double crochet
BBL: bobble stitch (4 loops)
BLO: back loop only
FLO: front loop only
dec: decrease
inc: increase
hdc: half double crochet
tc: triple crochet
slst: slip stitch
Legs (make 2)
• Shape and stuff firmly as you go.
1:9 sc in mr (9)
2: inc x 9 (18)
3-8 (6 rounds): 18 sc (18)
• F/O 1st leg only, leaving a tail.
• Repeat for the 2nd leg and continue with pattern.
Body
9: (connecting the 2nd leg to 1st leg) 36 sc (18 sc around each) (36)
10-12 (3 rounds): 36 sc (36)
• Sew the gap between legs.
13-16 (4 rounds): 36 sc (36)
17: (4 sc, dec) x 6 (30)
18-19 (2 rounds): 30 sc (30)
20: (3 sc, dec) x 6 (24)
21-22 (2 rounds): 24 sc (24)
23: (2 sc, dec) x 6 (18)
• You can add a stitch marker in the 1st and last unworked front loop (the front loops will be used when sewing the body to the head.)
24: BLO: 18 sc (18)
25: dec x 9 (9)
• Finish stuffing firmly.
• F/O and sew the hole closed.
• If it is easier, you can f/o after round 23 and skip round 24 & 25.

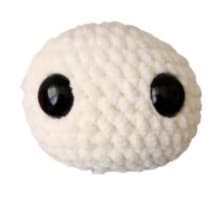
Head
• The head is worked from top to bottom.
1: 9 sc in mr (9)
2: inc x9 (18)
3: (2sc,inc)x6 (24)
4: (inc,sc)x12 (36)
5-11: (7 rounds): 36 sc (36)
12: (sc,dec)x12 (24)
• Add eyes between round 7 & 8 with 4 visible stitches between.
• Adjust as needed.
13: (2sc,dec)x6 (18)
• Stuff firmly and shape.
• F/O and leave a long tail to sew the head to the body.
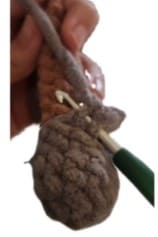
Mittens & arms (make 2)
• Start off with mitten color.
1: 9 sc in mr (9)
2: (inc,2sc)x3 (12)
3-4: (2 rounds): 12 sc (12)
5: (sc,dec)x4 (8)
6: 8 sc (8), cc to brown at the end.
Lightly stuff at the mitten. Do not stuff the arm.
7: BLO: 8 sc (8)
8: (dec,2sc)x2 (6)
9-14: (6 rounds): 6 sc (6)
15: Fold in half 3 sc across both sides (3)

F/O and leave a tail to sew the arms onto the body.
After you sew the arms on, add a surface crochet BBL for the thumb on the side of mitten facing outward toward belly.

With the mitten facing towards you, attach yarn in the front loop left in round 6 and make & sc around.
Buttons (make 2-3)
• 2 options: you can make separate pieces and sew them on or surface crochet BBL’s.
• Using thinner yarn (worsted weight) and a smaller hook size (3.5mm).
Option 1: separate pieces.
1: 6 sc in MR (6)
• F/O and leave a tail to sew onto the body.
Option 2: surface crochet BBL’s.
• ch 2, then make 3 unfinished dc in the same stitch and go through all 4 loops on hook,ch 1 and fasten off.
Add the buttons to the middle of the belly and space them out evenly.
(optional) add eye and smile detail.
Carrot nose
• Using orange yarn:
1: 4 sc in MR (4)
2: 4 sc (4)
3: (inc,sc)x2 (6)
4: 6 sc (6)
• Fasten off, and leave a tail to sew onto the face.

Top hat
• The hat is worked from top to bottom.
1: 9 sc in MR (9)
2: inc x9 (18)
3: BLO: 18 sc (18)
4-6: (3 rounds): 18 sc (18), cc to stripe color.
7: BLO: 18 sc (18), cc to hat color.
8: BLO: 18 sc (18)
9: FLO inc x18 (36)
10: 36 sc (36)
Fasten off, weave tail on inside.
Sew the hat onto of the head either slightly off centered or centered (adjust to preference).

You can get a PDF for free.


