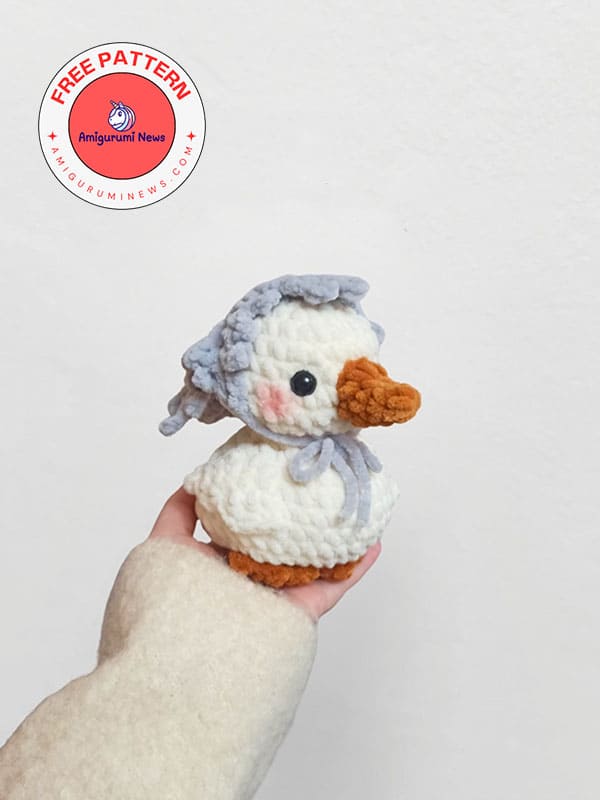
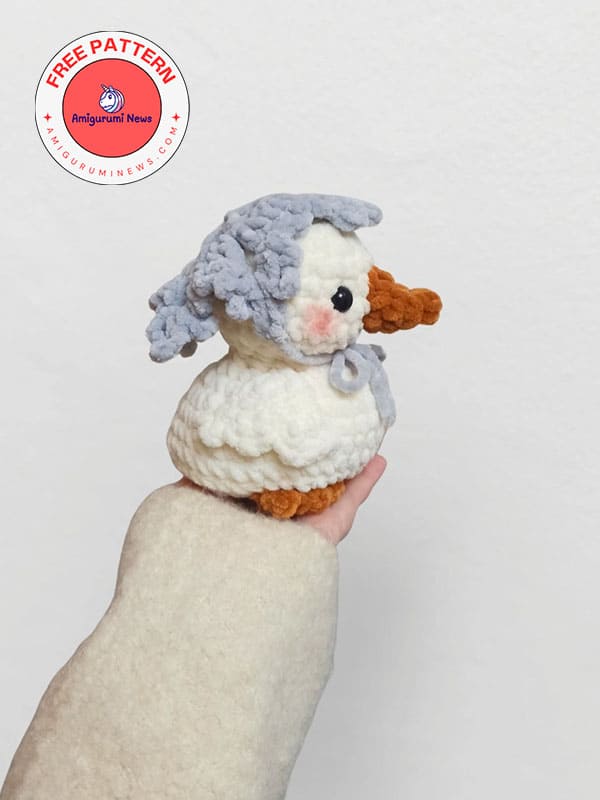
This little crochet duckling instantly makes you smile with its chubby body, tiny wings, and gentle expression. Designed with a soft plush texture and rounded stitches, it perfectly represents the cozy world of crochet animals. The small beak, blushed cheeks, and floppy hat-like detail on its head give this duckling a calm and innocent personality, making it feel almost alive in your hands.
Unlike sharp or overly detailed amigurumi designs, this duckling focuses on softness and warmth. Its smooth curves and simple color palette create a comforting look that works beautifully as a nursery decoration, a desk companion, or a heartfelt handmade gift. Whether you are crocheting for yourself or for someone special, this crochet duckling pattern offers a relaxing and enjoyable project from start to finish.
The compact size also makes it easy to finish in a short time, which is perfect if you love completing small crochet animals without long interruptions.
Little miss crochet duckling pattern
What truly makes this crochet duck pattern special is its soft and cuddly character, as well as the wonderful snowflake-motif bonnet accessory. Its round body fits perfectly in the palm of your hand, while its short wings and stitched facial features give it a peaceful, baby-like charm. This is an ideal type of crochet duckling for children’s rooms or calming spaces, giving off a comforting rather than purely decorative feel.
This amigurumi pattern is suitable for beginners but is also satisfying for experienced crocheters. You’ll practice techniques necessary for creating polished and professional-looking crochet animals, such as smooth shaping, clean stitch definition, and balanced proportions. The design also allows for easy customization: you can change the yarn texture for a fluffier look or adjust the colors to create different duckling personalities.
In white, using a 5mm hook:
R1: 6 sc in MR (6)
R2: inc X 6 (12)
R3: (sc, inc) X 6 (18)
R4: (2sc, inc) X 6 (24)
R5-6: sc around (2 rounds) (24)
The st markers on the next round mark the cheeks (where the blush will go).
R7: 7sc, place a st marker on the last st, 2inc, 6sc, 2inc, place a st marker on the next st, 7sc (28)
R8: sc around (28)
R9: (2sc, dec) X 7 (21)
R10: (sc, dec) X 7 (14)
Add safety eyes between R6&7 with 6 visible sts between them. Stuff the head and cheeks generously.
R11-12: sc around (2 rounds) (14)
R13: inc X 14 (28)
R14: 4inc, 21sc, 3inc (35)
R15-18: SC around (4 rounds) (35)
R19: 3hdc inc (these should be at the center- back of the duck), sc32 (38)
R20: sc around (38)
R21: dec X 19 (19)
Stuff the body generously.
R22: (sc, dec) X 6, sc (13)
R23: (sc, dec) X 4, sc (9)
Slst and FO. Sew closed and secure.
Duckling wings
In white, using a 5mm hook, make 2:
R1: ch7 (7)
R2: Starting in the 2nd ch from the hook, work 6 sc, ch1 and turn (6)
R3: 5sc, ch1 and turn (5)
R4: Sk1, 4sc, ch1 and turn (4)
R5: 3sc, ch1 and turn (3)
R6: Sk1, 2sc (2)
FO, leaving a long tail for sewing.
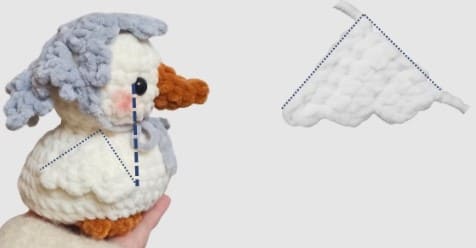
Align the wing to the body for sewing. The FO tail should be at the front of the duck body and should align with the eye placement (dashed line below). The top of the wing should start at R12 and the bottom of the wing should align with R16. Sew 2 edges to the body, leaving the scalloped edge free (sew along the dotted line below).
FO edge:
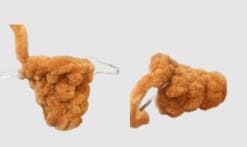
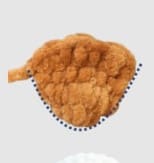
Duckling beak
In orange, using a 4mm hook:
R1: 4 insc MR (4)
R2: (sc, inc) X 2 (6)
R3: sc around (6)
R4: Place a ST marker on the last st, inc X 2, place a st marker on the next st, 4 sc (8).
Slst and FO, leaving a long tail for sewing. Leave unstuffed and sew the beak across R5-8 of the head. Make sure that the increases marked with a st marker are at the top of the beak.
Duckling feet
In orange, using a 4mm hook, make 2:
R1: 5 sc in MR (5)
R2: inc X 5 (10)
R3: Fold in half, tuck the MR tail into the foot and work 5sc in both loops of both sides, ch1 and turn (5)
R4: (dc, slst) X 2, [dc, slst]
FO, leaving a long tail for sewing.
Sew the base of the feet to R23 of the body. Slightly angle to feet outwards and sew along the sides (dotted line) to secure in place.
Snowflake bonnet
In light blue, using a 4mm hook:
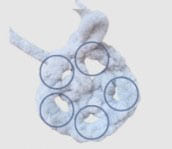
R1: ch 6 in a MR, (this counts as the first dc), work (dc, ch3) X 4, slst into the 3rd ch from the initial ch6 to complete the round.
R2: In this round we will work into the CH3 spaces only (see circles in R1). Slst into the next ch3 space, ch3 (counts as first dc), 4dc, ch3, (5dc, ch3) X 4, slst into the 3rd ch.
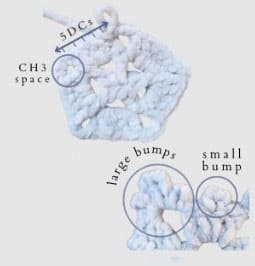
R3: In this round we will make a small bump in the middle of the dc sts and large bumps in the ch3 spaces (see pics).
(2slst, ch3, 3slst this makes a small bump. You should now be in the ch3 space. In this space we will work the large bumps: ch3.
Slst, ch5, slst, ch7, slst, ch5, slst, ch3, slst.) X 5 to create all the points of the snowflake.
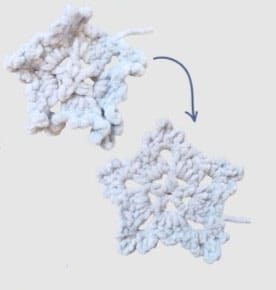
Slst and FO, leaving a long tail. The snowflake will be curled when finished. Stretch and shape it so that it becomes flat and shapely. You can also block it if you like!
Using the long FO tail and a tapestry needle, sew along the edge of the snowflake so the tail is at one of the 5 points. Attach another tail 2 points away. Secure and hide the MR tail. We will use these tails to secure the bonnet to the head – tie a bow under the duck chin to secure and trim excess yarn.
I curved the bonnet around the duck head to give it some shape and keep her nice and warm!
Optional:
Use pink yarn and a tapestry needle to add blush to the ducks cheeks, just under the eyes. Alternatively, you can use powdered blush and a small brush to apply.