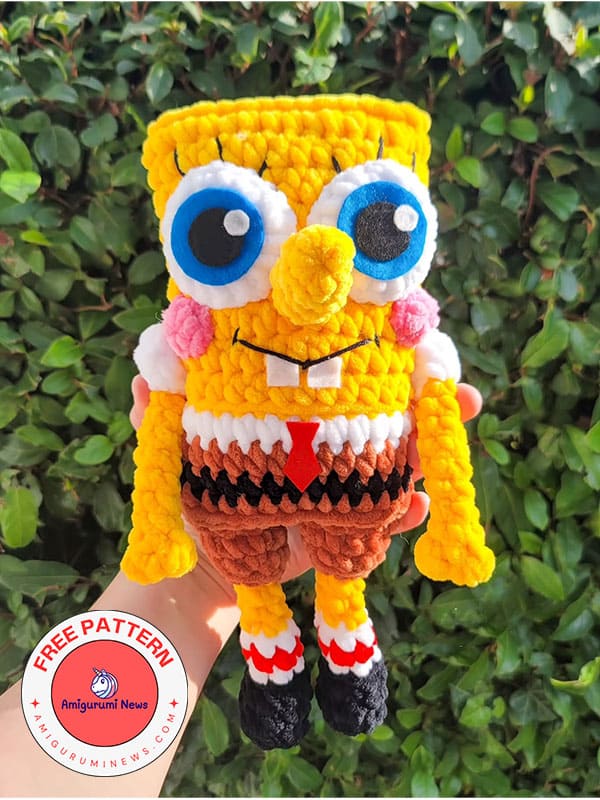
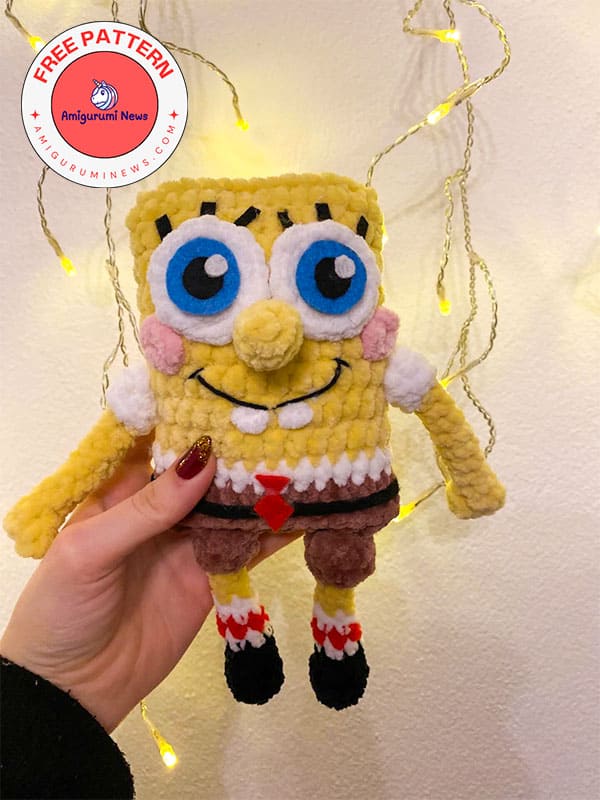
Amigurumi lovers who enjoy fun and nostalgic designs will instantly fall in love with this amigurumi spongebob free pattern. Inspired by one of the most iconic cartoon characters, this crochet project is perfect for fans of handmade toys and playful decor. With its bright yellow body, expressive eyes, and detailed outfit, Spongebob is one of the most popular crochet cartoon figures.
Using a crochet spongebob free pattern, you can create a soft and adorable amigurumi doll suitable for gifts, collections, or even home decoration. This project is beginner-friendly if you are familiar with basic amigurumi techniques such as single crochet, increases, and decreases.
Crocheting cartoon characters is also a great way to improve shaping and color-changing skills. The Spongebob design allows you to practice facial details, body proportions, and small accessories, making it both fun and educational for crochet enthusiasts.
Amigurumi spongebob free pattern
One of the best things about a crochet spongebob free pattern is the freedom to customize. You can adjust the size by changing yarn weight or hook size, or personalize details like facial expressions and colors. These patterns are also perfect for creating a full collection of crochet characters, making them ideal for fans of themed amigurumi projects.
Whether you are crocheting for fun, improving your skills, or creating handmade gifts, an amigurumi spongebob free pattern is a great addition to your crochet animals and character collection. This cheerful design combines creativity, nostalgia, and craftsmanship, making it a rewarding project for any crochet lover.
ch- chain
MR- magic ring
sc- single crochet
inc- increase
dec- decrease
hdc- half double crochet
FLO- front loop only
BLO- back loop only
CC- color change
FO- fasten off
Mbob- mini bobble stitch (4 loops on your hook)
btl- back third loop
Materials:
Yarn: yellow, brown, white, red, pink, black.
Some felt.
Black yarn for embroidery.
Body
Start with yellow and chain 15.
R1. Starting in 2nd ch from hook, make 14 hdc down chain, turn and work 14 hdc on the other side of the chain (28)
R2. In BTL, work 28 hdc around (28)
R3-10. Work hdc around (28) – 8 rounds.
CC to white, begin stuffing and stuff as you go.
R11. In BLO, hdc around (28)
CC to brown:
R12. Hdc around (28)
CC to black, do not fasten off brown.
R13. sc around (28)
Continue with brown:
R14. Hdc around (28)
R15. In BTL, hdc around (28)
FO, leave a long tail for sewing, finish stuffing sew bottom together and hide tails.
You’ve completed SpongeBob’s body. We can say we’ve covered the biggest part. Now all that’s left are the arms, legs, and small details.
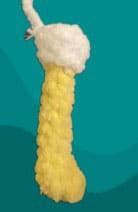
Arms X2
Don’t stuff.
Start with yellow:
R1. MR 4 sc (4)
R2. 2sc, MBOB, sc (4)
R3-10. sc around (4) – 8 rounds.
CC to white.
R12. BLO sc (8)
R13. (sc,dec)x2, 2sc (6)
FO and leave a tail for sewing.
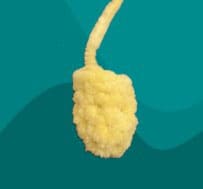
Now we’re going to make SpongeBob’s iconic nose.
Nose
Start with yellow:
R1. MR 6 sc (6)
R2-5. sc around (6) – 4 rounds.
Slightly stuff.
FO and leave a tail for sewing.
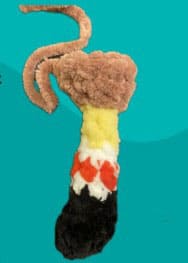
Legs X2
Start with black:
R1. MR 6 sc (6)
R2. inc x6 (12)
R3. 3sc, 3dec, 3sc (9)
R4. sc, 3dec, 2sc (6)
CC to white, only stuff the foot.
Do not stuff the leg.
R5. In BLO, sc around (6)
CC to red, do not fasten off white.
R6. sc around (6)
Continue with white.
R7. sc (6)
CC to yellow.
R8. In BLO, (sc,dec)x2 (4)
R9-10. sc around (4) – 2 rounds.
CC to brown.
R11. In FLO, inc x4 (8)
R12. In BLO, (3sc,inc)x2 (10)
R13. sc around (10)
FO and leave a tail for sewing.
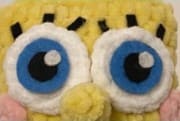
Eyes option 1
Start with white:
R1. MR 6 sc (6)
R2. inc x6 (12)
R3. (sc,inc)x6 (18)
FO, leave a tail for sewing.
Felt:
Cut out 2 big circles of blue.
2 black ones.
2 little white ones.
Glue sew them on.
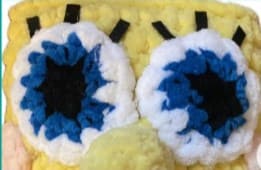
Eyes option 2
Start with black:
R1. MR 6 sc (6)
CC to blue:
R2. inc x6 (12)
CC to white:
R3. (sc,inc)x6 (18)
FO, and leave a tail for sewing.
Blush X2
Start with pink:
R1. MR 6 sc (6)
FO, leave a tail for sewing.
Teeth X2
Start with white and chain 2.
R1. In 2nd chain from hook, make 1 sc (1)
FO, and leave a tail for sewing.
Finishing touches
Sew the eyes to the body around R4-7.
Sew the nose between the eyes.
Sew blush next to the eyes.
Sew arms to the body, make sure that the thumb is facing the body.
I sewed them on right under the blush on R8 of the body.
Sew legs to the bottom of the body.
Make sure the toes are pointing forwards.
Embroider the mouth.
Sew on the teeth.
Cut out a red tie of felt and glue in front of the belt.
Cut out some lashes and glue them on.