

This adorable crochet teddy bear pattern is a lovely project for anyone who enjoys making soft and charming amigurumi toys. With its rounded ears, tiny stitched face, and plush texture, this little bear has a sweet handmade look that makes it perfect for gifts, nursery decor, or craft fair items. The cozy design works especially well as a crochet teddy bear pattern chunky yarn project, giving it a fluffy and cuddly finish that feels extra warm and comforting.
Free simple crochet teddy bear pattern
Because the shape is easy to build and the details stay minimal, it also works beautifully as a crochet teddy bear pattern for beginners. Even if you are still learning amigurumi basics, this pattern is simple enough to follow while still looking polished and adorable. A simple crochet teddy bear pattern like this is ideal when you want something cute, quick, and beginner-friendly without too much sewing or complicated shaping.
The finished teddy has a timeless look that appeals to both kids and collectors. Small, soft, and irresistibly cute, it’s the kind of handmade bear that instantly becomes a favorite.
Designer: rachelslittleshop
Materials and tools:
10 mm safety eyes (may change based on your hook and yarn)
Big twist posh: vanilla bean
4 mm crochet hook
Polyfill/stuffing
Stitch marker
Darning needle
Scissors
Optional: ribbon (for bowtie)
Abbreviations:
MC- magic circle
sc- single crochet
hdc- half double crochet
dc- double crochet
inc- increase
dec- decrease
st- stitch
slst- slip stitch
ch- chain
FO- fasten off
Head
R1. 8 sc in MC (8)
R2. 8 inc (16)
R3. (sc,inc)x8 (24)
R4. (3sc,inc)x6 (30)
R5-8. 30 sc (4 rounds) (30)
R9. 8sc, 4 inc, 6sc, 4 inc, 8sc (38)
R10-11. 38 sc (2 rounds) (38)
R12. 8sc, 4dec, 6sc, 4dec, 8sc (30)
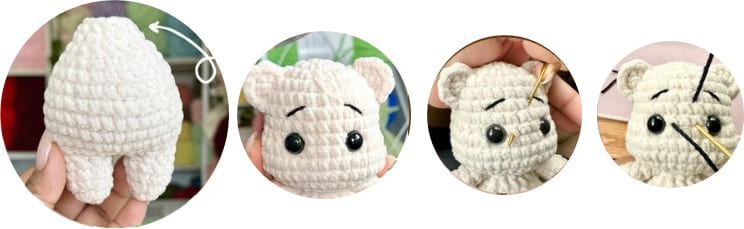
Insert eyes between R8-R9 5 stitches apart.
R13. (3sc,dec)x6 (24)
Begin to stuff the head.
R14. 12dec, slst (12)
Finish stuffing head.
Leave a long tail to sew onto body.
Legs + body
R1. 5 sc in MC (5)
R2. 5 inc (10)
R3-5. 10 sc (3 rounds) (10)
FO leg#1. Repeat R1-R5 for leg#2, do not FO.
Ch 1, join to leg#1 with a sc. (this is first stitch of next round).
R6. 8sc, 5inc, 9sc (27)
R7. 10sc, (sc,inc)x3, 11 sc (30)
R8-R11. 30 sc (4 rounds) (30)
Begin stuffing legs + body.
R12. (3sc,dec)x6 (24)
R13. 24 sc (24)
R14. (2sc,dec)x6 (18)
Continue stuffing body.
R15. 18 sc (18)
R16. (sc,dec)x6 (12)
R17. 12 sc, FO (12)
Arms
R1. 8 sc in MC (8)
R2-R6. 8 sc (5 rounds) (8)
Stuff up to row 4.
R7. (2sc,dec)x2 (6)
Fold and make 3 sc across opening. Leave a long tail to sew onto body.
Ears
Right ear:
Insert hook between R5-R6,slst and sc into the same stitch.
R4-R5. 4 dc in the same stitch.
R3-R4. slst. FO and weave in ends.
Left ear:
Insert hook between R3-R4 slst.
R4-R5. 4 dc into the same stitch.
R5-R6. sc, and slst.
FO leaving a short tail and join with other loose end and tie.

Assembly
Sew head to the body on R16 for a more stable join.
Embrodier brows on R5-R6 and R6-R7 3 stitches apart.
Sew the arms between head and bod, making sure they are aligned evenly on both sides of the body.
Embroider nose on R8-R9.
Bow tie
Cut a 12″ piece yarn or ribbon to make a bow tie around the neck. (Adjust the length as needed for your plushie)


