Spring is the perfect season to create something soft, cheerful, and handmade, and a crochet chick pattern is one of the cutest projects to try. Whether you are decorating for Easter, making a baby gift, or simply adding charm to your handmade collection, a tiny chick brings warmth and personality to any design. Many crafters love a crochet spring chick because it captures the playful and bright feeling of the season with simple shapes and soft yarn colors.
Tiny spring crochet chick pattern
This project is ideal for beginners and experienced makers alike, since most chick designs use easy stitches and quick assembly. You can customize your chick with pastel shades, embroidered details, or even tiny accessories like bows, flowers, or mini eggs. It also pairs beautifully with other crochet animals, making it a fun addition to a spring-themed amigurumi set.
A handmade chick is more than just a decoration—it is a joyful little creation that adds a touch of happiness to your crochet time. If you enjoy seasonal projects, this adorable design is a wonderful way to celebrate spring with creativity.
Start with yellow color:
R1. 8 sc into the MR (8)
R2. (inc)*8 times (16)
R3. (1sc,1 inc)*8 (24)
R4. (3sc, 1 inc)*6 (30)
R5. 10 sc, change to orange, 1 BO, change to yellow, 8 sc, change to orange, 1 BO, change to yellow, 10 sc (30)
R6-7. 30 sc (30)
R8. 8 sc, 5 ch – 4 sc down the chain, 1 sc, 5 ch – 4 sc down the chain, 12 sc, 5 ch – 4 sc down the chain, 1 sc, 5 ch – 4 sc down the chain, 8 sc (30)
R9. (4sc, 1dec)*5 (25)
R10. 25 sc (25)
R11. (3sc,1dec)*5 (20)
R12. 20 sc (20)
Attach the eyes between rounds 9 and 10, leave 2 sc between the eyes.
R13. (2sc,1dec)*5 (15)
R14. (1sc,1dec)*5 (10)
R15. (dec)*4 (6)
Cut the yarn, weave in the yarn tail in front loops of the remaining six stitches with your hook or sewing needle, then pull to and hide the end of yarn inside the chick.
Embroider the beak with orange yarn.
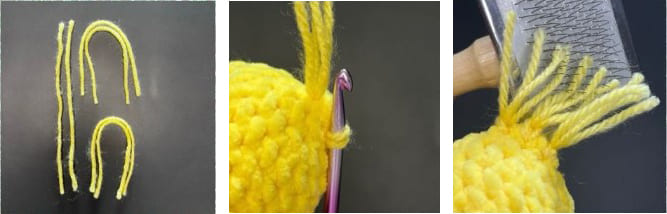
Head tuft
Cut 6 pieces of acrylic yarn (about 2-3 in / 5-7 cm each).
Attach them on top of the chick’s head in 3 spots (2 strands per spot).
To attach: Fold the yarn in half, insert your hook into a stitch, pull the loop through, then pull the ends through the loop and tighten.
Brush to fluff using a pet brush.