

Hello everyone who loves amigurumi,
Today I shared the amigurumi frog pattern for you. It’s easy to crochet the free frog amigurumi pattern step by step. You can use it as a keychain. You can use it for decor in your home. You can use it to decorate your children’s room. You can surprise your loved ones by crocheting different colors. You can make the eyes and cheeks of the amigurumi frog free pattern using buttons. Let’s crochet the body and head together. After completing its arms and legs, our amigurumi toy will be finished. You can then decorate as you wish. Thank you to the creator of the amigurumi frog pattern free. Don’t forget to add it to your favorite list and share it with your loved ones.
Amigurumi Frog Lovely PDF Free Pattern
Designer: grannyscrochethook
You Will Need
• Fingering yarn (170m/ 50g)
– 8 gr of green
– 6 gr of off-white
– 6 gr of burgundy
– scraps of fuchsia and red
• 24 gr of fiberfill
• 44 cm of 2mm green synthetic crafting cord
• Plastic buttons (yellow, 2 x 5 mm; pink, 2 x 10 mm; black, 1 x 4 mm)
• 1,4mm crochet hook
• Stitch marker, sewing needle, scissors
• 2 cups of coffe
Size: 70mm in diameter if made with indicated yarn and hook size.
Abbreviations
MR- magic ring
st- stitch
ch- chain
slst- slip stitch
sc- single crocnet
dc- double crochet
inc- increase
dec- decrease
Rnd- round
Eyes And Body
Eye 1
In green
Rnd 1. 6sc in a MR (6)
Rnd 2. (inc, sc) x 3 (9)
Rnd 3. sc in each st around (9)
Fasten off
Eye 2
Repeat rounds 1-3 of eye 1, but do not fasten off as the eyes are about to be joined
Body
Rnd 1. Working on eye 2, 4sc, ch 12, join eye 1 with a sc, 8 more sc along eye 1, 12sc in the chain, 5sc along eye2 (42)
Rnd 2. sc in each st around (42)
Rnd 3. (3sc, inc, 3sc) x 6 (48)
Rnd 4. (7sc, inc) x 6 (54)
Rnd 5. (4sc, inc, 4sc) x 6 (60)
Stuff the eyes
Rnd 6-11. (6 rounds) sc in each st around (60)
Change to off- white
Rnd 12-18. (7 rounds) sc in each st around (60)
Change to burgundy
Rnd 19-21. (3 rounds) sc in each st around (60)
Rnd 22. (4sc, dec, 4sc) x 6 (54)
Rnd 23. (7sc, dec) x 6 (48)
Rnd 24. (3sc, dec, 3sc) x 6 (42)
Rnd 25. (5sc, dec) x 6 (36)
Rnd 26. (2sc, dec, 2sc) x 6 (30)
Start stuffing the body
Rnd 27. (3sc, dec) x 6 (24)
Rnd 28. (sc, dec, sc) x 6 (18)
Rnd 29. (sc, dec) x 6 (12)
Make sure your work is stuffed rock hard
Rnd 30. dec x 6 (6)
Close the hole, fasten off weave in the end.
Arm (x2)
Start in green
Rnd 1. 6sc in a MR (6)
Rnd 2-7. (6 rounds) sc in each st around (6)
Change to off- white
Rnd 8-14. (7 rounds) sc in each st around (6)
Fasten off, leaving a long tail for sewing.
Sew the arms on either side of the body between rounds 12 and 13
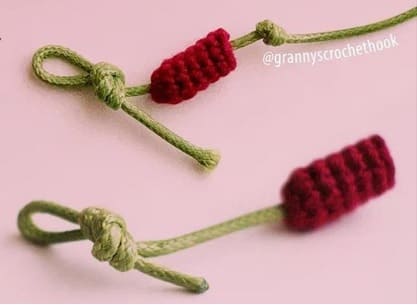
Leg (x2)
In Burgundy
Rnd 1. 8sc in a MR (8)
Do not pull the MR too tight as you’ll need to insert the lower part of the in it later.
Rnd 2-6. (5 rounds) sc in each st around (8)
Fasten off leaving a tail for sewing.
Cut a 20-22 cm piece of cord and pass it through the MR. Tie knots on both ends as shown in the pictures below. Adjust the length to your liking; cut off the excess cord, if needed. Sew the legs to the bottom of the body symmetrically, approx. between rounds 27 and 25
Mouth
In Fuchsia
Rnd 1. ch 14; starting from the 2nd ch from hook, 13 slst (13)
Fasten off. Split a tail of yarn into strands and, using a singleone, sew the mouth approx. between rounds 4 and 8 of the body, centered.
Bow Tie
In red
Leave a long starting tail.
Rnd 1. (ch 3, 4dc, ch 3, slst) x 2 in a MR
Pull the ring tight, cut the yarn leaving another long tail. Wrap both tails around the center of the work to from the bow shape, tie a knot. Use
the same tails to secure the bow tie on the body, centered, between rounds 11 and 12
Finish Touches
• Sew a 5mm yellow button to the center of each eye
• To make cheeks; sew 10 mm pink buttons on either side of the mouth, approx. between rounds 5 and 8 of the body
• Sew the smallest button in the center of the body, approx. 2 rounds below bow tie.
• Using scraps of off- white yarn, embroider shortlines on the bottom of the body to decorate the pants.
• Make a loop for hanging


