
Hello everyone who loves amigurumi,
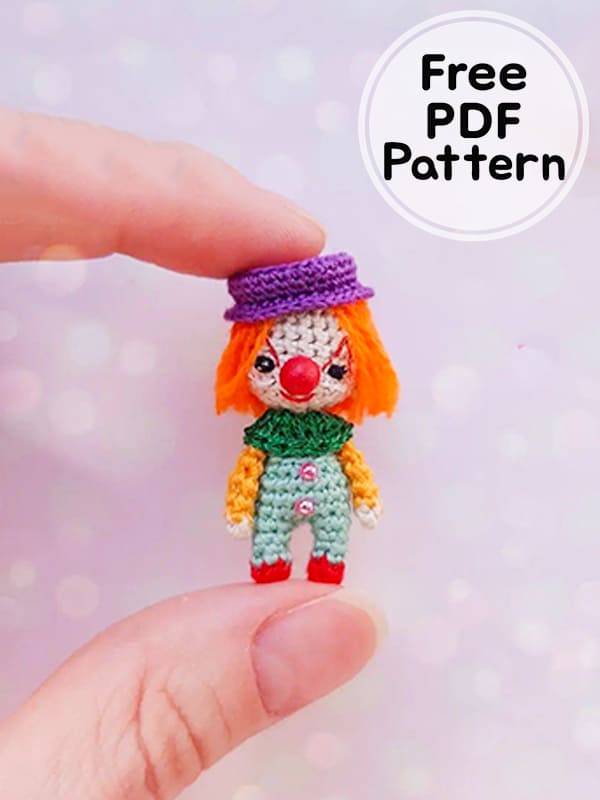
Today I shared the amigurumi clown pattern for you. The free amigurumi pattern is very suitable for use as a keychain. Amigurumi crochet doll is easy to crochet step by step. You can crochet your favorite amigurumi crochet dolls using different colors of yarn. Amigurumi doll hat is crocheted using purple yarn. Her hair is crocheted using orange color yarn. We will crochet the legs and body part together. After completing the arms and head, let’s sew them in place on the body part. You can decorate the amigurumi doll free pattern as you wish. Thank you to the creator of the amigurumi pattern.
Crochet Doll Clown Amigurumi Keychain PDF Free Pattern
Designer: tanushka.toys
Materials
Mouline thread for embroidery. Separate 3 strands from the twist. You can take muline of any color.
• Acrylic yarn (bright orange). For hair
• Black and red sewing thread for eye and mouth decoration
• Hook 0,75mm
• Plastic half-beads with a diameter of 2mm for buttons
• A piece of polymer clay for the spout
• Acrylic colors: red, white and black for makeup
• Glue
• Nail scissors
• Sintepon for stuffing
Abbreviations
ch- chain
sc- single crochet
dc- half double crochet
hdc – half double crochet
Rnd- round
MR- magic ring
inc- increase
dec- decrease
BLO- Back loop only
FLO- Front loop only
All knitting goes in a spiral, at the end of the row, in brackets, the total number of loops in the row is indicated. If you are afriad of losing the loops and rows, use a marker (you do not need to follow it).
Body
We begin to knit from the legs. We knit them 2 pieces. We do not cut the thread at the second leg, we will begin to knit the body from it.
Rnd 1. In red. 5sc in MR (5)
Rnd 2. 5sc (5)
Change to a thread of the main color.
Rnd 3-4. 5sc (5)
Finished the first leg. The thread was cut and tucked in.
Tied the second leg, we begin to knit the body. Remember, we do not cut the thread we continue.
Rnd 5. On the second leg, knit 5sc, 2ch, 5sc on the first leg, 2sc along a chain of 2 ch (14)
Rnd 6-9. 14sc (14)
Rnd 10. Make reductions on the sides and in the front (we make out the belly). The sum should come out 11sc.
Rnd 11. BLO 11 dc
Rnd 12. dec x 5, 1sc (6)
Rnd 13. 6 dc
Head
We knit inside out
Rnd 1. 6sc, MR
Rnd 2. 6 inc (12)
Rnd 3. (1sc, inc) x 6 (18)
Rnd 4. (2sc, inc) x 6 (24)
Rnd 5-9. 24sc
Rnd 10. (2sc, dec) x 6 (18)
Rnd 11. (1sc, dec) x 6 (12)
Rnd 12. dec x 6 (6)
Ears
Take your head horizontally facing you. Approximately on the 8th row on the side of the head (from the crown), grab the ch, knit the hdc into this loop of the head. Fasten the thread, stretch it to the opposite side, where the second ear will be, and knit 1 ch, 1 hdc. Fasten and cut the thread.
Collar
For the collar, 1 take 2 threads of a mouline and a 0,75 mm hook.
Rnd 1. 20 hdc in MR. But! do not tighten the ring too much, it should be wom around the neck. If 20 hdc is not enough, then dial a little thread.
Put on the collar, sew on the head.
Arms (x2)
Rnd 1. Primary color thread. 4sc
Rnd 2. Change to a yellow thread. For the FLO row, knit 1 inc, 3sc (5sc)
Rnd 3-4. 5sc
Rnd 5. dec, 3sc (4)
Finish, leave the thread for sewing. Sew to the body at the level of the 11th row, where they knitted on the body by the BLO
Hat
Leave a long thread first to grab the hat to the head
Rnd 1. 6sc in MR
Rnd 2. 6 inc (12)
Rnd 3. (1sc, inc) x 6 (18)
Rnd 4. 1sc, inc, (2sc, inc) x 5, 1sc (24)
Rnd 5. FLO. 24sc
Rnd 6-7. 24sc
Rnd 8. (3sc, inc) x 6 (30)
Rnd 9. 2sc, inc, (4sc, inc) x 5, 2sc (36)
Cut and fasten the thread.
Assembly
Sew/ glue buttons/ half-beads on the body. I made my hair simple. CUt the acrylic yarn into pieces 5cm long. Pass them in two strands along the lopps of the head (in a circle), leaving an empty space on the crown (it will be like a bold spot). Trim the length of your hair. Roll the hair roots to the head, while distributing the strands. Sew the eyes with black threads in the 8th row from the crown. The distance between the eyes should be 4 st. Make the noseout of polymer clay. Blind a ball with a diameter less than 8,5cm. Since I do not know how to bake polymer clay, I cook it. Cook for 10-15 minutes. Glue the nose between the eyes with super glue. Sew the mouth with red thread, making it look like a smile. To keep it better, take a little glue and secure your mouth with it. Paint the makeup with acrylic paints. Draw the triangles above the eyes with red paints, draw the lines under the eyes with white. Go over the eyes in black so that the threads (with which the eyes were embroidered) do not stand out so much. Also, with white paints, put two dots in front of the eyes, this will give the eyes shine. Sew the hat to your head, or you can glue it on.


