
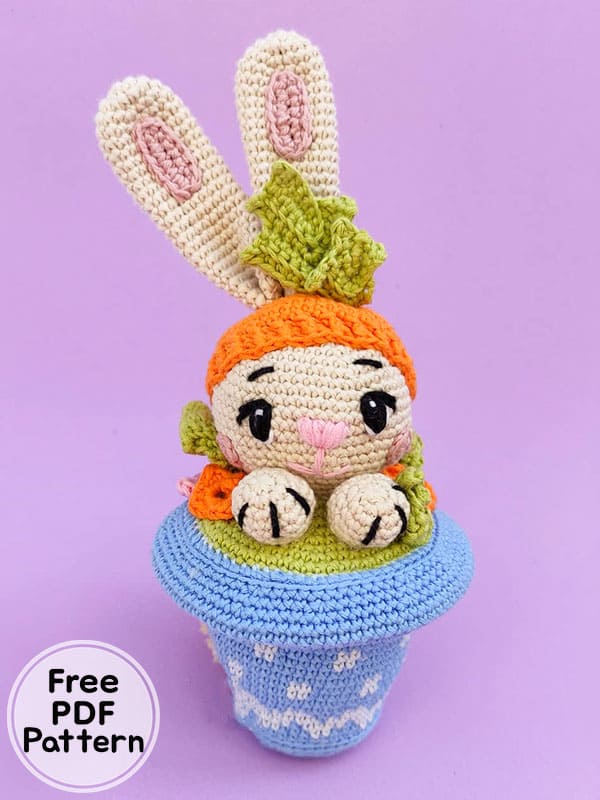
Hello my friends, Today I shared a different look amigurumi pattern. The designer, who interprets the crochet bunny amigurumi pattern differently, has created a wonderful work. I’m so excited to share this with you. Crocheting an amigurumi toy that looks like it is hidden in a flower pot is medium difficulty. Amigurumi pattern consists of three main parts. We will crochet step by step as flower pots, crochet bunny pattern and decorations. In the description section, I wrote in detail how to crochet.
You can prepare the bunny free amigurumi patterns to give as a gift at new home visits. You can use the amigurumi toy for decoration all over your home. It is most suitable for kitchen and living room. It will be the cutest decor for children’s rooms. Thank you to the creator of the toy amigurumi patterns free.
Crochet Bunny in Flowerpot Amigurumi Patterns Free PDF
Designer: laso.handmade
Materials
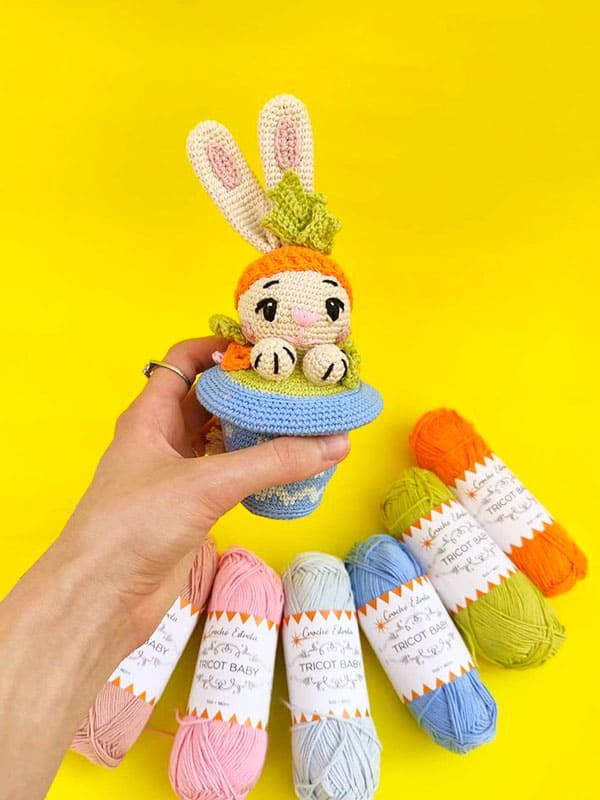
Croche Estrela Tricot Baby (100% cotton) (1,8 oz (50g)) = approx 180m
Colors; 749- Baby pink, 759- Orange, 547-Green, 711-Pink, 216- Blue, 238- Blue, 087-Beige
Crochet hook 2,00mm
Tapestry needle
Filling
Cardboard
Abbreviations
MR- magic ring
sc- single crochet
inc- increase
dec- decrease
ch- chain
slst- slip stitch
dc- double crochet
hdc- half double crochet
BLO- back loop only
** – repeat information between
()- number of stitches in the round
Head
Croche Estrela Tricot Baby 087- Beige
Rnd 1. 6sc in MR (6)
Rnd 2. *inc* (12)
Rnd 3. *1sc, inc* (18)
Rnd 4. *2sc, inc* (24)
Rnd 5. *3sc, inc* (30)
Rnd 6. *4sc, inc* (36)
Rnd 7. *5sc, inc* (42)
Rnd 8. *6sc, inc* (48)
Rnd 9. *sc* (48)
Rnd 10. *sc* (48)
Rnd 11. *7sc, inc* (54)
Rnd 12-14. *sc* (54)
Rnd 15. *8sc, inc* (60)
Rnd 16. *sc* (60)
Rnd 17. *8sc, dec* (54)
Rnd 18. *7sc, dec* (48)
Rnd 19. *6sc, dec* (42)
Rnd 20. *5sc, dec* (36)
Rnd 21. *4sc, dec* (30)
Rnd 22. *3sc, dec* (24)
Fasten off and leave a log thread to attach the head to the vase later.
Carrot
Croche Estrela Tricot Baby 759- Orange
Rnd 1. 6sc in MR (6)
Rnd 2. *inc* (12)
Rnd 3. *1sc, inc* (18)
Rnd 4. *2sc, inc* (24)
Rnd 5. *3sc, inc* (30)
Rnd 6. *4sc, inc* (36)
Rnd 7. *5sc, inc* (42)
Rnd 8. *6sc, inc* (48)
Rnd 9. *7sc, inc* (54)
Rnd 10-12. *sc* (54)
Rnd 13-14. *FLO sc, BLO sc* (54)
Fasten off and leave a log thread to attach the carrot to the head.
Ears (x2)
Croche Estrela Tricot Baby 087-Beige
Rnd 1. 6sc in MR (6)
Rnd 2. *inc* (12)
Rnd 3. *1sc, inc* (18)
Rnd 4-24. *sc* (18)
Fasten off leave a log thread to attach the ears to the carrot. Fold the base before attach.
Inside the ears (x2)
Croche Estrela Tricot Baby 711- pink
7ch, inc in the second ch from the hook, 3sc, 3sc in the first ch, 4sc, inc
Attach to the ears
Legs (x2)
Croche Estrela Tricot Baby 087-Beige
Rnd 1. *6sc in MR* (6)
Rnd 2. *inc* (12)
Rnd 3. *1sc, inc* (18)
Rnd 4-6. *sc* (18)
Rnd 7. *1sc, dec* (12)
Fasten off and leave a log thread to attach the legs to the vase
Cheeks (x2)
Croche Estrela Tricot Baby 711-Pink
Rnd 1. 6sc in MR, slst (6)
Fasten off and leave a log thread to attach the cheeks to the head.
Pot
Croche Estrela Tricot Baby 216- Dark Blue
For the pot you should cut 2 cardboard bases.
One for the base and another for the top
Rnd 1. 6sc in MR (6)
Rnd 2. *inc* (12)
Rnd 3. *1sc, inc* (18)
Rnd 4. 1sc, inc, *2sc, inc*, 1sc (24)
Rnd 5. *3sc, inc* (30)
Rnd 6. 2sc, inc, *4sc, inc*, 2sc (36)
Rnd 7. *5sc, inc* (42)
Cut the first base
Rnd 8-9. BLO *sc* (42)
Rnd 10. BLO *6sc, inc* (48)
Rnd 11. *(dark blue) 3sc, (light blue) 2sc* x 9, (d.b) 3sc (48)
Rnd 12. (l.b) 1sc, (d.b) 1sc, *(l.b) 4sc, (d.b) 1sc* x 9, (d.b) 1 sc (48)
Rnd 13. *(l.b) 4sc, (d.b) 1sc* x 9, (l.b) 3sc (48)
Rnd 14. (l.b) 3sc, *(d.b) 3sc, (l.b) 2sc* x 9 (48)
Rnd 15. (d.b) *7sc, inc* x 6 (54)
Rnd 16. (d.b) 4sc, inc, *8sc, inc* x 6, 4sc (60)
Rnd 17-18. *(d.b) 5sc, (l.b) 2sc* x 8, (d.b) 4sc (60)
Rnd 19-20. (d.b) *sc* (60)
Rnd 21-22. (d.b) 2sc, *(l.b) 2sc, (d.b) 5sc* x 8, (l.b) 2sc (60)
Rnd 23-24. (d.b) *sc* (60)
Rnd 25. (d.b) *9sc, inc* (66)
Rnd 26. (l.b) BLO *sc* (66)
Rnd 27. (l.b) BLO *10sc, inc* (72)
Rnd 28. (l.b) BLO *sc* (72)
Fasten off
To Close The Pot
Croche Estrela Tricot Baby 547- Green
Rnd 1. 6sc in MR(6)
Rnd 2. *inc* (12)
Rnd 3. *1sc, inc* (18)
Rnd 4. 1sc, inc, *2sc, inc*, 1sc (24)
Rnd 5. *3sc, inc* (30)
Rnd 6. 2sc, inc, *4sc, inc*, 2sc (36)
Rnd 7. *5sc, inc* (42)
Rnd 8. 3sc, inc, *6sc, inc*, 3sc (48)
Rnd 9. *7sc, inc* (54)
Rnd 10. 4sc, inc, *8sc, inc*, 4sc (60)
Rnd 11. *9sc, inc* (66)
Croche Estrela Tricot Baby 238- Light Blue
Rnd 12. 5sc, inc, *10sc, inc*, 5sc (72)
Cut the second base.
Fasten off and leave a log thread to attach the piece to close the pot to the pot.
Edge Of The Pot
Croche Estrela Tricot Baby 216- Dark Blue
72 ch, slst on the first chain
Rnd 1. *11sc, inc* (78)
Rnd 2. 6sc, inc *12sc, inc* x 6, 6sc (84)
Rnd 3. *13sc, inc* (90)
Rnd 4-7. *sc* (90)
Rnd 8. *13sc, dec* (84)
Rnd 9. 6sc, dec *12sc, dec* x 6, 6sc (78)
Rnd 10. *11sc, dec* (72)
Close with slst.
Fasten off and leave a log thread to attach the edge of the vase to the piece to close the vase.
This piece should be attach to the row 12 of piece to close the vase.
Flowers (x4)
Croche Estrela Tricot Baby 759- Orange, 749- Baby Pink
Make 2 in pink and 2 in orange.
In a MR, repeat the following instruction 5 x: *1slst, 1sc, 1hdc, 1dc, 1hdc, 1sc*
Carrot Leaf Big (x3)
Croche Estrela Tricot Baby 547-Green
8ch
6sc starting from the second ch from the hook, 3sc in the first ch
Continue on the other side
5sc, 3ch, turn
BLO start from the fourth ch from the hook
*5sc, 3sc together on the next sc, 4sc, 3ch, turn* (repeat x 3)
Carrot Leaf Small (x4)
Croche Estrela Tricot Baby 547-Green
5ch
3sc starting from the second ch from the hook, 3sc in the first ch
Continue on the other side
2sc, 3ch, turn
BLO start from the fourth ch from the hook:
*3sc, 3sc together on the next sc, 2sc, 3ch, turn* (repeat x 2)
Assembly
Embroder the face
Attach the cheaks to the face.
Attach the carrot to the head
Attach the ears to the carrot
Attach the leafs to the carrot
Fill the head
Embroder the details on the legs
Fill the legs
Insert the first base on the pot and fill it.
Insert the second basae
Attach the piece to close the pot to the pot, stitch by stitch.
Attach the edge of the pot to the pot, on the row 12 (of the piece to close the pot)
Attach the head and the legs to the pot.
Do a pompon the same colour as the bunny and attach it to the back of the pot.
Attach the rest of the leafs and the flowers next to the bunny head.
Congratulations, you have completed the amigurumi pattern.


