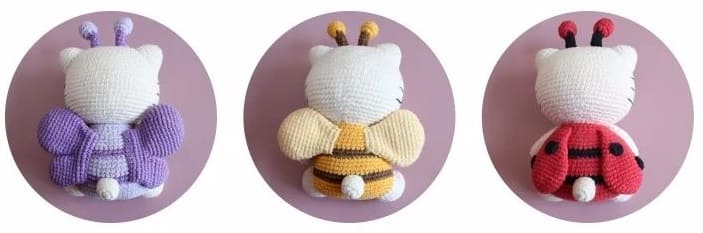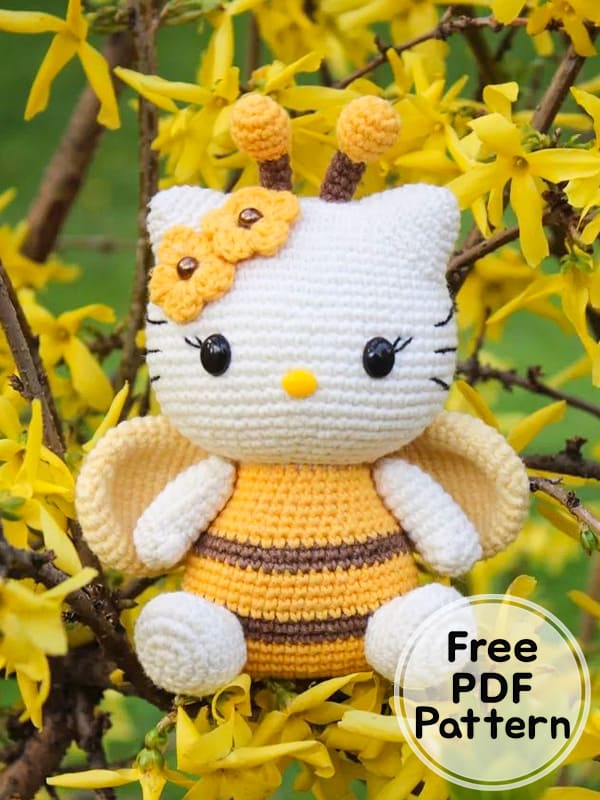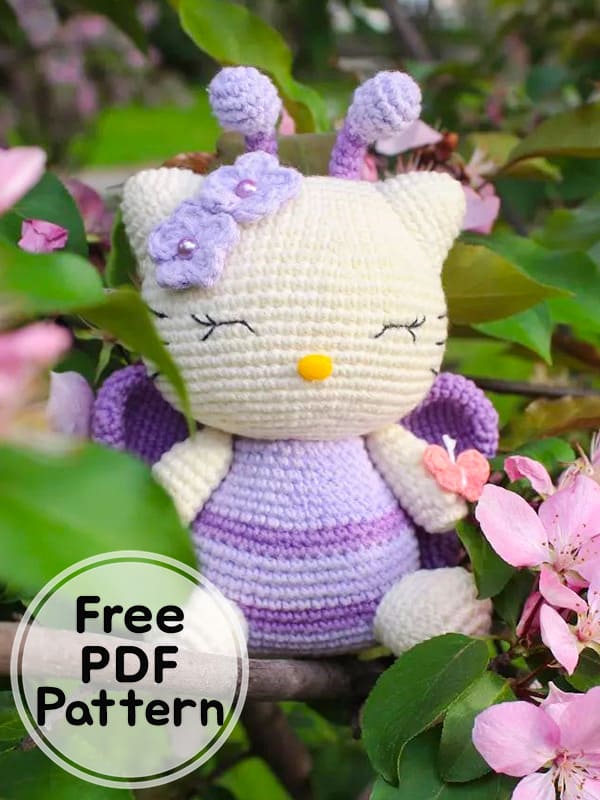
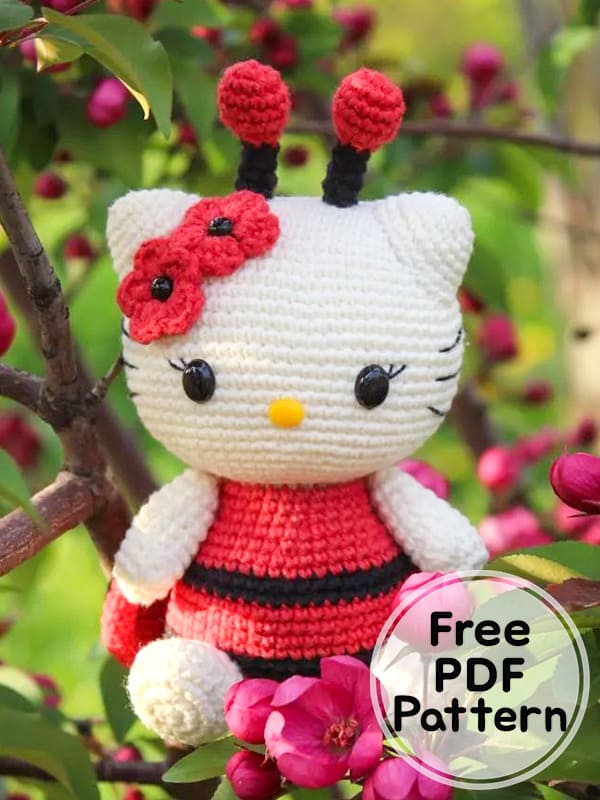
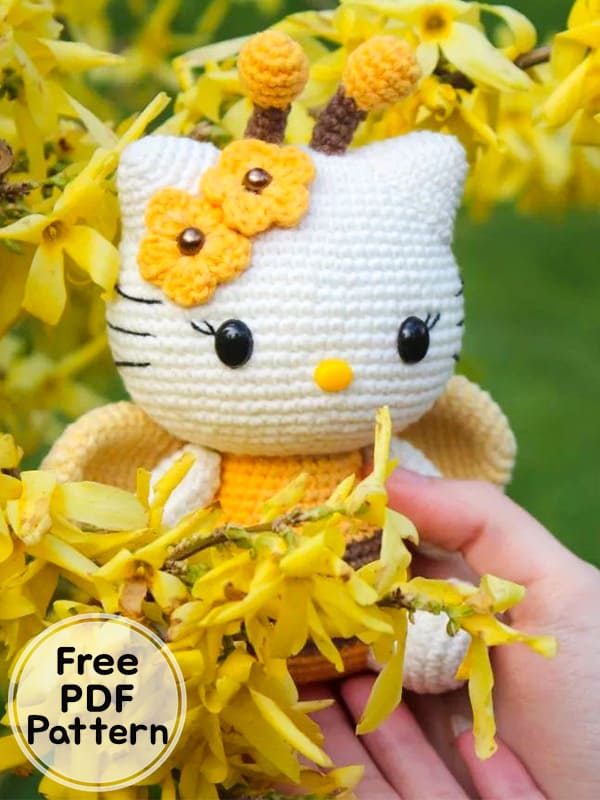
We are here with the hello kitty crochet amigurumi pattern, a character of Japanese pop culture. The height of the crochet cat toy is approximately 12 cm, excluding the antenna. To make such a small amigurumi kitty, the author used YarnArt Jeans yarn and a 2mm hook. All parts of the toy are crocheted separately and sewn together. From the step by step description of the scheme you will also learn how to connect two types of wings to decorate our spring Hello Kitty.
Crochet Butterfly Hello Kitty Amigurumi Free PDF Pattern
Designer: eugenyeva
Materials and tools
Yarn Art Jeans
No. 03 – milky (the main color for Kitty).
For Butterfly:
No. 89 – light purple;
No. 72 – lilac.
For Ladybug:
No. 26 – red;
No. 53 – black.
For Bee:
No. 35 – yellow;
No. 70 – chocolate;
No. 88 – light yellow.
Black floss threads for face decoration;
Strong cotton thread (for example, “Iris”) for attaching handles;
Crochet markers;
Filler for toys
Hook number 2;
Sewing pins;
Needle with a wide eye, as well as a thin sewing needle;
Oval half-beads of black color for the eye (8*10 mm) and yellow for the spout (6*8 mm) / pieces of felt of the corresponding colors and sizes or sewing threads for embroidery of the eye and spout;
Scissors;
A small piece of wire for the antennae.
Abbreviations
MR: Magic ring
Sc: Single crochet
Inc: Increase
Dec: Decrease
Slst: Slip stitch
Ch: Chain
Dc: Double crochet
Hdc: Half double crochet
Handles (x2)
1 row: 6 sc in MR (6)
2 row: 6 inc (12)
3 row: 12 sc (12)
4 row: 6 sc, 1 inc, 5 sc (12)
5–10 row: 12 sc (12)
Stuff the handles, fill less tightly towards the end.
11 row: 6 dec (6)
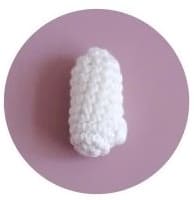
Pull and cut the thread, leaving a small tail. Using a needle, pull off the hole by passing the thread through the front half loops of the last row. hide the end threads inside the part.
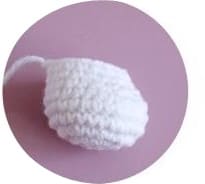
Legs (x2)
1 row: 8 sc in MR (8)
2 row: 8 inc (16)
3 row: (1 sc, inc) * 8 (24)
4–6 row: 24 sc (24)
7 row: 8 sc, 4 dec, 8 sc (20)
8 row: 8 sc, 2 dec, 8 sc (18)
9 row: 18 sc (18)
Pull and cut the thread, leaving the end for sewing.
Ears (x2)
1 row: 6 sc in MR (6)
2 row: (1 sc, inc) * 3 (9)
3 row: (2 sc, inc) * 3 (12)
4 row: (3 sc, inc) * 3 (15)
5 row: (4 sc, inc) * 3 (18)
6 row: (5 sc, inc) * 3 (21)
7 row: 3 sc, inc, (6 sc, inc)* 2,3 sc (24)
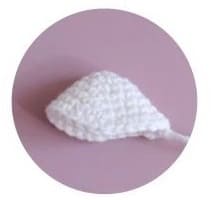
Pull and cut the thread, leaving the end for sewing.
Stuff your ears.
Tail
1 row: 6 sc in MR (6)
2 row: 6 inc (12)
3–5 row: 12 sc (12)
Pull and cut the thread, leaving the end for sewing.
Stuff the ponytail.

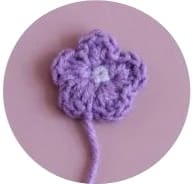
Flowers (x2)
1 row: 5 sc in MR (5)
Change the thread to a contrasting one, the previous one can be cut.
2 row: (slst, hdc, 3 dc, hdc) * 5 (30)
Pull and cut the thread, leaving the end for sewing.
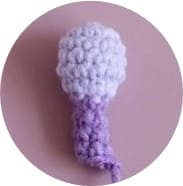
Antennae (x2)
1 row: 6 sc in MR (6)
2 row: 6 inc (12)
3–5 row: 12 sc (12)
6 row: 6 dec (6)
Stuff the detail. Change the color to contrast.
7–10 row: 6 sc (6)
Pull and cut the thread, leaving the end for sewing.
For stability, insert a piece of wire inside antennae base.
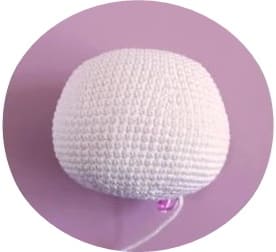
Head
Make a chain of 14 ch, crochet from the 2nd loop from the hook:
1 row: inc, 11 sc, 2 inc in the last loop, on the other side of the chain: 11 sc, inc (30)
2 row: 2 inc, 11 sc, 3 inc, 13 sc, inc (36)
3 row: inc, 1 sc, inc, 13 sc, inc, 1 sc, inc, 1 sc, inc, 13 sc, inc, 1 sc (42)
4 row: 42 sc (42)
5 row: 1 sc, inc, 2 sc, inc, 14 sc, inc,
2 sc, inc, 2 sc, inc, 14 sc, inc, 1 sc (48)
6 row: 48 sc (48)
7 row: (7 sc, inc) * 6 (54)
8 row: 54 sc (54)
9 row: (8 sc, inc) * 6 (60)
10 row: 60 sc (60)
11 row: (9 sc, inc) * 6 (66)
12 – 20 row: 66 sc (66)
21 row: (9 sc, dec) * 6 (60)
22 row: 1 sc, dec, (8 sc, dec) *5, 7 sc (54)
23 row: (7sc, dec) * 6 (48)
24 row: 1 sc, dec, (6 sc, dec) *5, 5 sc (42)
25 row: (5 sc, dec) * 6 (36)
26 row: 1 sc, dec, (4 sc, dec) *5, 3 sc (30)
Bring the thread to the beginning of the 27th row, where we left the marker. Start filling in the part.
27 row: (3 sc, dec) * 6 (24)
Mark the beginning of the 27th row with a marker!
28 row: 1 sc, dec, (2 sc, dec) * 5, 1 sc (18)
29 row: (1 sc, dec) * 6 (12)
30 row: 6 dec (6)
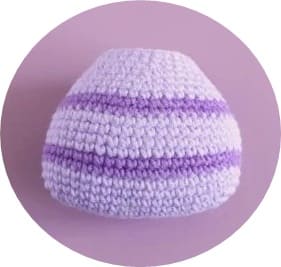
Body
Make a chain of 15 ch, crochet from the 2nd loop from the hook:
1 row: inc, 12 sc, 2 inc in the last loop, on the other side of the chain: 12 sc, inc (32)
2 row: 2 inc, 12 sc, 4 inc, 12 sc, 2 inc (40)
3 row: (inc, 1 sc) * 2, 12 sc, (inc, 1 sc) * 4, 12 sc, (inc, 1 sc) * 2 (48)
4 – 6 row: 48 sc (48)
Without cutting the main thread, attach the yarn of a contrasting color and crochet the next 2 rows with it.
7–8 row: 48 sc (48)
We change the thread again and crochet the next 4 rows with the main color.
9–12 row: 48 sc (48)
We crochet the next 2 rows in a contrasting color.
13 row: 48 sc (48)
14 row: (6 sc, dec) * 6 (42)
The thread of the additional color can be cut, now we crochet only the main one.
15 – 16 row: 42 sc (42)
17 row: (5 sc, dec) * 6 (36)
18 row: 36 sc (36)
19 row: (4 sc, dec) * 6 (30)
20 – 21 row: 30 sc (30)
Crochet an additional 2 sc so that the row ends exactly on the side of the body. Pull and cut the thread, hide the tail inside the part and stuff the body tightly.
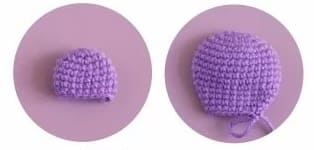
Wings for a bee and a ladybug (x2)
1 row: 6 sc in MR (6)
2 row: 6 inc (12)
3 row: (1 sc, inc) * 6 (18)
4 row: (2 sc, inc) * 6 (24)
5 row: (3 sc, inc) * 6 (30)
6–9 row: 30 sc (30)
10 row: (13 sc, dec) * 2 (28)
11 row: (12 sc, dec) * 2 (26)
12 row: (11 sc, dec) * 2 (24)
13 row: (10 sc, dec) * 2 (22)
14 row: (9 sc, dec) * 2 (20)
15 row: (8 sc, dec) * 2 (18)
16 row: (7 sc, dec) * 2 (16)
17 row: (6 sc, dec) * 2 (14)
Crochet 2 extra sc to even out the row, fold the piece in half and crochet 7 sc, grabbing both ends of the piece. Pull and cut the thread, leaving the end for sewing. The item does not need to be filled in.
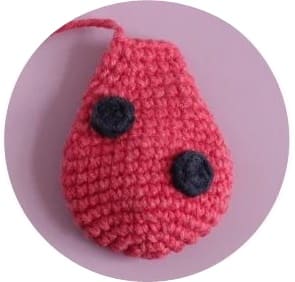
Ladybug spots (x4)
1 row: 6 sc in MR, sс (6)
Pull and cut the thread, leaving a long end for sewing. Symmetrically arrange the spots on both wings and sew.
Butterfly wings (x2)
The butterfly wing consists of an upper and lower part, which are then combined into one.
Lower part of the wing (part #1):
1 row: 6 sc in MR (6)
2 row: 6 inc (12)
3 row: (1 sc, inc) * 6 (18)
4–7 row: 18 sc (18)
8 row: (7 sc, dec) * 2 (16)
Pull and cut the thread, leaving a small tail.
The upper part of the wing (part No. 2):
1 row: 6 sc in MR (6)
2 row: 6 inc (12)
3 row: (1 sc, inc) * 6 (18)
4 row: (2 sc, inc) * 6 (24)
5 row: (3 sc, inc) * 6 (30)
6–9 row: 30 sc (30)
10 row: (13 sc, dec) * 2 (28)
11 row: (12 sc, dec) * 2 (26)
12 row: (11 sc, dec) * 2 (24)
13 row: (10 sc, dec) * 2 (22)
14 row: (9 sc, dec) * 2 (20)
15 row: (8 sc, dec) * 2 (18)
Starting from the next row, we will connect both parts.
Do not cut the working thread.
16 row: without removing part No. 2 from the hook, enter it into the 1st sc of the last row of part No. 1 and crochet sc, then we crochet along part No. 1: 5 sc, dec, 8 sc, go to part No. 2: 7 sc , dec, 9 sc (32)
Thus, we connected the parts of the wing and now we continue to crochet in a circle.
If a hole has formed in the corner, sew it with the thread that we left at part number 1.
17 row: 5 sc, dec, 14 sc, dec, 9 sc (30)
18 row: 4 sc, dec, 13 sc, dec, 9 sc (28)
Crochet an additional 6 sc so that the row ends at the bottom of the part.
Fold the wing in half and work 14 sc, picking up the stitches on both sides.
Pull and cut the thread, leaving the end for sewing.
Assembly and decoration
1. We connect the head and body. Align the last row of the body with the 27th row of the head, which we previously marked with a marker, fix the details with pins. Make sure that the head is straight (orient along the chain from ch, with which we started knitting the head, it should be parallel to the body). Start sewing on the head, alternately grabbing the single crochet of each piece. While sewing, add filler between the neck and head.
2. Fix the ears with pins at the level of 2-10 rows of the head and sew.
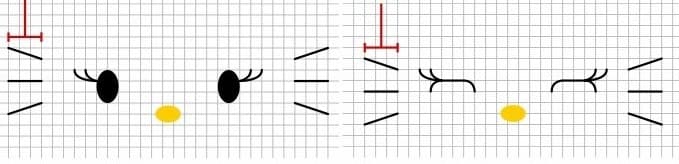
3. Glue or embroider a nose in the center of the face between 9 and 10 rows, counting from the bottom of the head. Then decorate the eyes with embroidery or glue the finished ones (it is more convenient to embroider the eyelashes before the eyes are glued). After that, embroider the mustache with black thread – 3 strips on each side.
For the convenience of the location of all elements of the face, be guided by the diagrams. You can adjust the position based on your crocheting density.
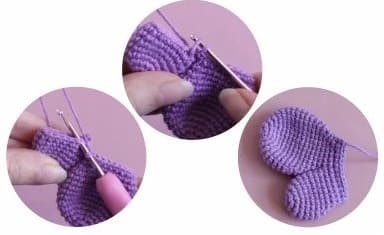
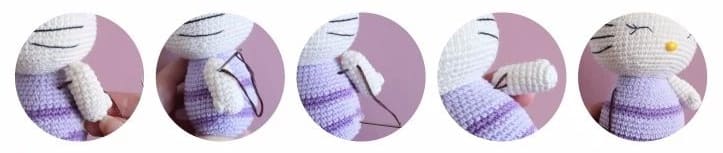
4. Attach the handles to the body with a thread fastener. To do this, you need a long needle and a strong cotton thread in 2 additions (preferably white, a dark thread is used for clarity). Insert the needle at any point on the back and bring it out on the side of the body between 17 and 18 next, leave the tail of medium length. Next, pass the needle from the inside side of the handle to the outside (1). Then insert the needle at the same point where the thread comes from (2), and bring it out from the inside of the handle, but retreating 2 sc from the first hole (3). After that, pass the needle to the same point on the side of the body, where the thread comes from (4), and bring it out symmetrically from the opposite side of the body (5). Attach the second handle in the same way. For reliable fastening, you can skip the thread for the 2nd time. After both handles are fixed, bring the thread to the back and tie a knot, hide the ends inside the part.
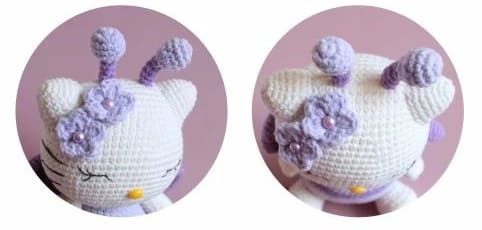
5. Sew the antennae to the top of the head.
6. Sew the flowers on the bottom of one of the ears, leaving the petals free. The middle can be additionally decorated with beads.
7. Fix the legs at the level of 3-7 rows of the body at a distance of 9 sc from each other. The location of the legs may vary slightly, choose it so that the toy sits confidently. Sew on the legs, try to keep their round outline.
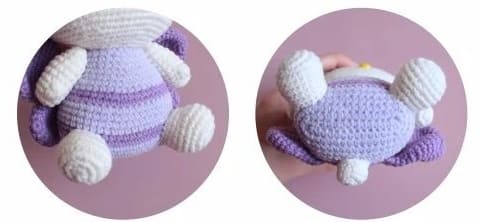
8. Sew the wings to the back of the toy. They can be positioned raised or folded, depending on the suit. If the wings dangle a lot, secure them with additional stitches.
9. Fix the tail at the level of 5-8 rows of the body and sew. The tail will also serve as an additional support for the toy when sitting.