
Hello friends, I am with you with a crochet cat for halloween. First of all, I would like to thank the owner of the pattern for the crocheted cat. Thanks to the step by step detailed and easy crochet cat pattern instruction, you can complete the free amigurumi pattern without difficulty. You can prepare a nice gift for your children by completing the crochet cat amigurumi toy for Halloween. Now I invite you to the free crochet cat pattern instruction. Stay tuned for more halloween crochet patterns.
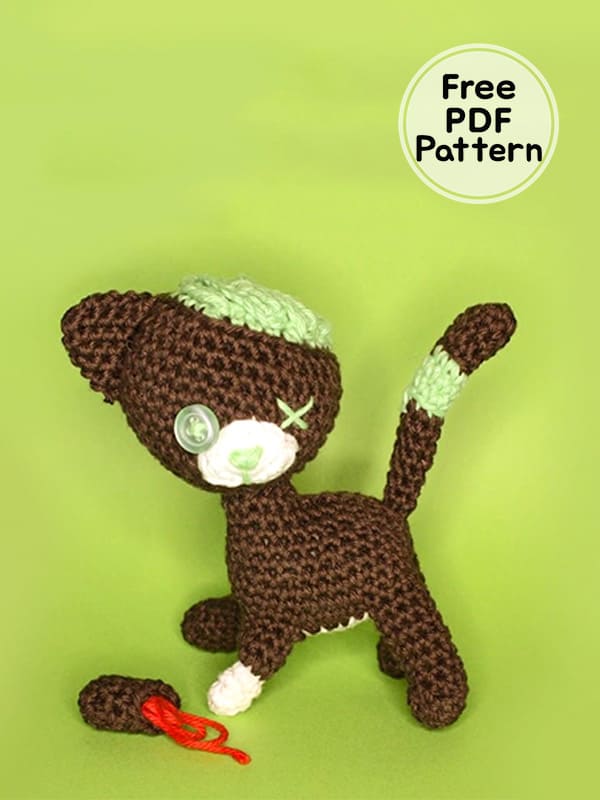
Zombie Crochet Cat Amigurumi Free PDF Pattern
Designer: aria.crea
Materials
• A bit of yarn from 3 different balls of yarn (both of the same weight, here I’m using rainbow cotton 8/4 yarn balls).
We’ll be mainly using dark brown and green with a bit of white yarn for the snout, the belly and for the bone part (on one leg).
• Soft stuffing
• 2 hooks: here using a 3 mm hook and a 2.5 mm one only for the bone.
• 1 button for an eye
• 1 row marker
• 1 thread cutter
• 1 yarn needle
Abbreviations
MR: Magic ring
St: Stitch
Ch: Chain
Sc: Single crochet
Hdc: Half double crochet
Dc: Double crochet
Slst: Slip stitch
Inc: Increase
Dec: Decrease
BLO: Back loop only
FLO: Front loop only
PM: Place marker
Head
Begin with dark brown yarn:
Rnd 1. 6 sc in MR (6)
Rnd 2. 6 inc (12)
Rnd 3. (1sc,inc)*6 (18)
Rnd 4. (2sc,inc)*6 (24)
Rnd 5. (3sc,inc)*6 (30)
Rnd 6. (4sc,inc)*6 (36)
Rnd 7-12. 36 sc (36)
Rnd 13. (4sc,dec)*6 (30)
Change to green yarn:
Rnd 14. (3sc,dec)*6 BLO (24)
Rnd 15. (2sc,dec)*6 (18)
Stuff the head.
Rnd 16. (1sc,dec)*6 (12)
Rnd 17. 6 dec (6)
1 slst to end, cut the yarn, sew the end and hide it in the head.
Snout
With white yarn.
Rnd 1. 6 sc in MR (6)
Rnd 2. 1 sc, (1sc,1hdc,1sc), 3sc, (1sc,1hdc,1sc) (10)
Finish with 1 slst, cut the yarn leaving a long tail to sew.
Embroider the nose with green yarn.
Once done, sew the snout on the head.
Fix it so that the brain area is leaning on the right side of the head.
Ears
With dark brown yarn, only make one:
Rnd 1. 6 sc in MR (6)
Rnd 2. (2sc,inc)*2 (8)
Rnd 3. (3sc,inc)*2 (10)
Rnd 4. (4sc,inc)*2 (12)
Rnd 5. (5sc,inc)*2 (14)
1 slst to end, cut the yarn leaving a long tail, sew it.
Eyes
Facial sculpting.
Each side of the snout: sew the buttons as left eye and embroider right eye by making a cross.
Pull a thread between the 2 eyes positions and tighten it a bit to sculpt the face.
Brain
With green yarn, ch 70, cut the thread leaving a long tail to sew.
Pin it the way you want on the green area.
When happy with the result, sew it.
Legs (Make 2)
With dark brown yarn:
Rnd 1. 6 sc in MR (6)
Rnd 2. 6 inc (12)
Rnd 3. 12 sc (12)
Rnd 4. 3 dec, 6 sc (9)
Rnd 5-10. 9 sc (9)
1 slst to end, cut the yarn hide it into the leg.
Only make three.
For the 4th leg, repeat Rnd 1 to Rnd 5, 1 slst to end, cut the yarn leaving a long tail to sew.
For the upper part of the leg, start with white yarn for the bone using the 2.5 mm hook:
Rnd 1. 6 sc in MR (6)
Rnd 2-4. 6 sc (6)
Change for dark brown yarn and 3 mm hook:
Rnd 5. (1sc,inc)*3 FLO (9)
Rnd 6-7. 9 sc (9)
1 slst to end, cut the yarn hide it into the leg.
For the next step (the body), you’ll need to care about legs direction.
This arrow, will show the direction you may keep the legs facing. Always point the front side of the legs along the arrow direction.
Body
With white yarn, we are beginning by the belly:
Rnd 1. ch 6, 4 sc (starting in the 2nd ch from hook), 3 sc in the last ch to turn, 3 sc, 1 inc (12)
Rnd 2. 1 inc, 3 sc, 3 inc, 3 sc, 2 inc (18)
Cut the yarn leaving a long tail to sew the legs on it.
First make sure to have the belly facing down.
Each time we’ll sew a leg, we will use 3st on it and 3 st on the belly part.
Go a head using the diagram to understand.
First, sew leg 1 on 3 st.
Care about legs direction.
Pull the thread through the next 3 free st of the belly (do not stretch too much on this part) and sew leg 2, then leg 3 (still using 3 st on leg and belly).
Pull the thread through the next 3 free st of the belly and finish by sewing leg 4.
Cut the yarn, tie and hide it.
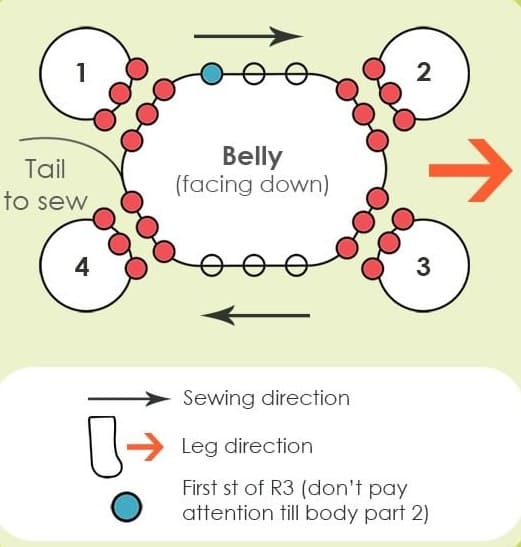
With dark brown yarn, begin in the indicated • st in diagram.
Rnd 3. 3 sc on the left side, 6 sc along the side of the left foreleg, then 6 sc along the right foreleg.
Repeat 3 sc on the right side of the belly and finish with the 6+6 sc along both remaining right and left hind legs. (30)
Rnd 4-6. 30 sc (30)
Rnd 7. 4 sc, 1 dec, 6 sc, 1 dec, 16 sc (28)
Rnd 8. 1 sc, 1 dec, 10 sc, (1dec,1sc)*3, (1sc,1dec)*2 (22)
Rnd 9. 16 sc, 3 dec (19)
Rnd 10. 17 sc, 1 dec (18)
Before starting Rnd 11, 3 sc and move the marker in the last st.
Rnd 11. 3 sc, 1 inc, 2 sc, 1 inc, 3 sc leave remaining st unworked (12)
For Rnd 12, only use the 12 st we did Rnd 11.
Rnd 12. 12 sc (start in the st right after the marked one) (12)
1 slst to end, cut the yarn leaving a tail, and stuff the body.
Sew the head with it and hide the yarn into the body.
End by sewing the back of your kitten with dark brown yarn.
Tail
Start with dark brown yarn:
Rnd 1. 6 sc in MR (6)
Rnd 2. (1sc,inc)*3 (9)
Rnd 3-4. 9 sc (9)
Rnd 5. 1 dec, 7 sc (8)
Change for green:
Rnd 6. 8 sc BLO (8)
Rnd 7-8. 8 sc (8)
Change for dark brown:
Rnd 9. 8 sc BLO (8)
Rnd 10. 1 dec, 6 sc (8)
Rnd 11-12. 7 sc (7)
Rnd 13. 5 sc, 1dec (6)
Rnd 14-15. 6 sc (6)
1 slst to end, cut the yarn leaving a long tail to sew.
Sew the tail on the body.


